Setup guide
Set up your club with PRO, start to finish
You have a WordPress site and a PRO license. This guide takes you from there to a working membership system with online joining and payments, a member list, digital membership cards, club activities with emergency contacts, and automated renewal reminders. Every screenshot comes from a made-up club, Lakeside Archery Club, so you can follow along with your own details.
Prefer to watch? See the video walkthrough on YouTube →
- Time 1 to 1.5 hours
- Skill level Beginner. No coding.
- You need A WordPress site you can log in to as an administrator, and your PRO license key
Before you start
Gather these now and the rest goes quickly.
- A WordPress site with an administrator login. If you do not have one yet, the next step shows you how to get one.
- Nothing to buy. The free plugin comes from the WordPress plugin directory, and it is a complete membership system.
- Your plugin file and license key. Both are in the email you received when you bought PRO or PRO+. The file is a
.zip. Do not unzip it. - Your club logo (a square or wide image on a plain background works best) and one or two photos of your club in action.
- Your dues. What does a membership cost? Do you charge a different amount in and out of season, or one flat yearly fee? When does the membership year end?
- A PayPal Business account, a Stripe account, or both, to collect dues online. Both are free to open. You only need one, and you can add the other later.
- Your waiver or terms, if your club uses one. You will paste it into the join form.
- Your social media links (optional): the web addresses of your club’s Facebook, Instagram, Strava or other pages, if you have them.
Don’t have WordPress yet?
Rosterkeeper for Clubs is a plugin for WordPress, the free website software that runs a large share of the web. You rent space for it from a hosting company, usually for a few dollars a month, and WordPress installs in a few clicks. If you already have a WordPress site you can log in to, skip this step.
What to look for in a host
- One-click WordPress install. Nearly every host offers it, so you never copy files by hand.
- A free SSL certificate (the padlock in the address bar). Online payments need it.
- PHP 7.4 or newer. Any current host has this.
- Email that works from your domain, so welcome emails and renewal reminders arrive.
Use any host you like. Your club may already have one for its domain. Ask them to install WordPress, or look for the one-click installer in their dashboard.
When WordPress is installed, log in at yourclubsite.com/wp-admin with the administrator name and password you chose.
Install the free plugin
The free plugin comes straight from the WordPress plugin directory. There is nothing to download or upload.
- Log in to your WordPress dashboard.
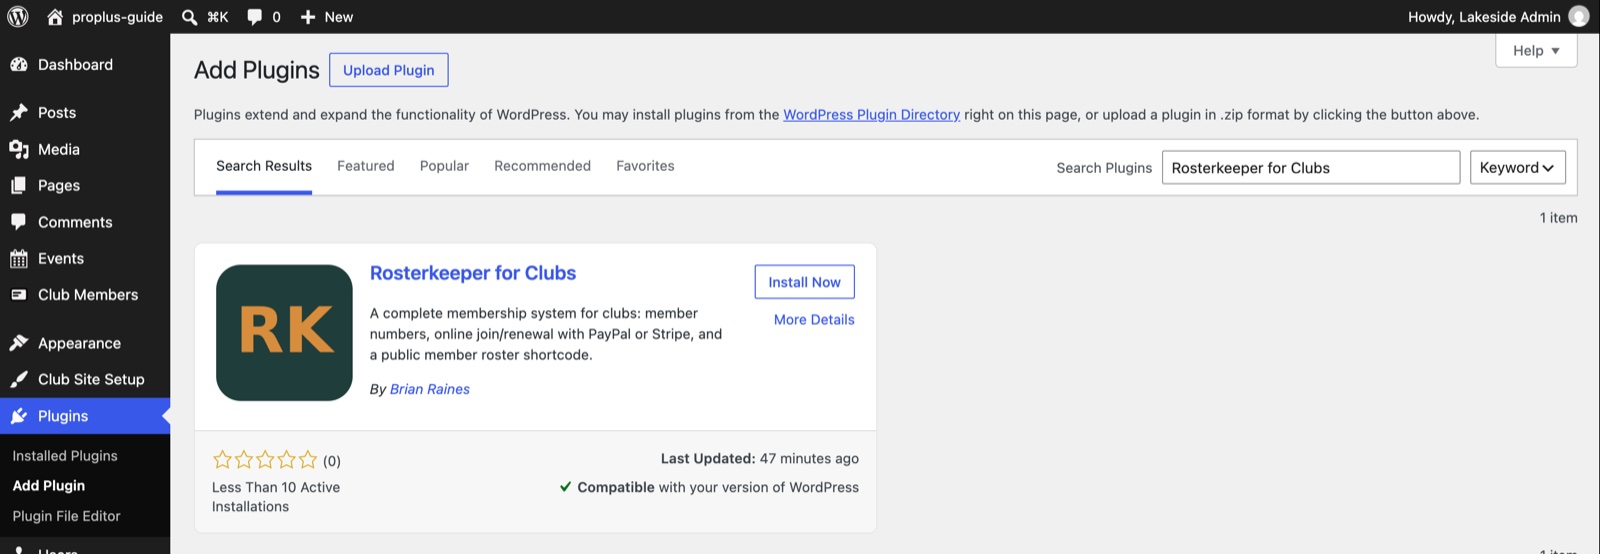
- In the left menu, click Plugins, then Add Plugin.
- In the search box at the top right, type Rosterkeeper for Clubs.
- Find the plugin in the results and click Install Now.
- When it finishes, click Activate.
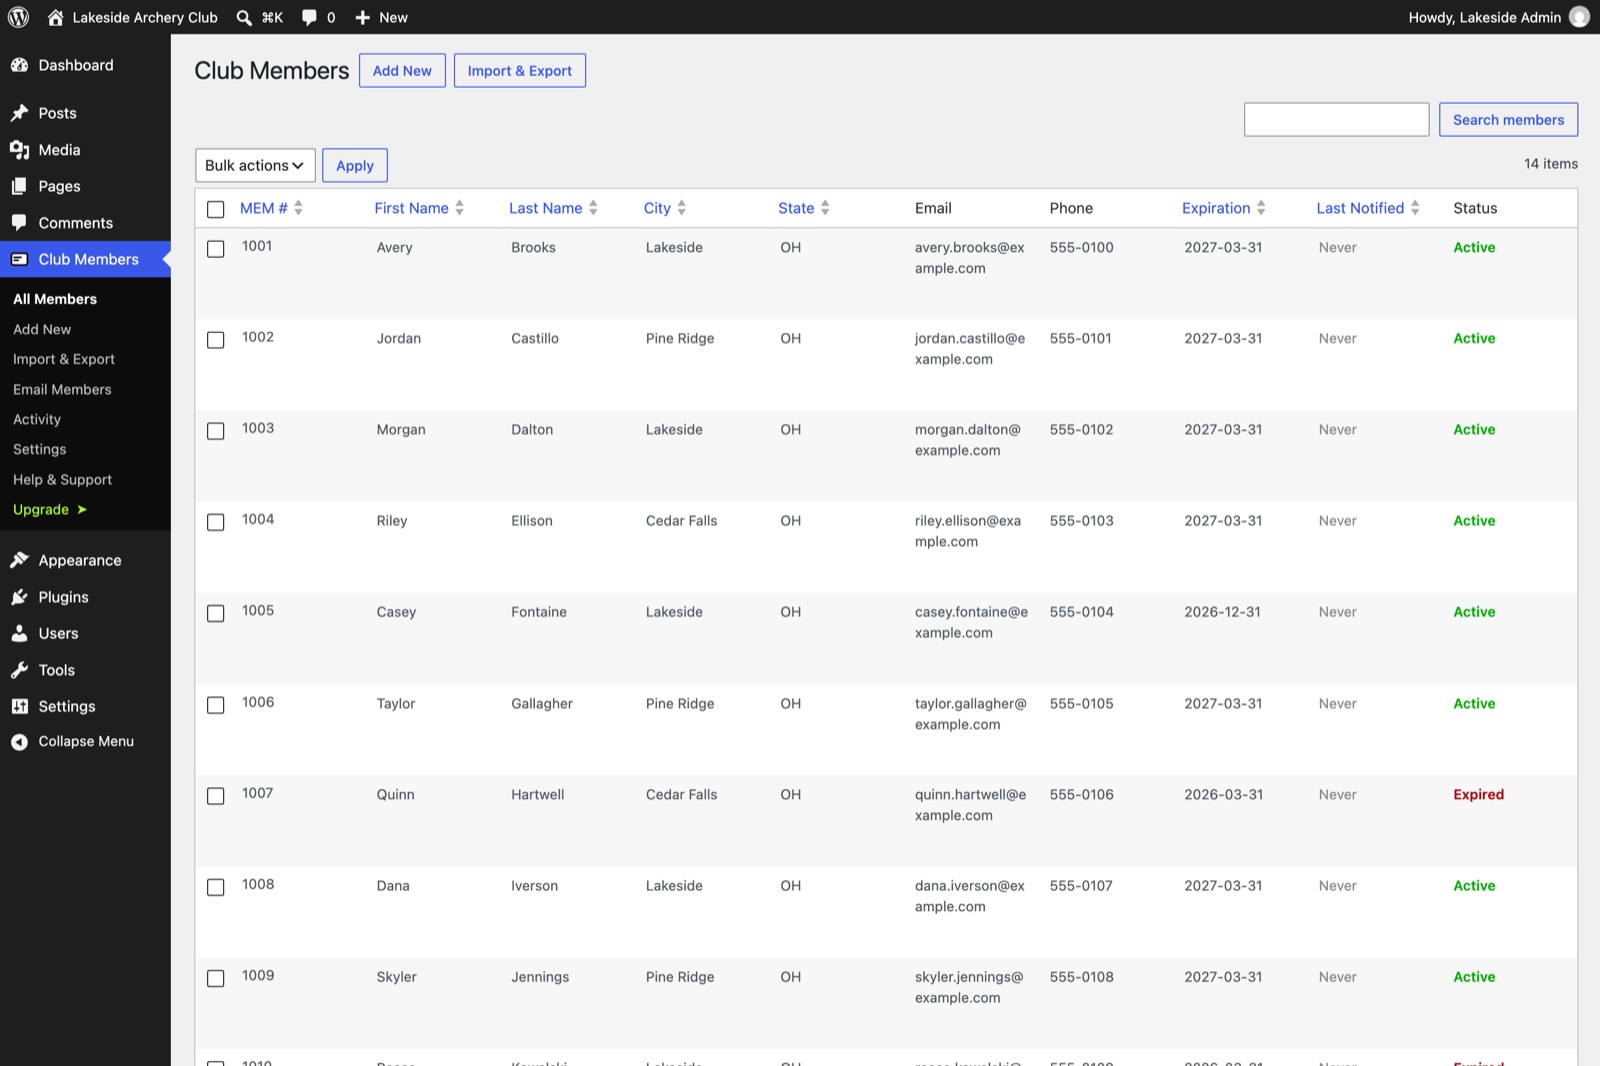
A new Club Members menu appears in the left menu. Your member list starts empty. The one below has made-up sample members.
Install the plugin and activate your license
You will upload the plugin file you received to your site, then enter your license key so WordPress knows which features you are entitled to.
Upload and activate the plugin
- Log in to your WordPress dashboard.
- In the left menu, click Plugins, then Add Plugin.
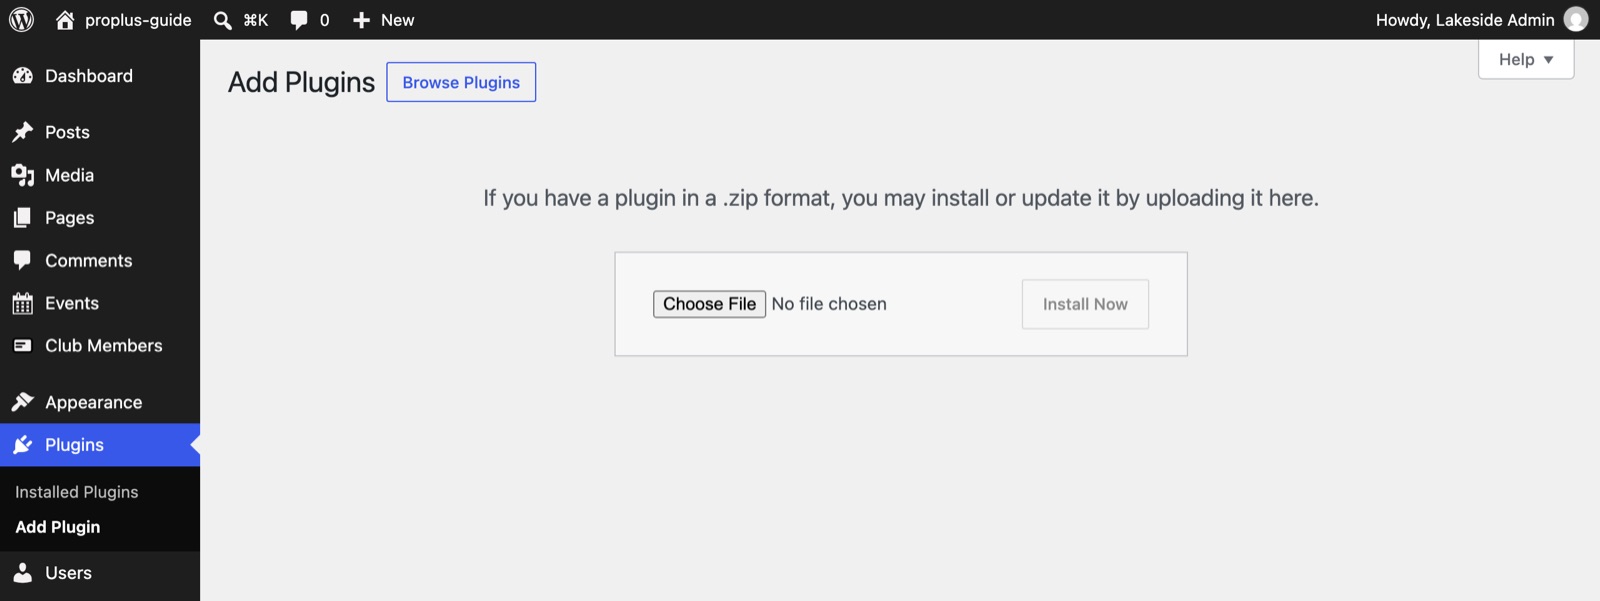
- Click Upload Plugin at the top of the page.
- Click Choose File, pick the
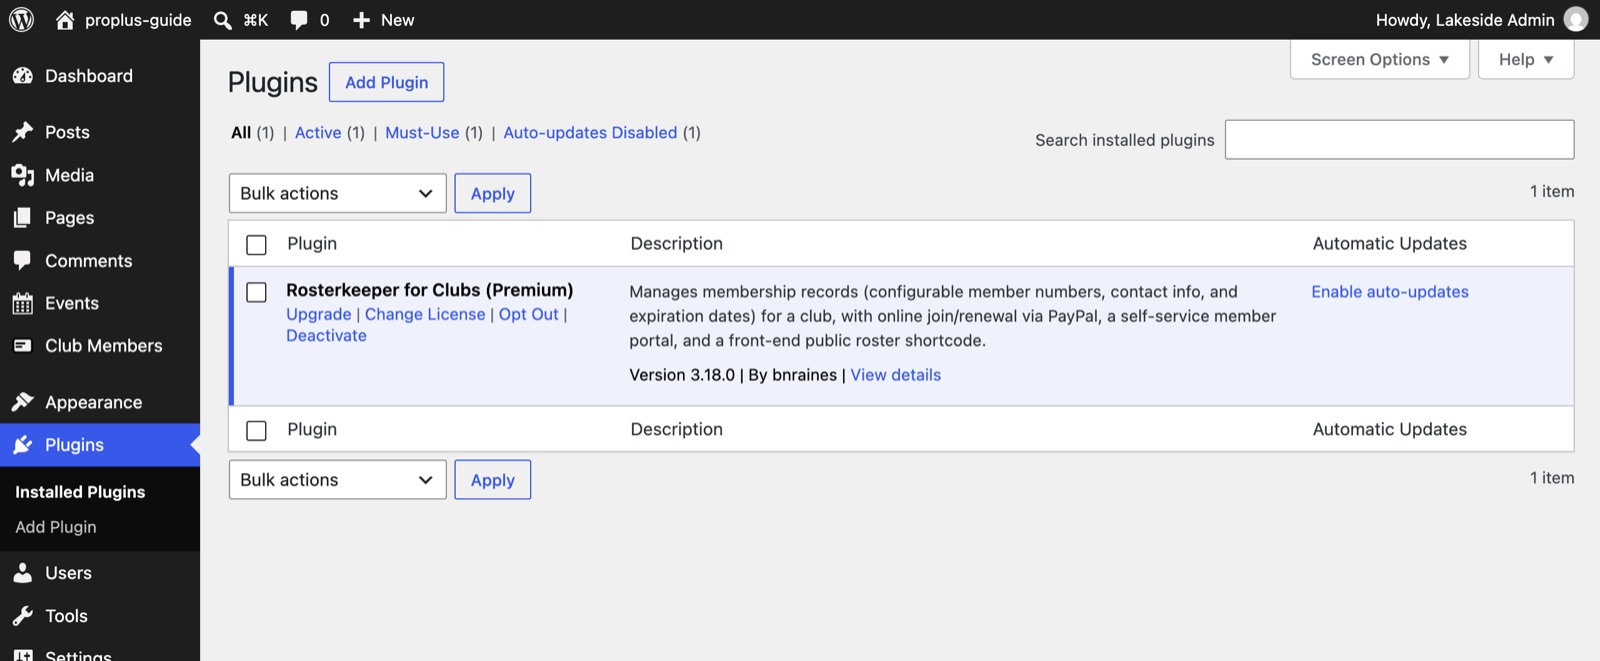
.zipfile from your purchase email, then click Install Now. - When it finishes, click Activate Plugin.
Enter your license key
As soon as the plugin is active, you will see a welcome screen asking for your license key.
- Click Club Members in the left menu if the screen does not appear on its own.
- Copy your license key from your purchase email and paste it into the License key box.
- Click Activate License.
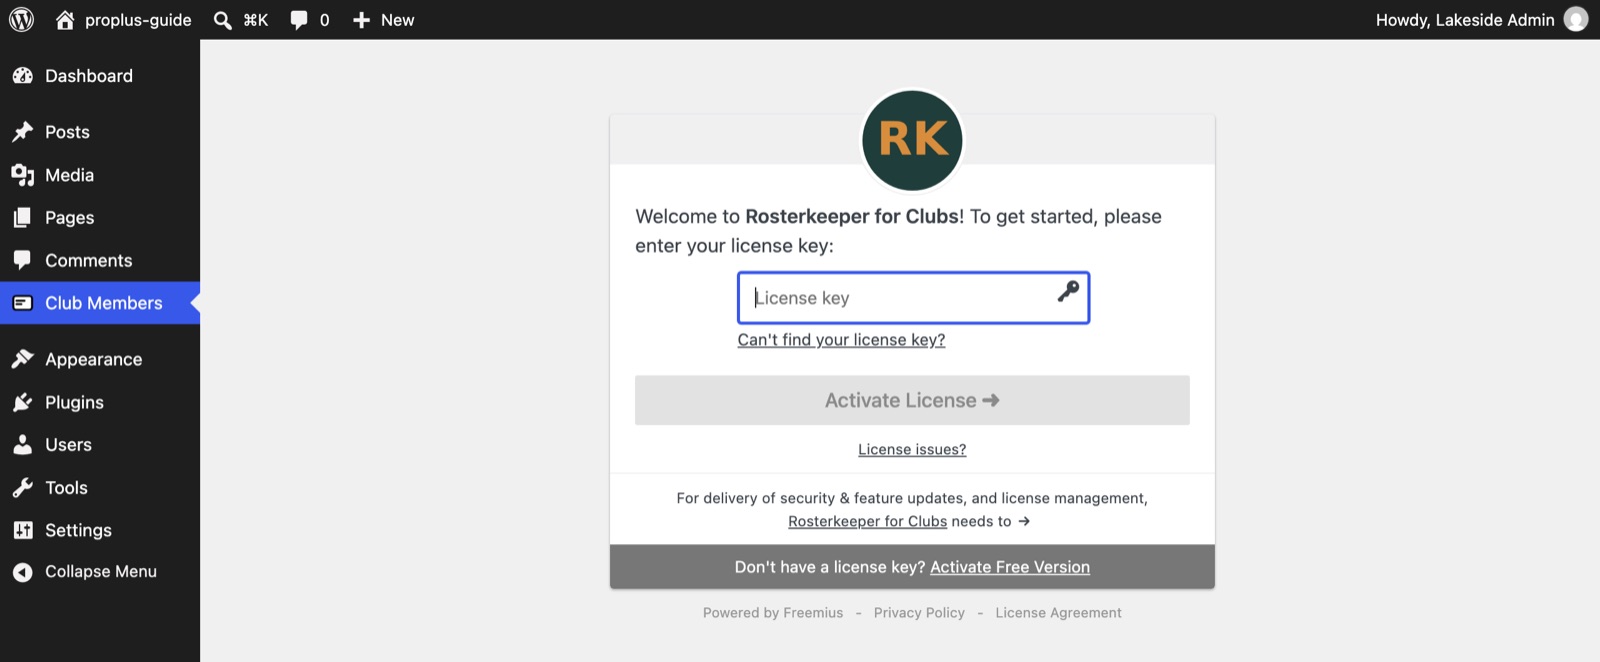
When it works, the Club Members menu opens, and a new Events menu appears (that one is a PRO+ feature).
When it works, the Club Members menu opens.
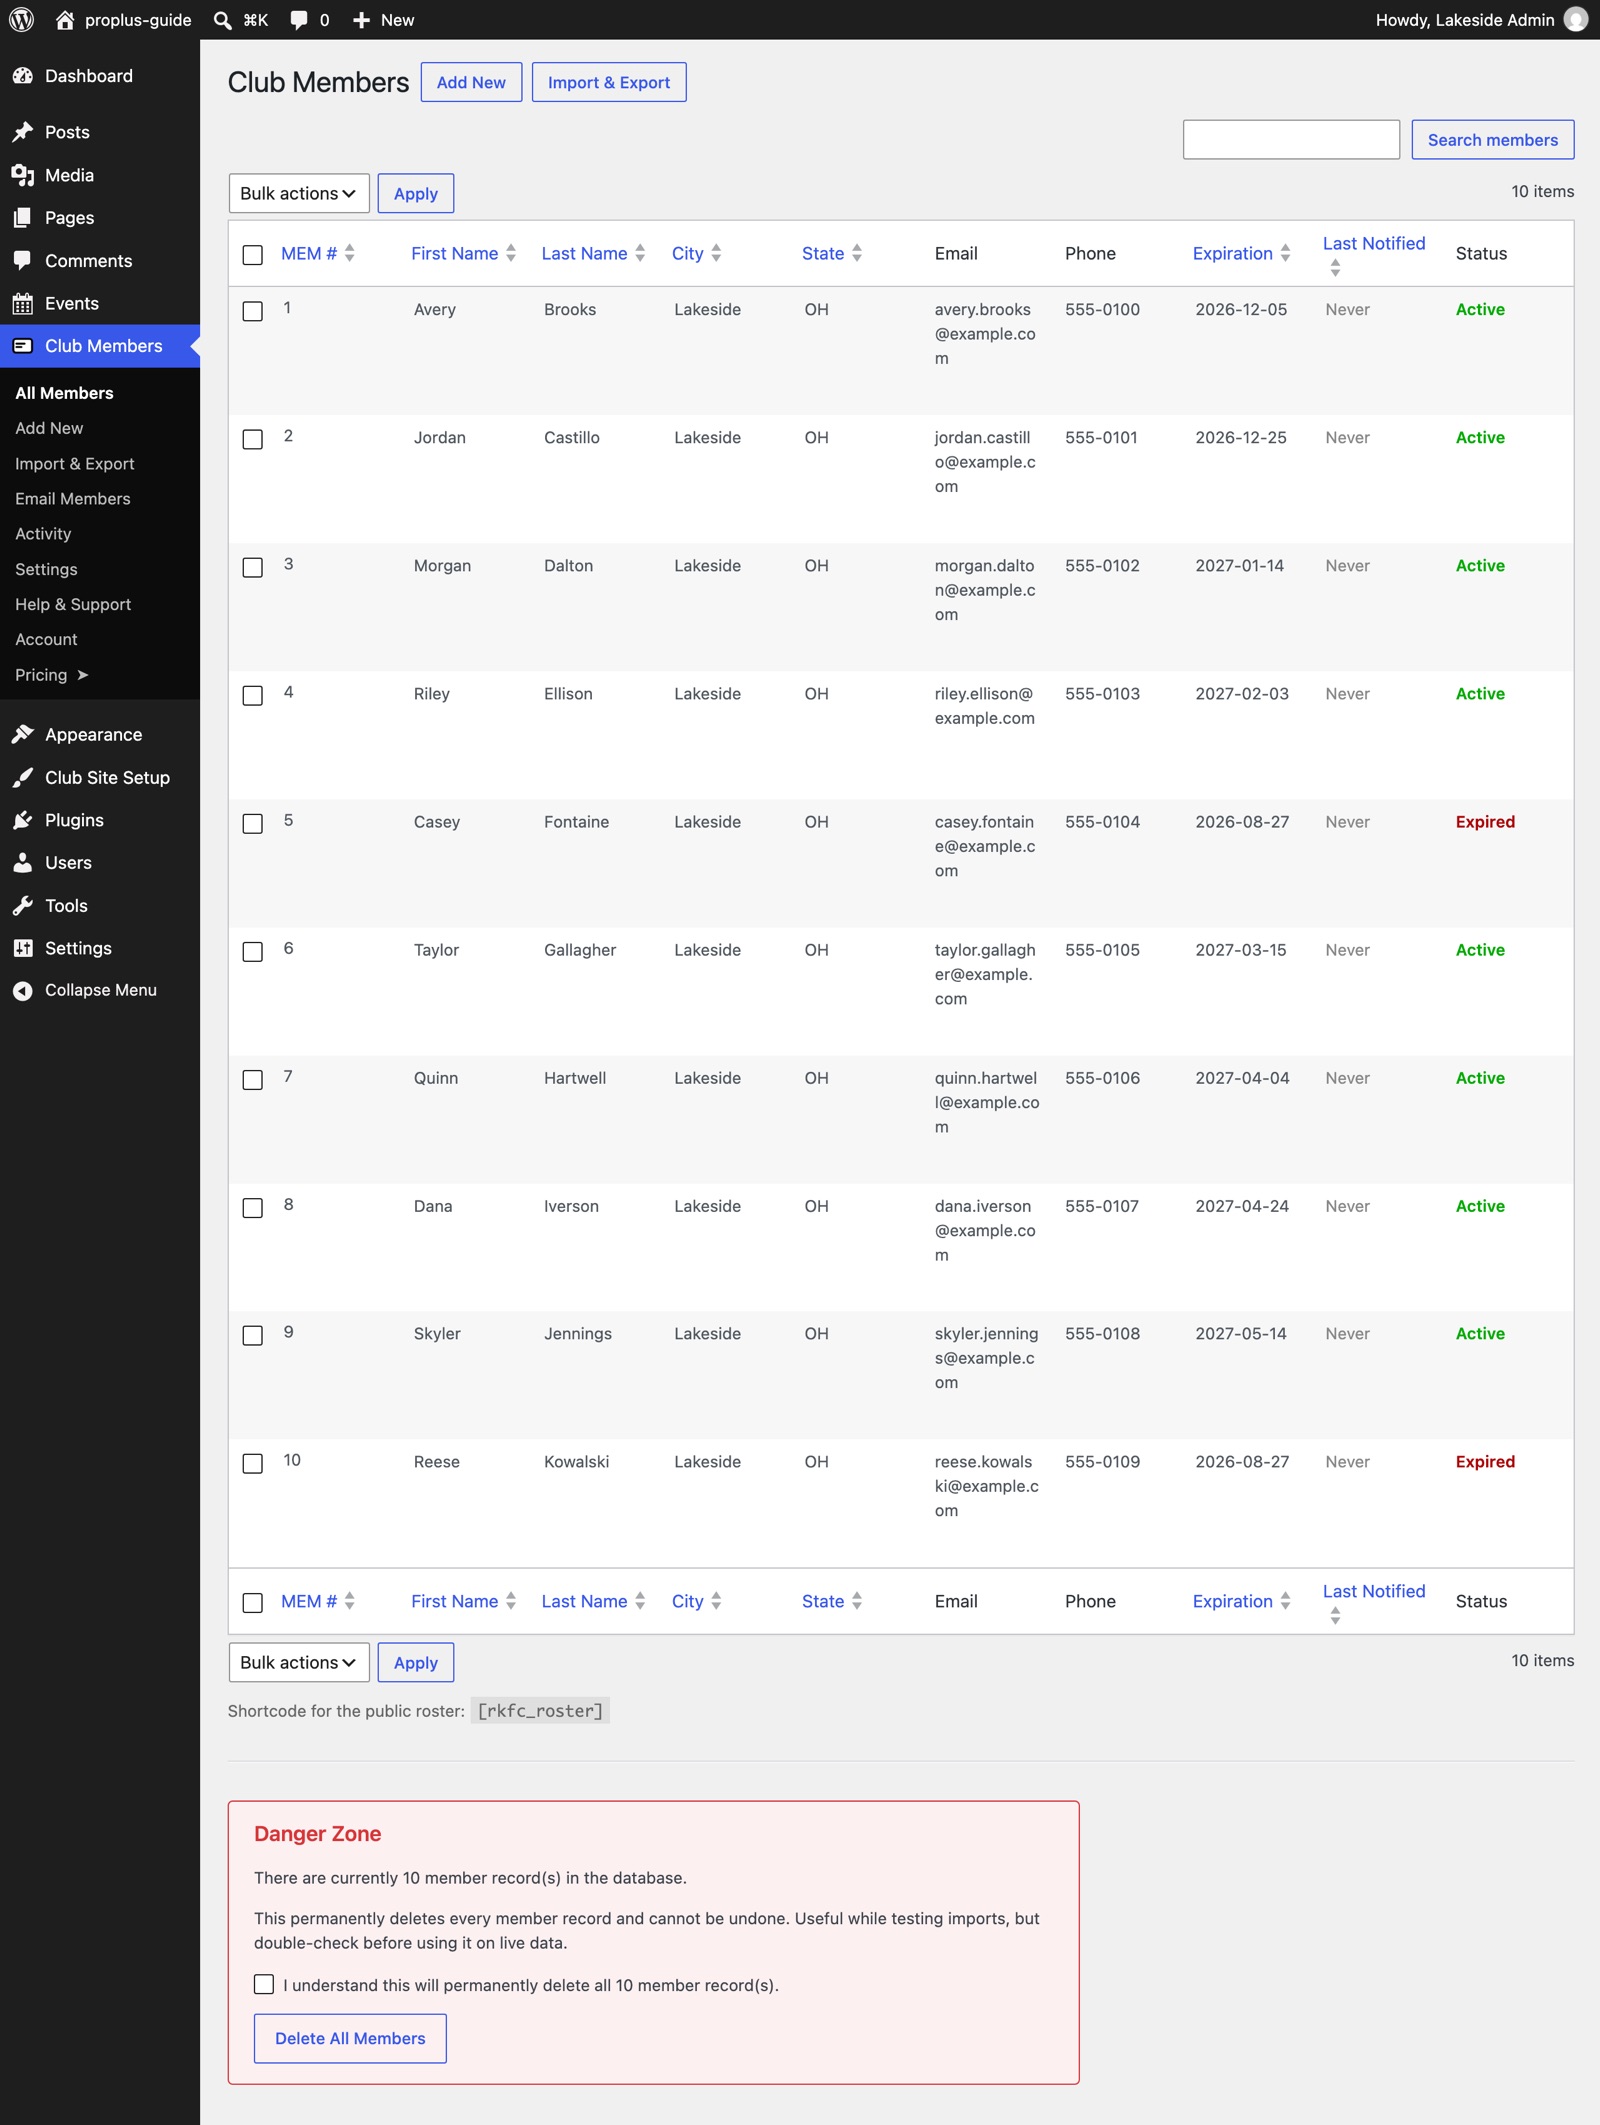
Check that you have PRO+
Check that you have PRO
Click Club Members → Account. The Plan line should read PRO PLUS.
Click Club Members → Account. The Plan line should read PRO.

Install the Club Site Starter theme
The theme controls how your whole site looks. Pro+ includes Club Site Starter, built for volunteer clubs, and you install it from inside the plugin. There is nothing to download.
- Click Club Members → Settings.
- Open the Site Theme tab (it is the last tab).
- Click Install Theme. It takes a few seconds.
- Click Activate Theme.
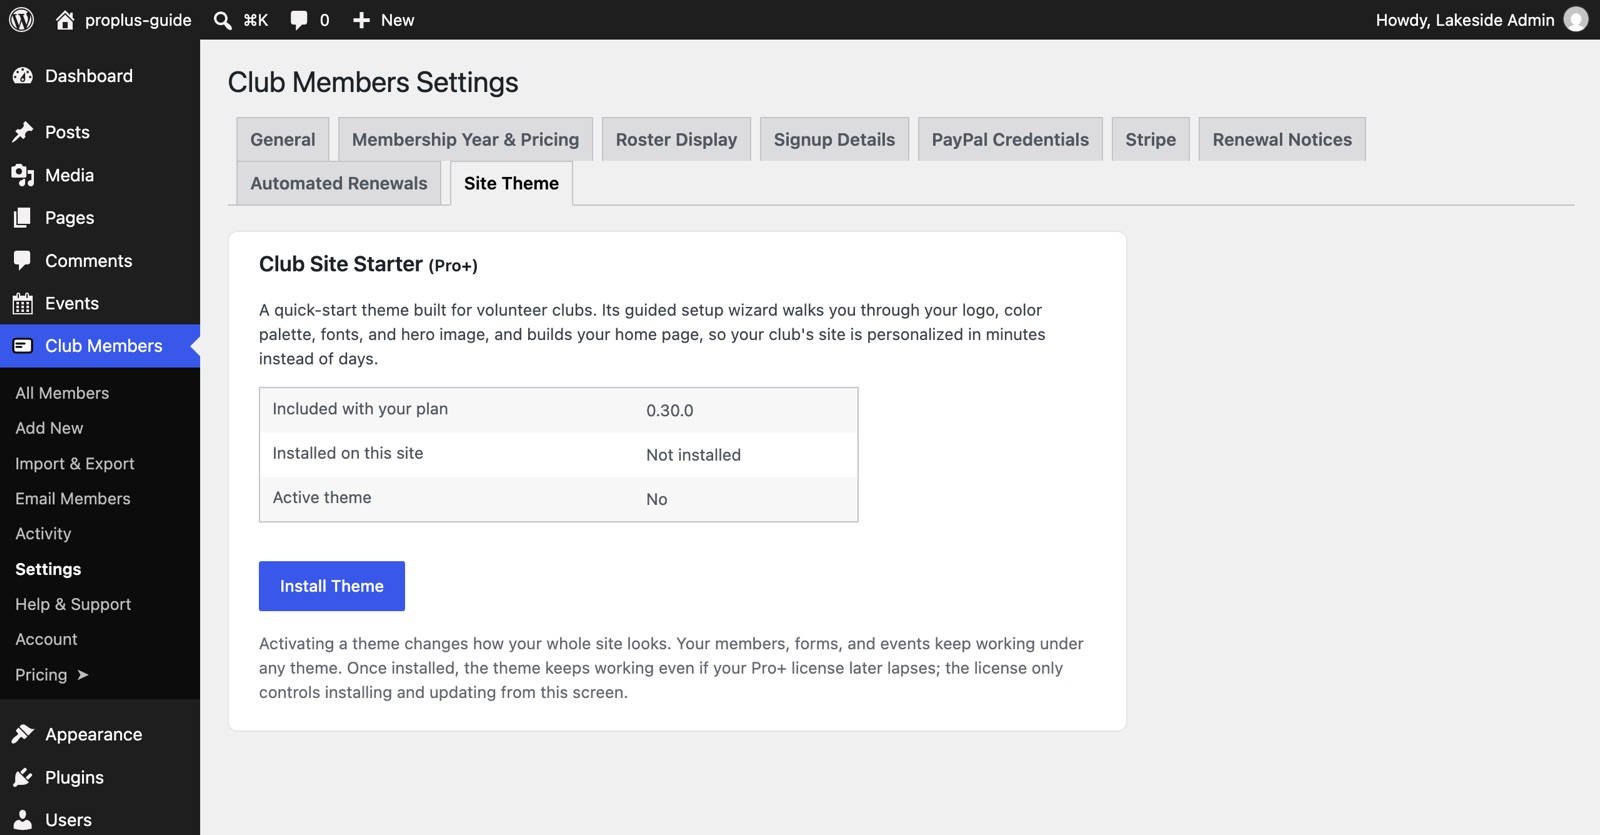
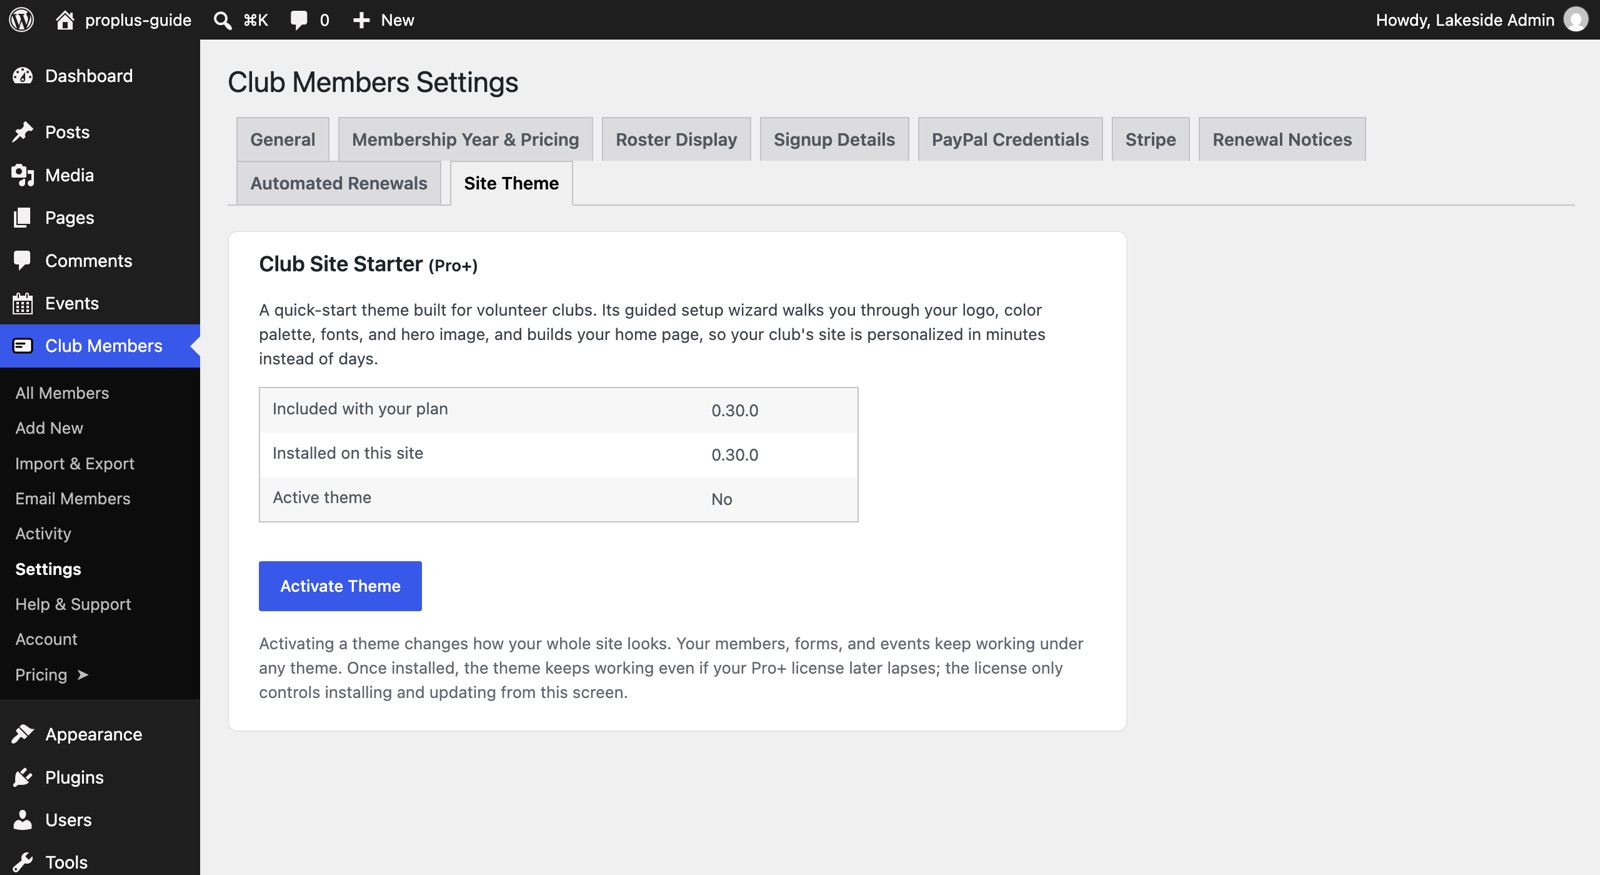
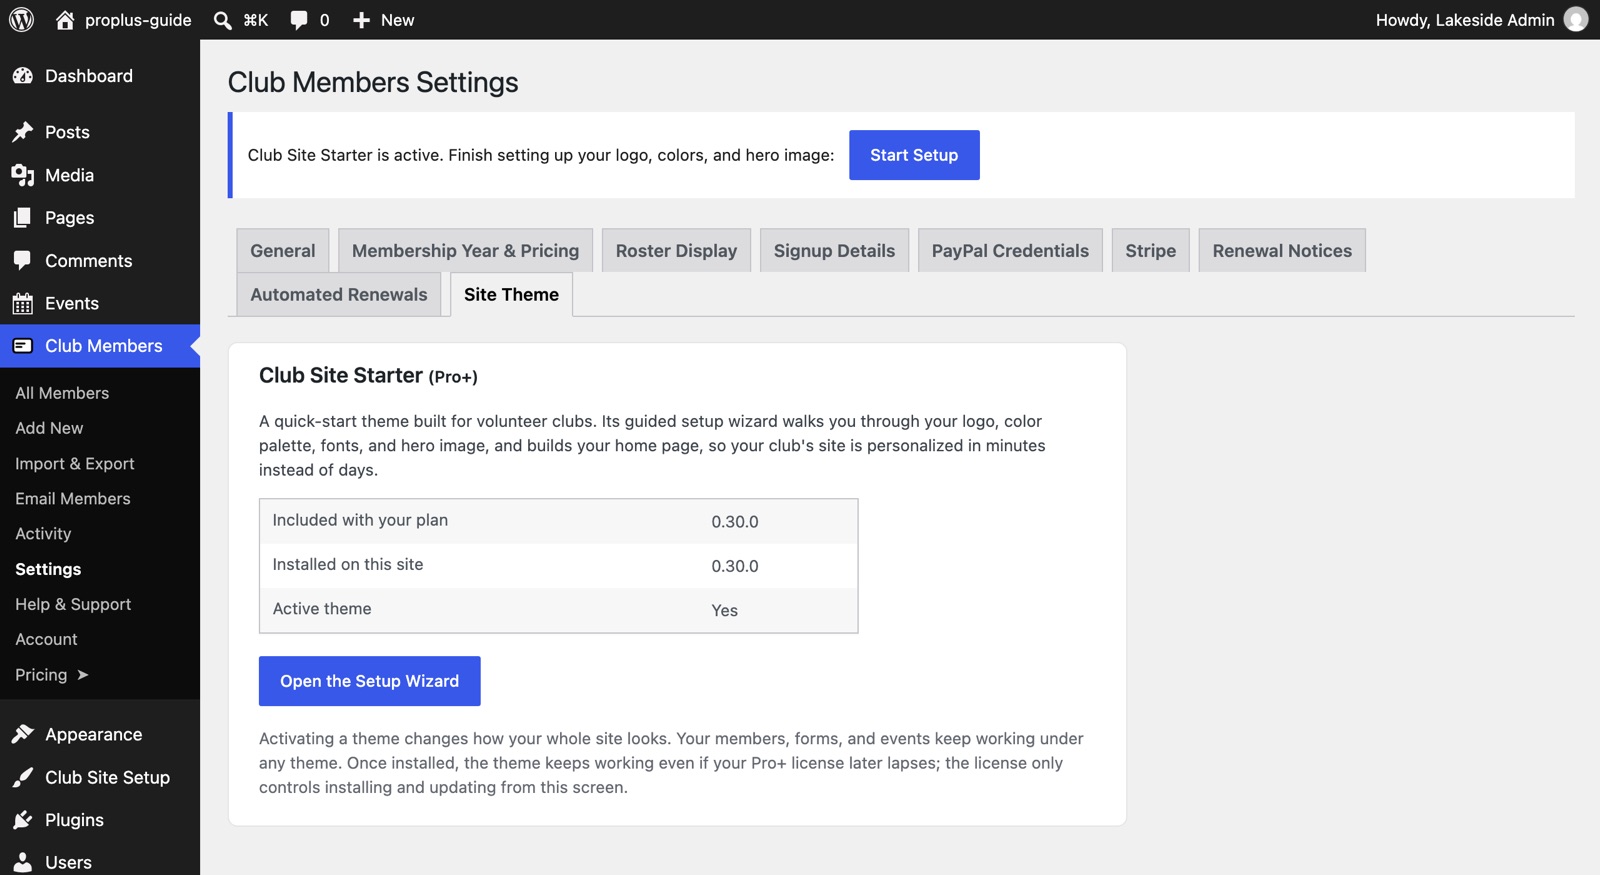
As soon as the theme is active, the setup wizard opens by itself. If you leave and come back later, find it in the left menu under Club Site Setup.
Run the setup wizard
The wizard asks a few quick questions and builds your home page as you go. There are seven short steps. You can change any answer later, so do not worry about getting it perfect.
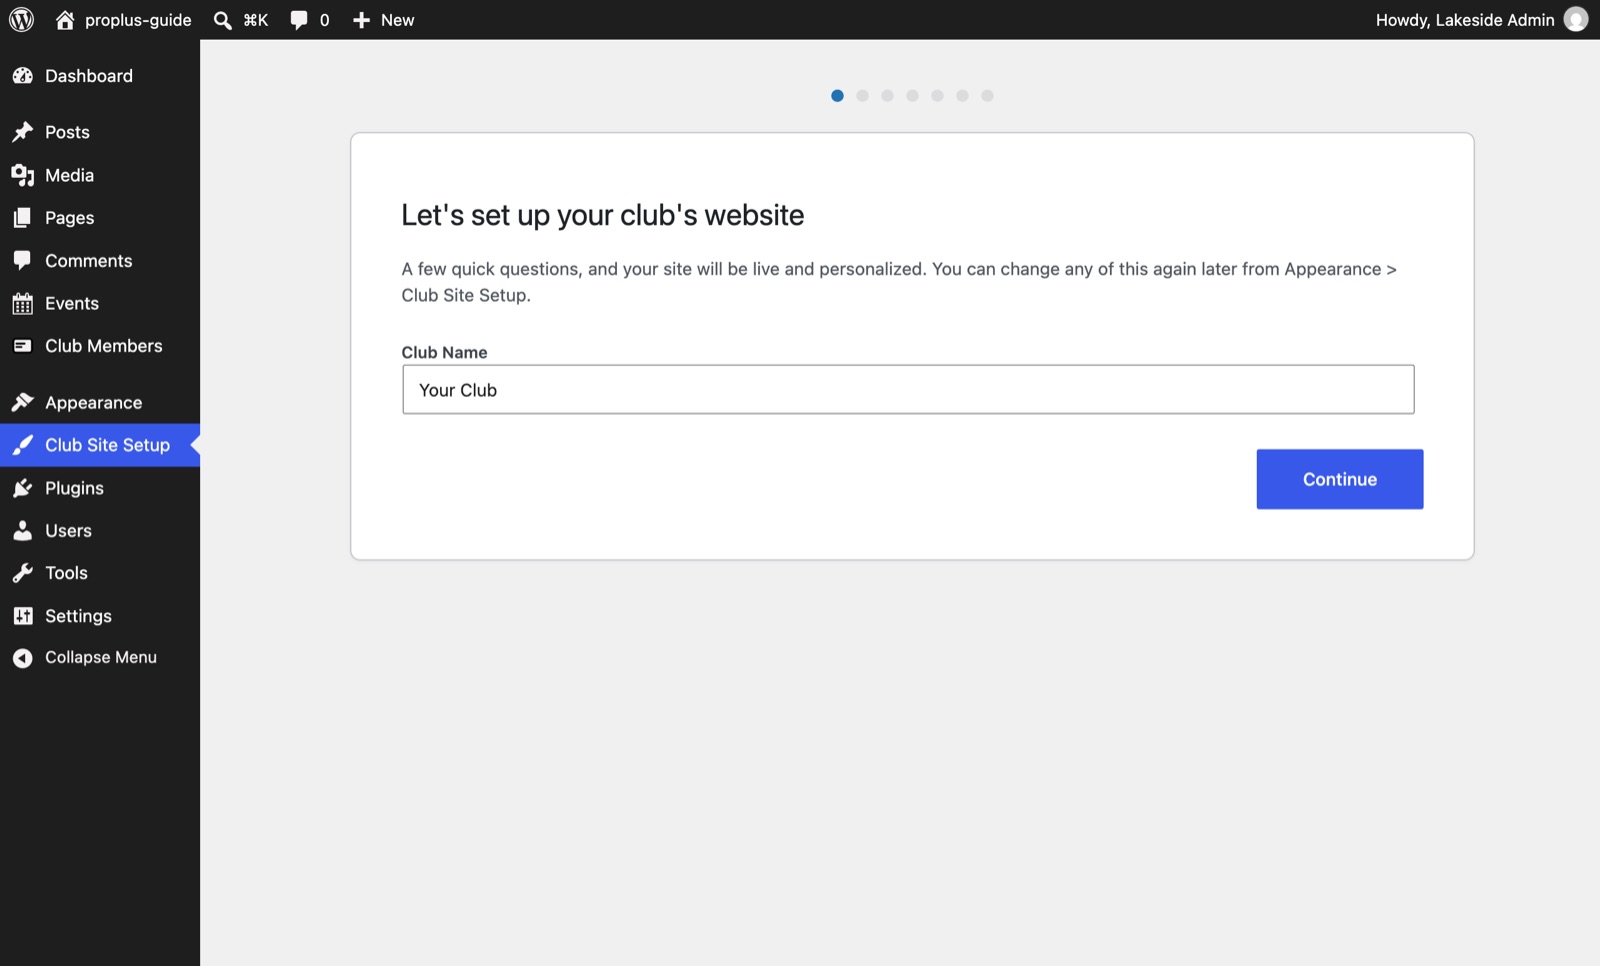
Step 1: Your club’s name
Type your club’s name, then click Continue. It appears in your site header, footer and emails.
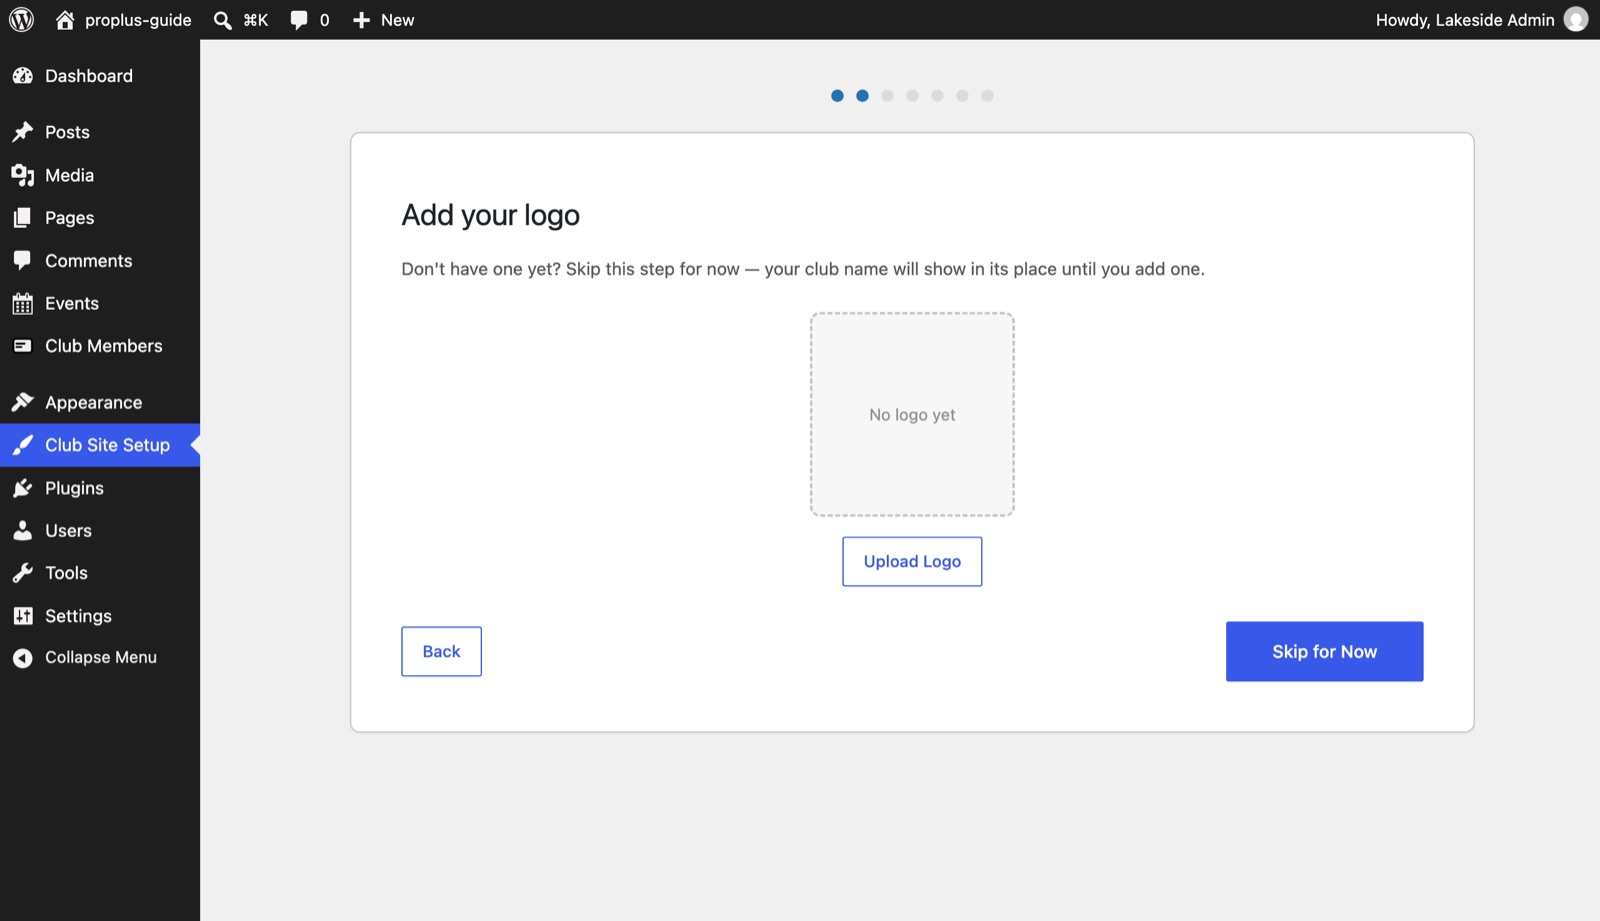
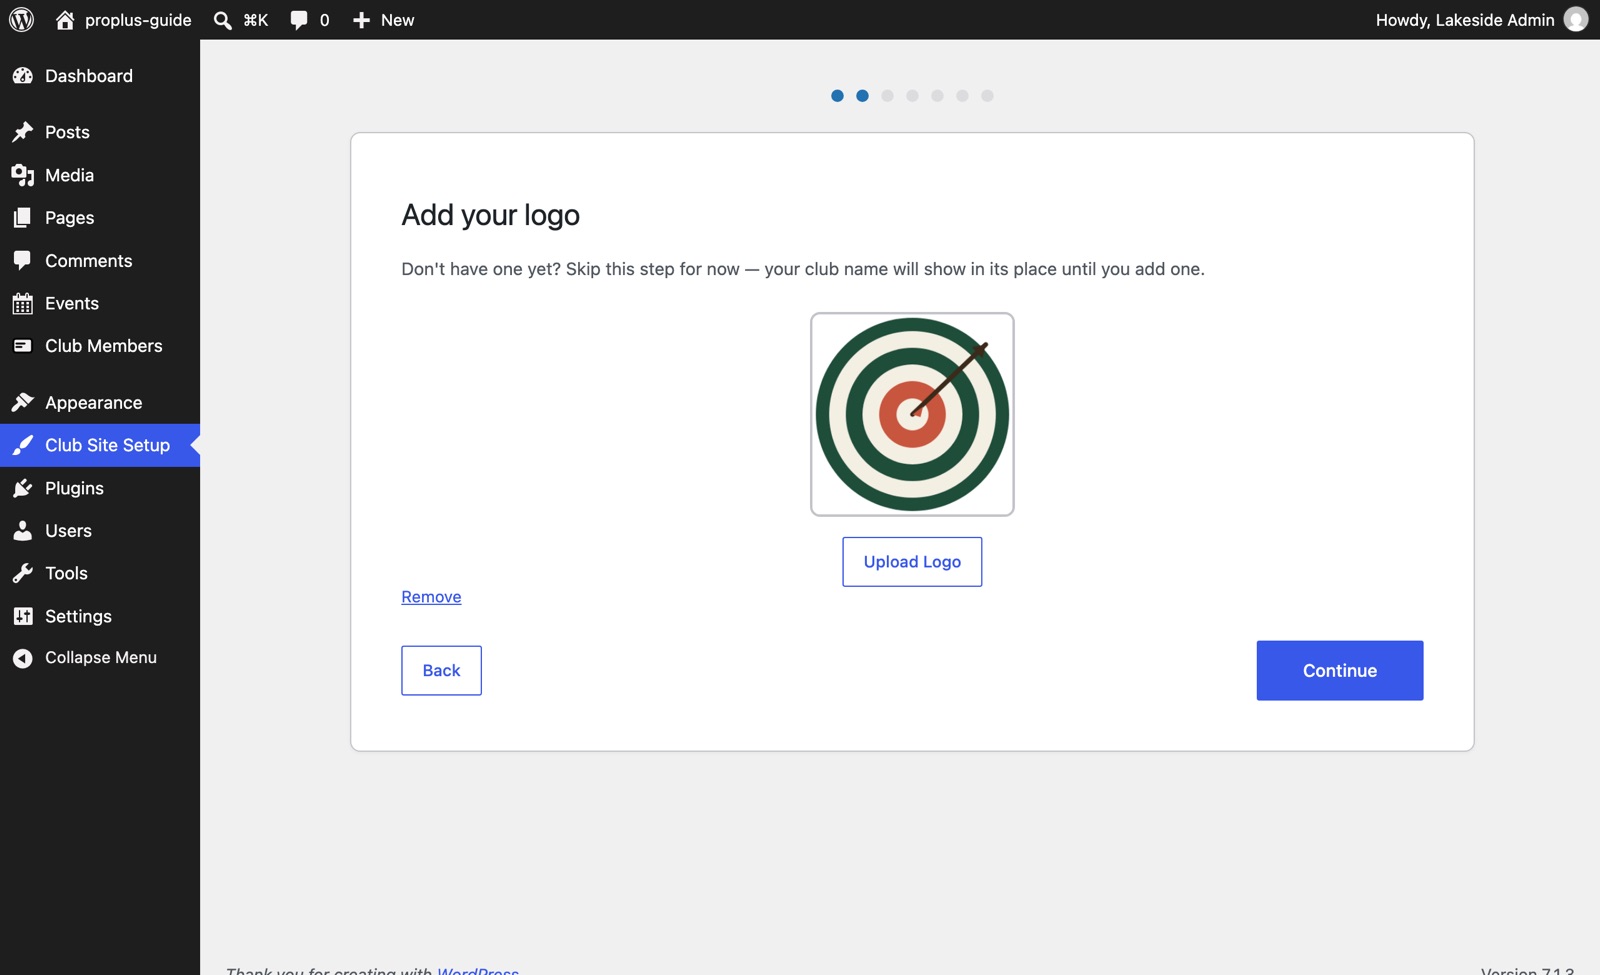
Step 2: Your logo
- Click Upload Logo. The WordPress media window opens.
- On the Upload files tab, drag your logo in or click Select Files. If you already uploaded it, use the Media Library tab and click it.
- Click Use this image, then Continue.
Step 3: Tagline, hero images and button
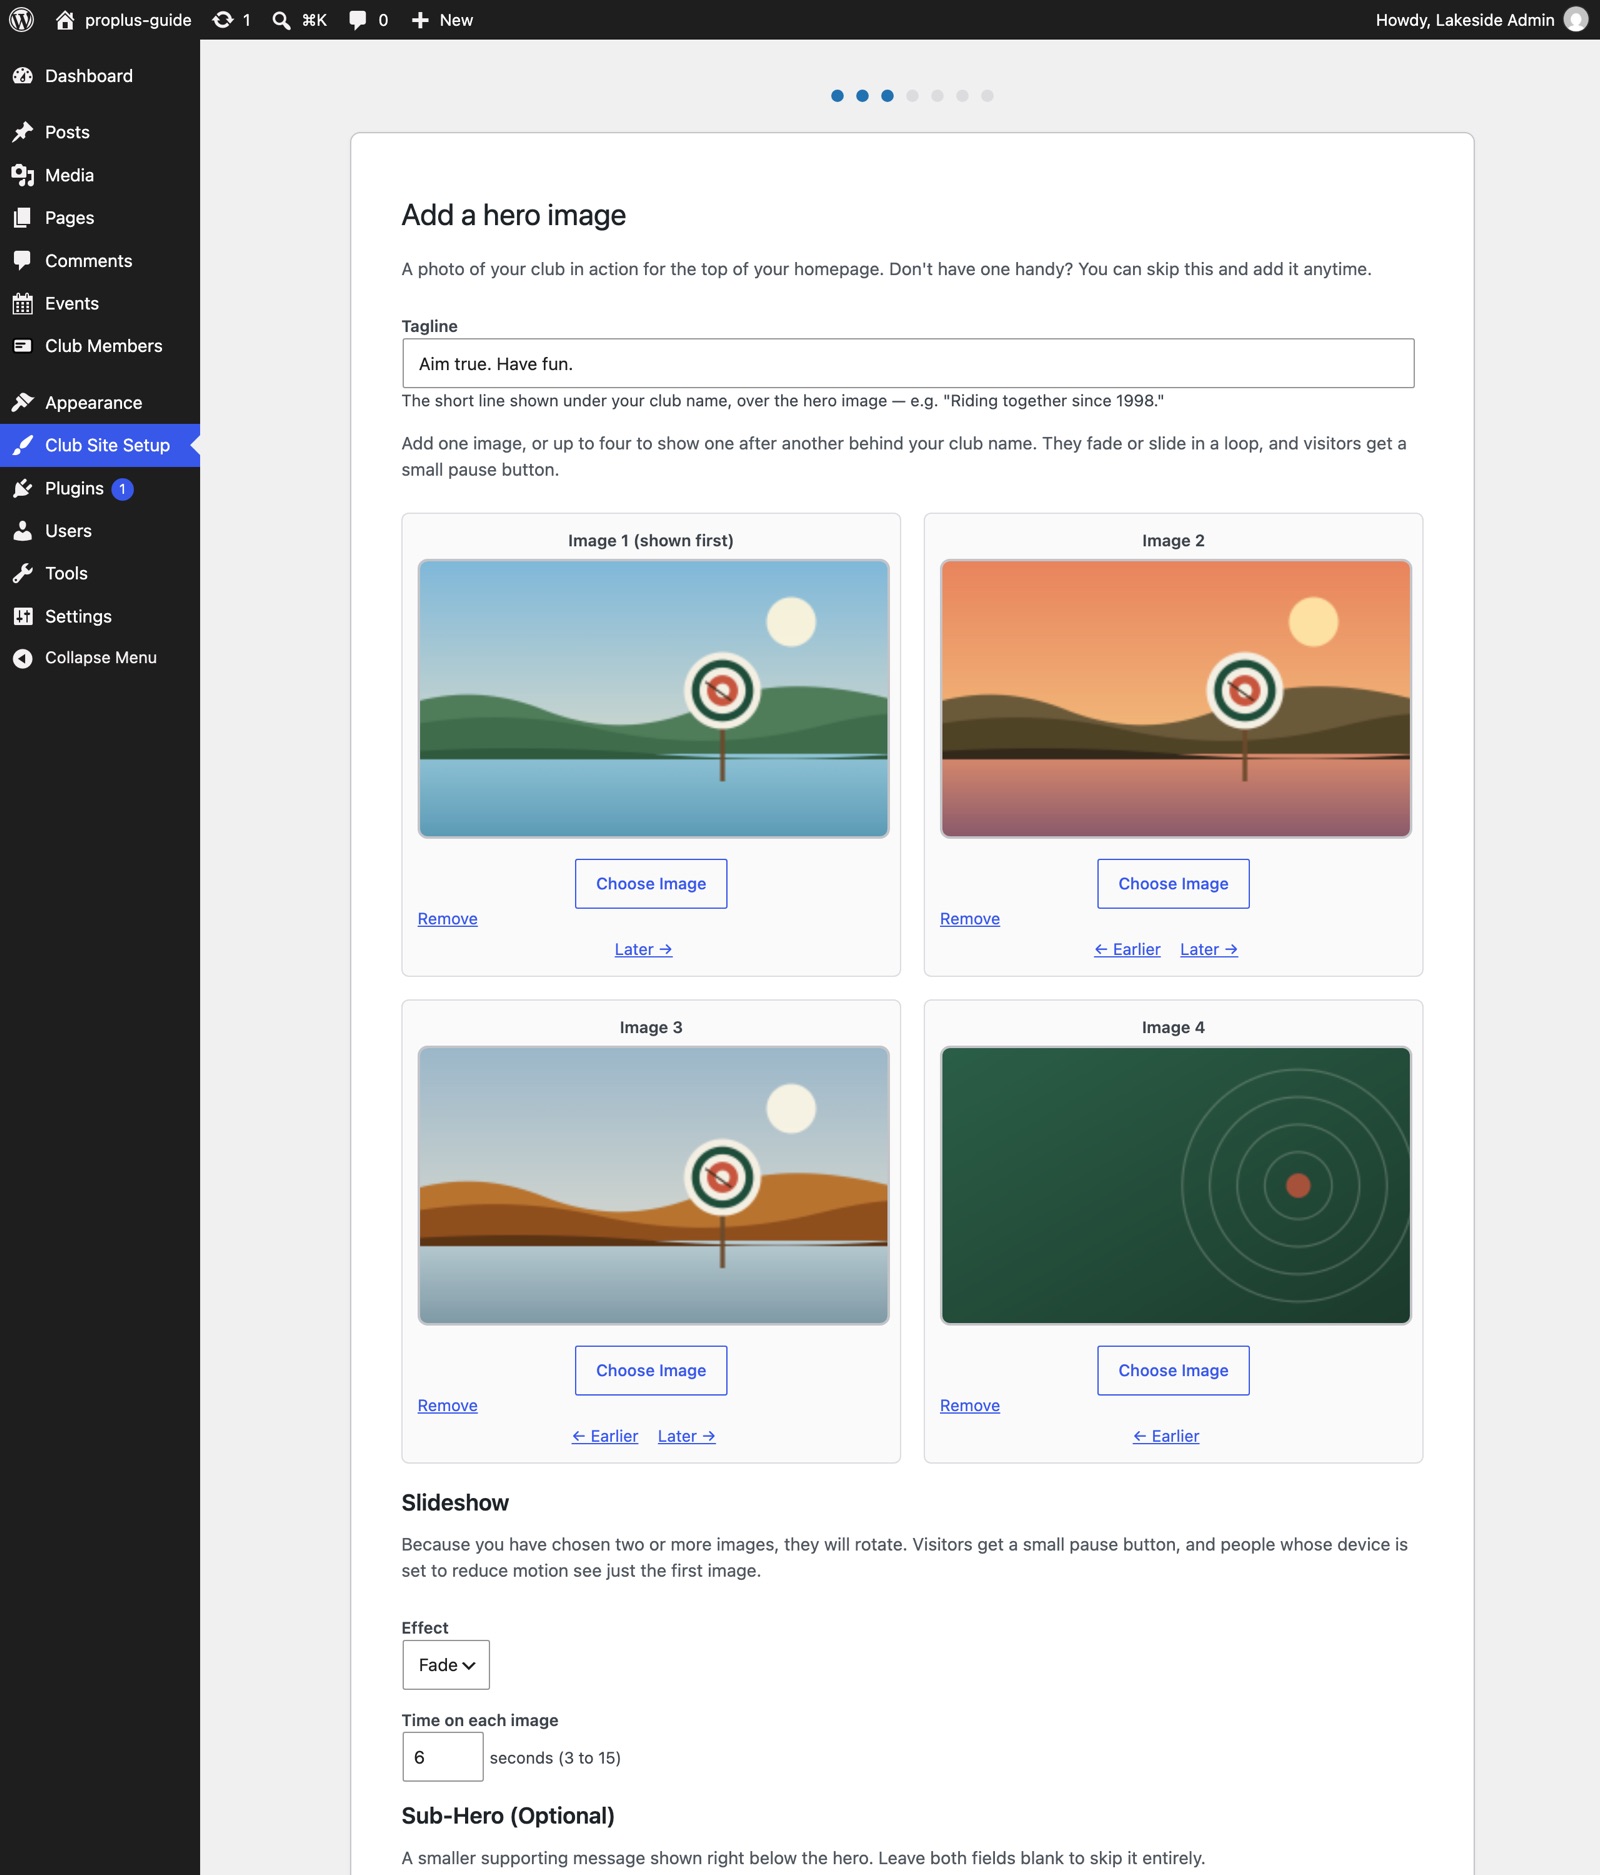
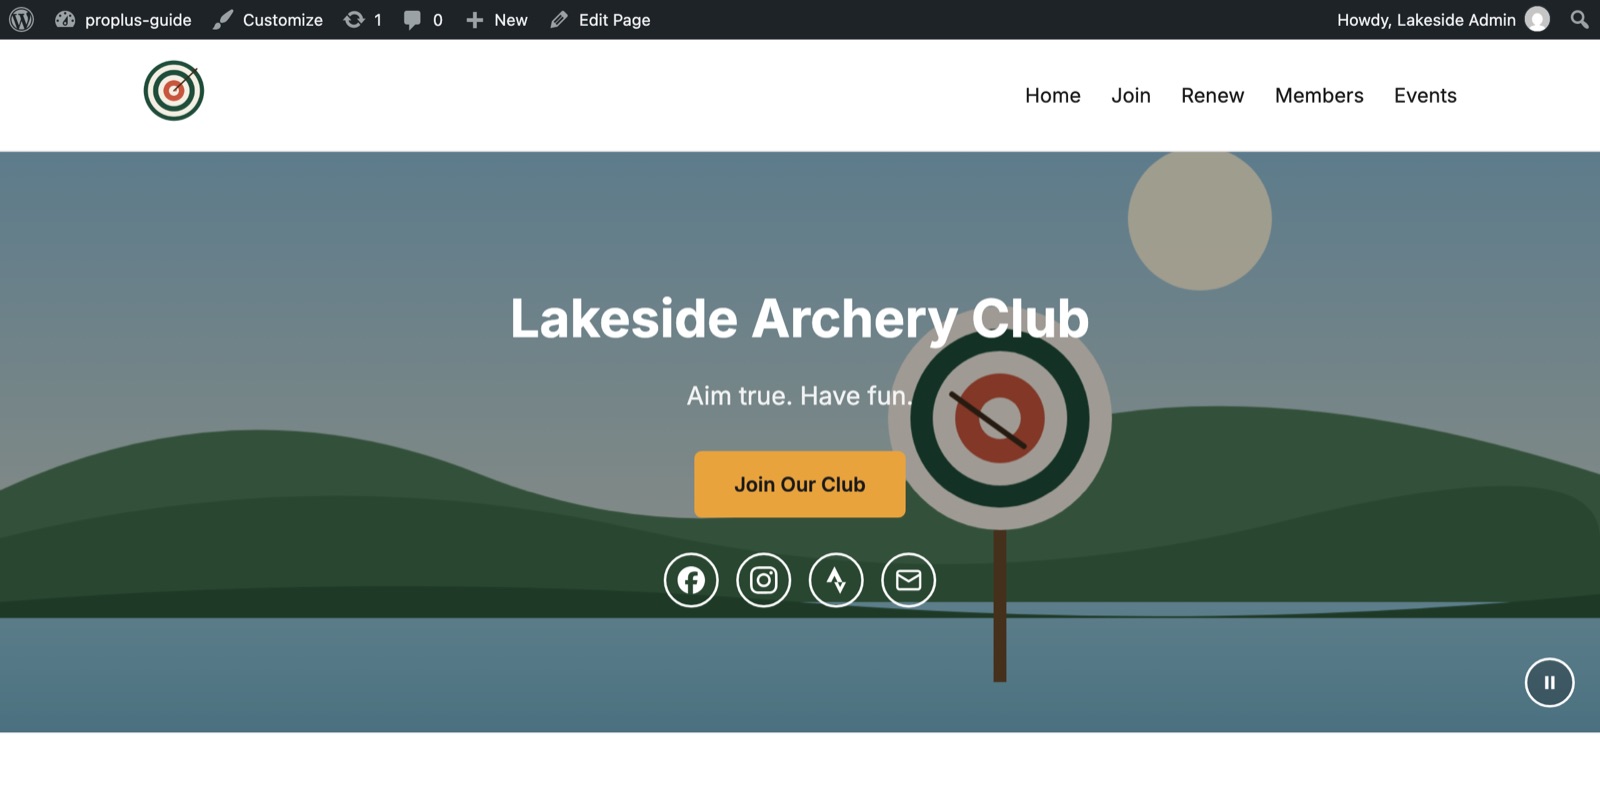
The hero is the big picture at the top of your home page. You can use one photo, or up to four that take turns behind your club name.
- Type a short Tagline, for example Aim true. Have fun.
- Under Image 1, click Choose Image and pick a photo of your club, the same way you chose the logo. One photo is perfectly fine.
- Optional: add up to three more photos under Image 2, 3 and 4. They will take turns behind your club name, looping forever. Use Earlier and Later to change the order, and Remove to take one out.
- As soon as you have two or more photos, a Slideshow box appears. Choose the Effect: Fade melts one photo into the next, and Slide pushes the next one in from the side. Then set the Time on each image, from 3 to 15 seconds. Six is a good start.
- Optional: fill in the Sub-Hero Title and Content, a short message shown just below the hero. Leave both blank to skip it.
- Check the Hero Button. By default it says Join Our Club and jumps down the page to the join section. Leave it as it is unless you have a reason to change it.
- Optional: edit the Closing Band, the colored strip above the footer on your home page and every other page. Change its Title, Text, Button Text and Button Link, or tick Hide the closing band. Leave a box blank to leave that part out. If your club is free, change the text so it doesn’t mention paying online. If you hide the band, give the Hero Button a real page link (such as
/join/), because the default jump link needs the band to land on. - Click Continue.
Step 4: Color palette
Pick the colors for buttons, headings and banners. The wizard looks at your logo and photos and suggests palettes that match them under Suggested from Your Images. Below that are Curated Palettes, ready-made combinations. Click one and then Continue.
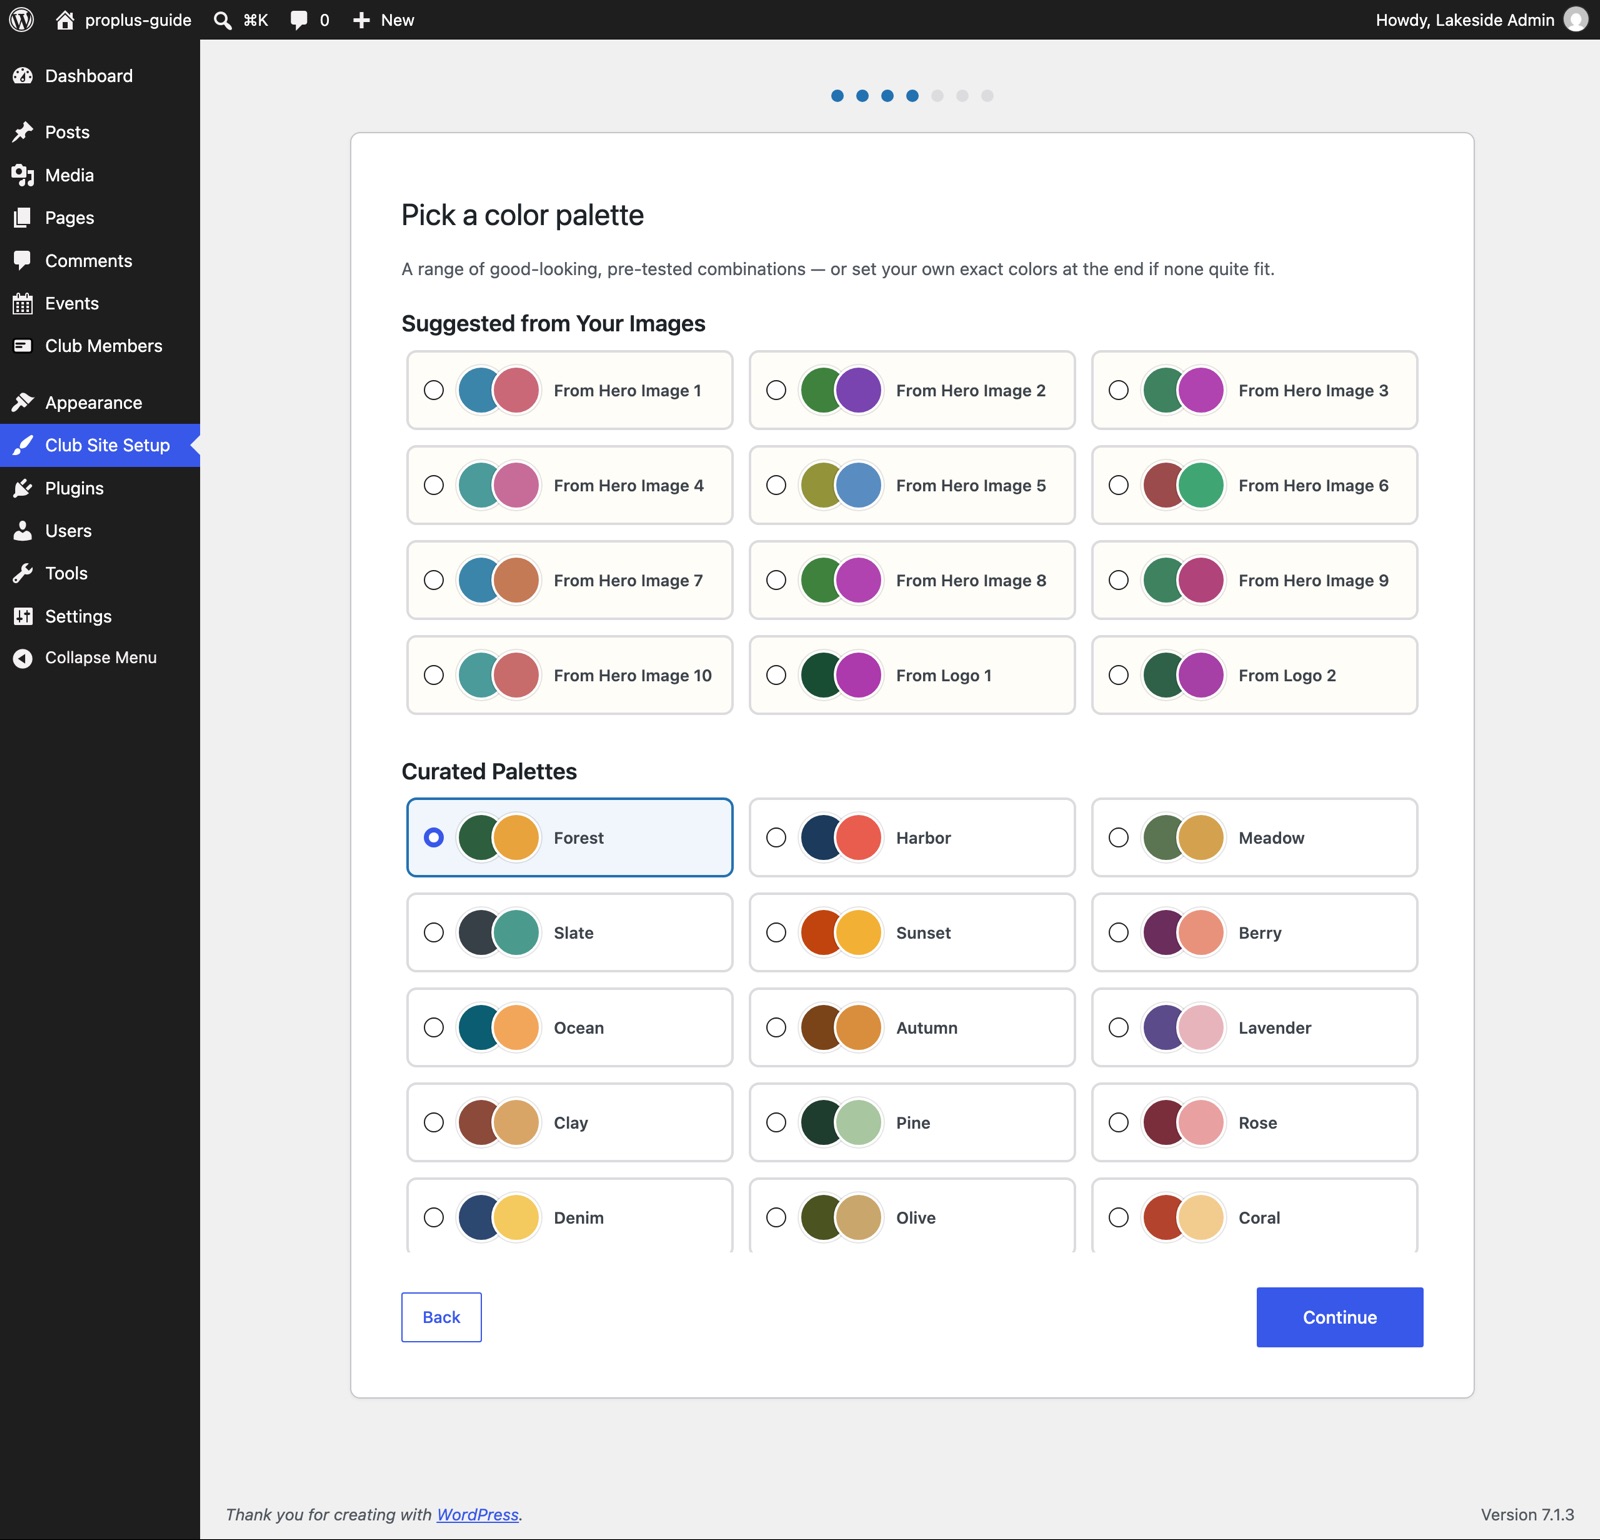
Optional: give the header and menu their own colors
Scroll down on the same screen to Header and Menu Colors (Optional). Your site has two bars at the top: the header, with your logo, club name and social icons, and the menu, the bar just below it with your page links. Each bar has its own background and text color, so you can make the header navy and the menu gold, for example.
- Click a color box, for example Header background, and pick a color. Click Clear any time to go back to the default.
- Optional: pick a Header text color. Leave it empty and the wizard chooses dark or white text for you, whichever reads better on your background.
- Do the same for Menu background and Menu text.
- Click Continue, then View Your Homepage to see the result.
The drop-down menus and the menu on phones follow your menu colors. The round social icons in the header flip to match, so they stay visible on any header color. Both bars are very slightly see-through, so your hero photo shows through faintly as you scroll.
Step 5: Fonts
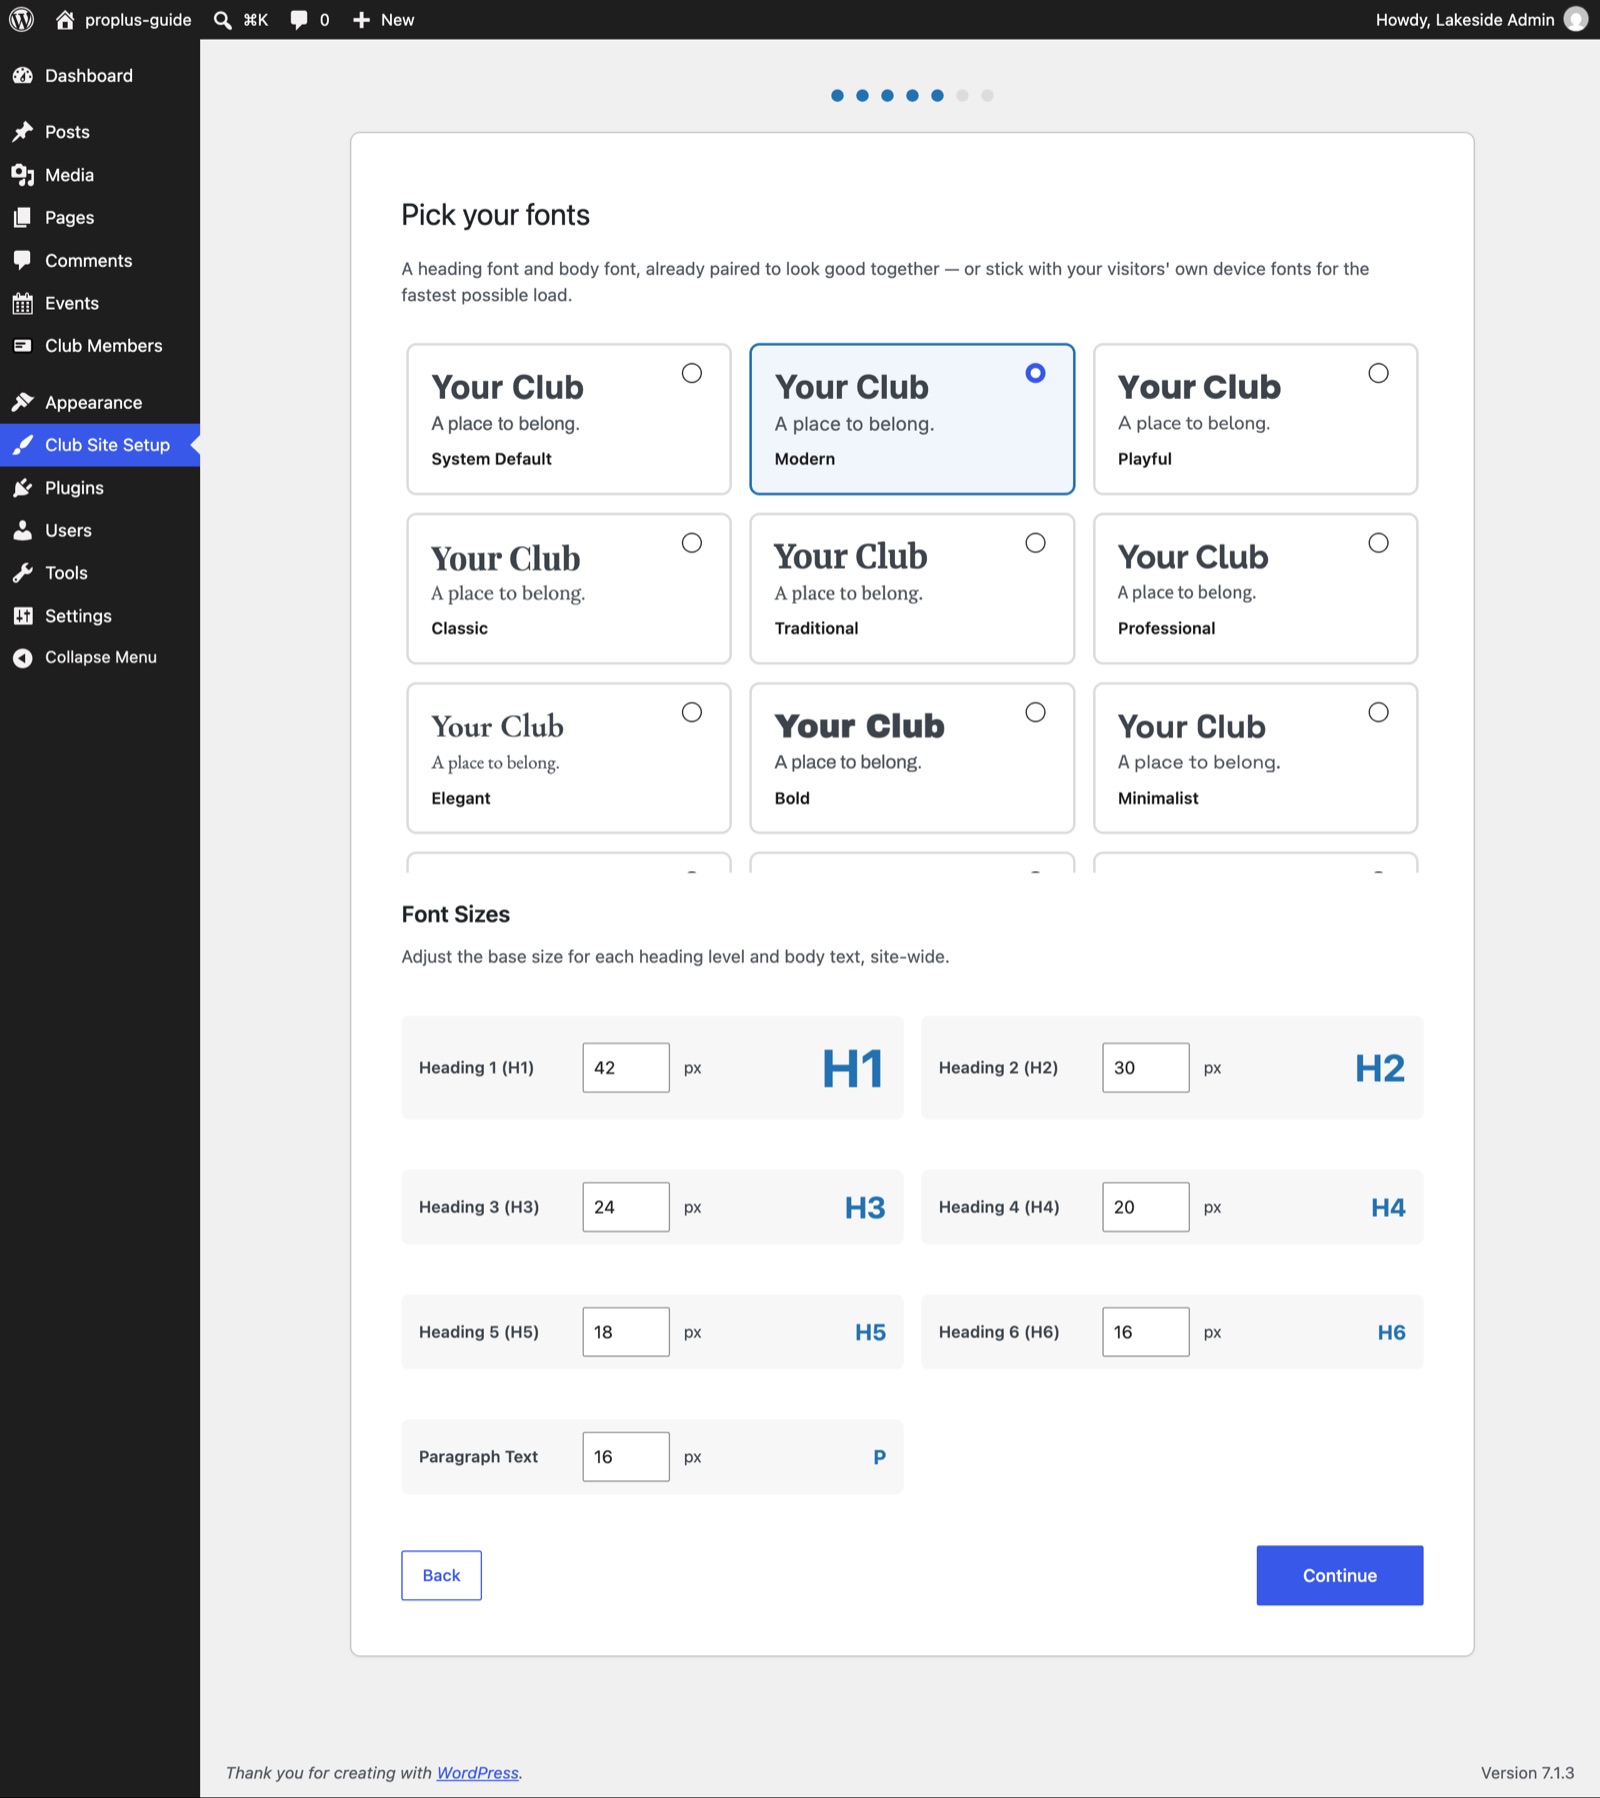
Choose a look for headings and body text, and a text size. The defaults are a good, readable choice. Click Continue.
Step 6: Homepage layout
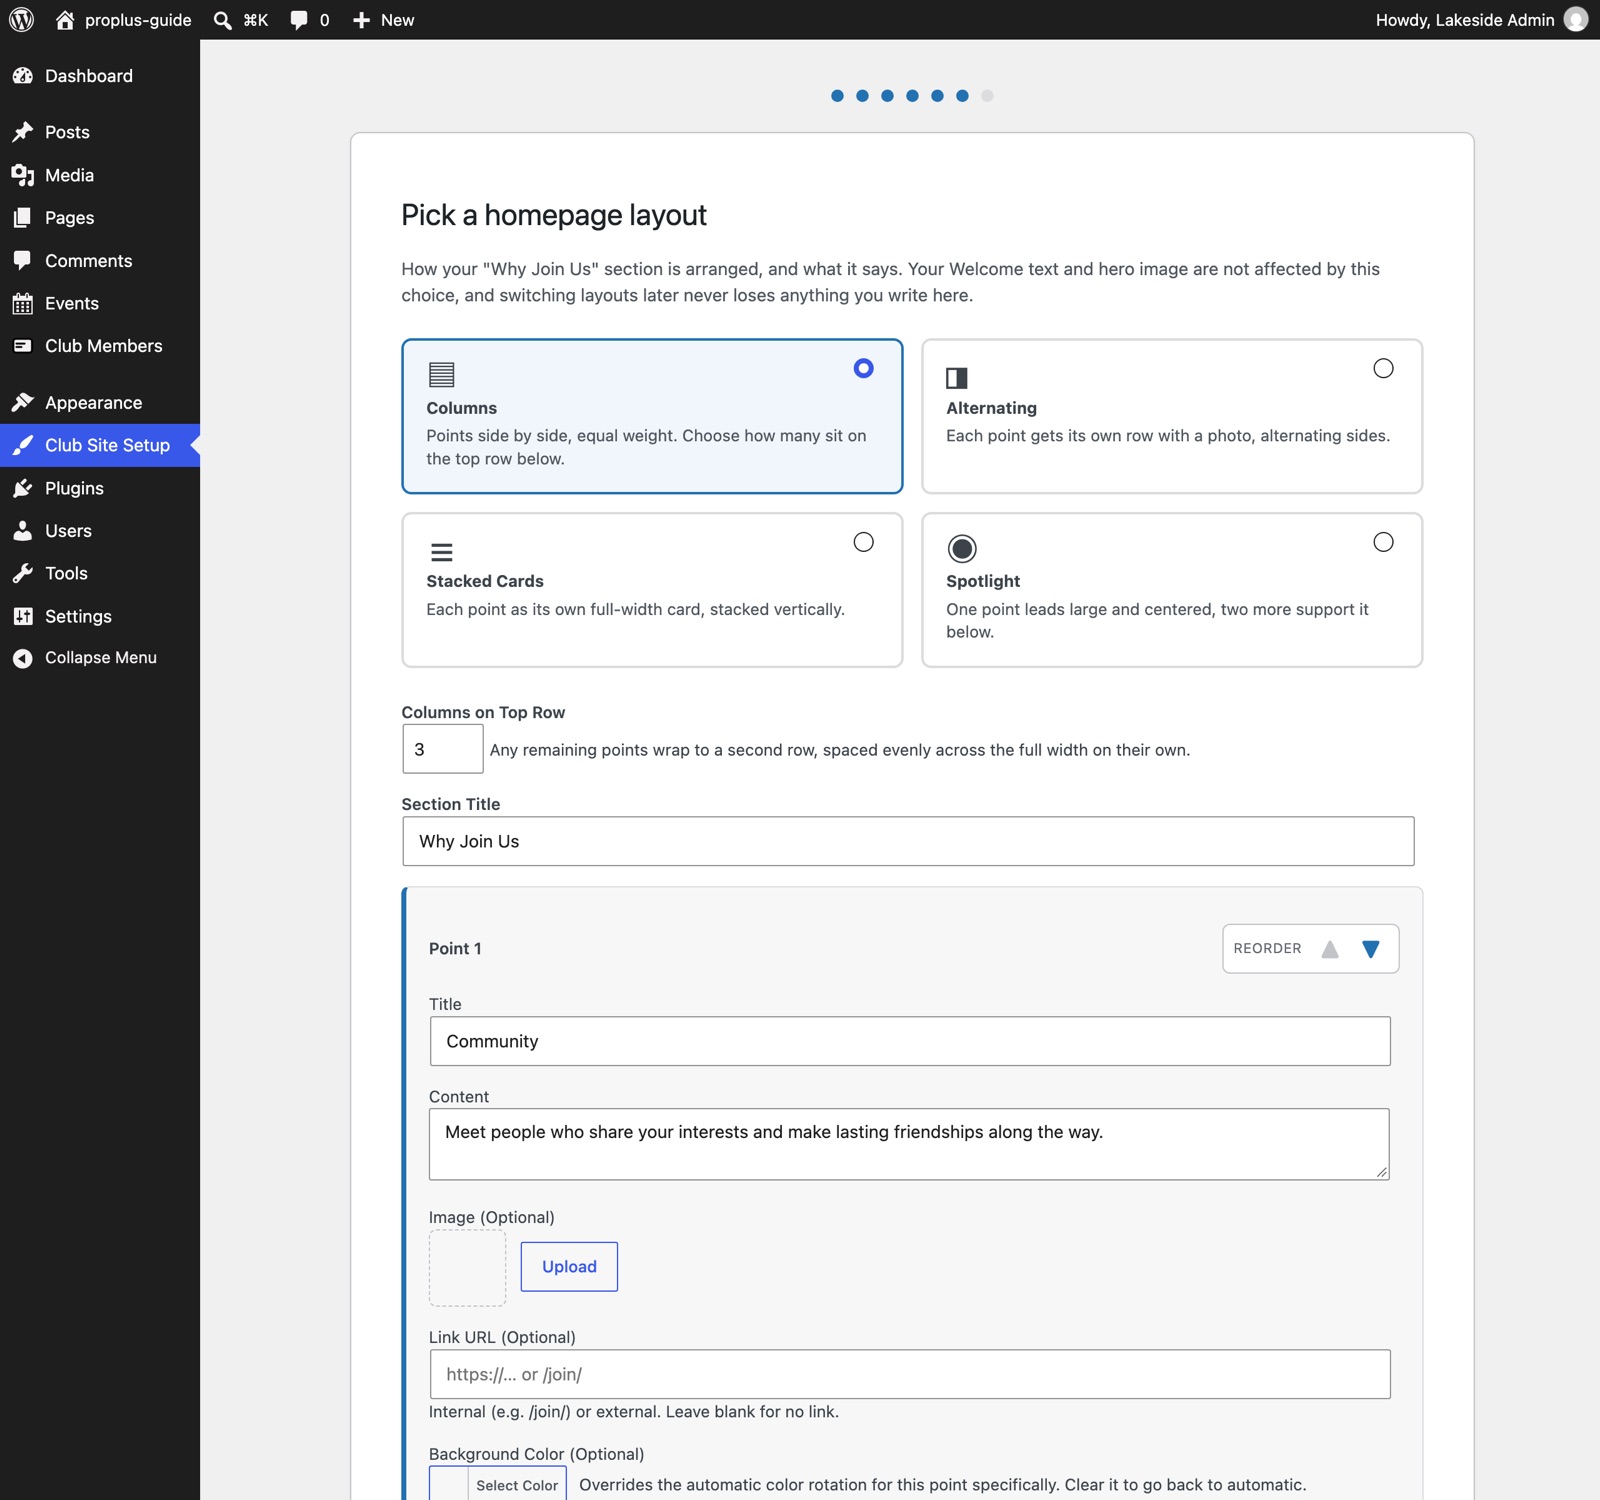
This controls the Why Join Us section on your home page. Choose how the points are arranged (Columns, Alternating, Stacked Cards or Spotlight), give the section a title, and edit the points themselves. Each point is a short heading and a sentence. Replace the sample wording with what is true for your club.
Step 7: Done
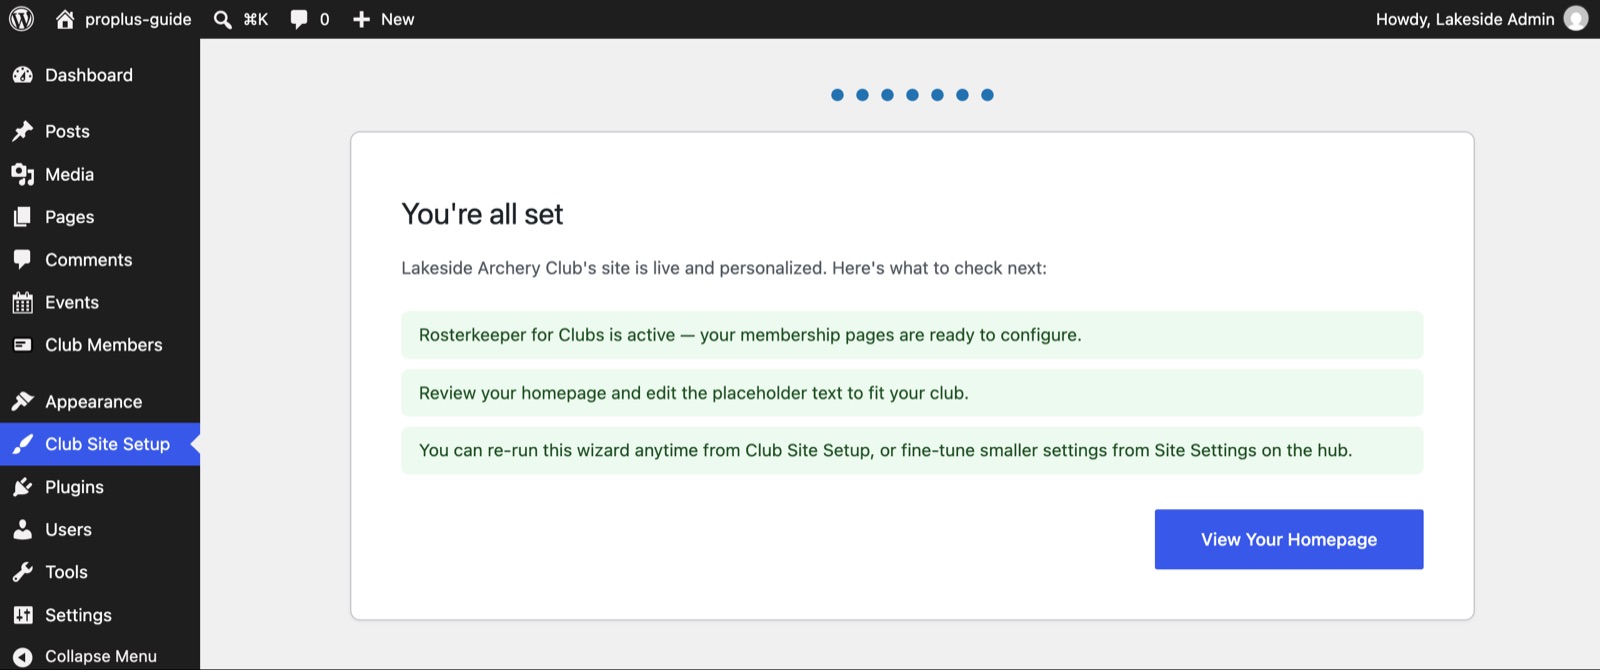
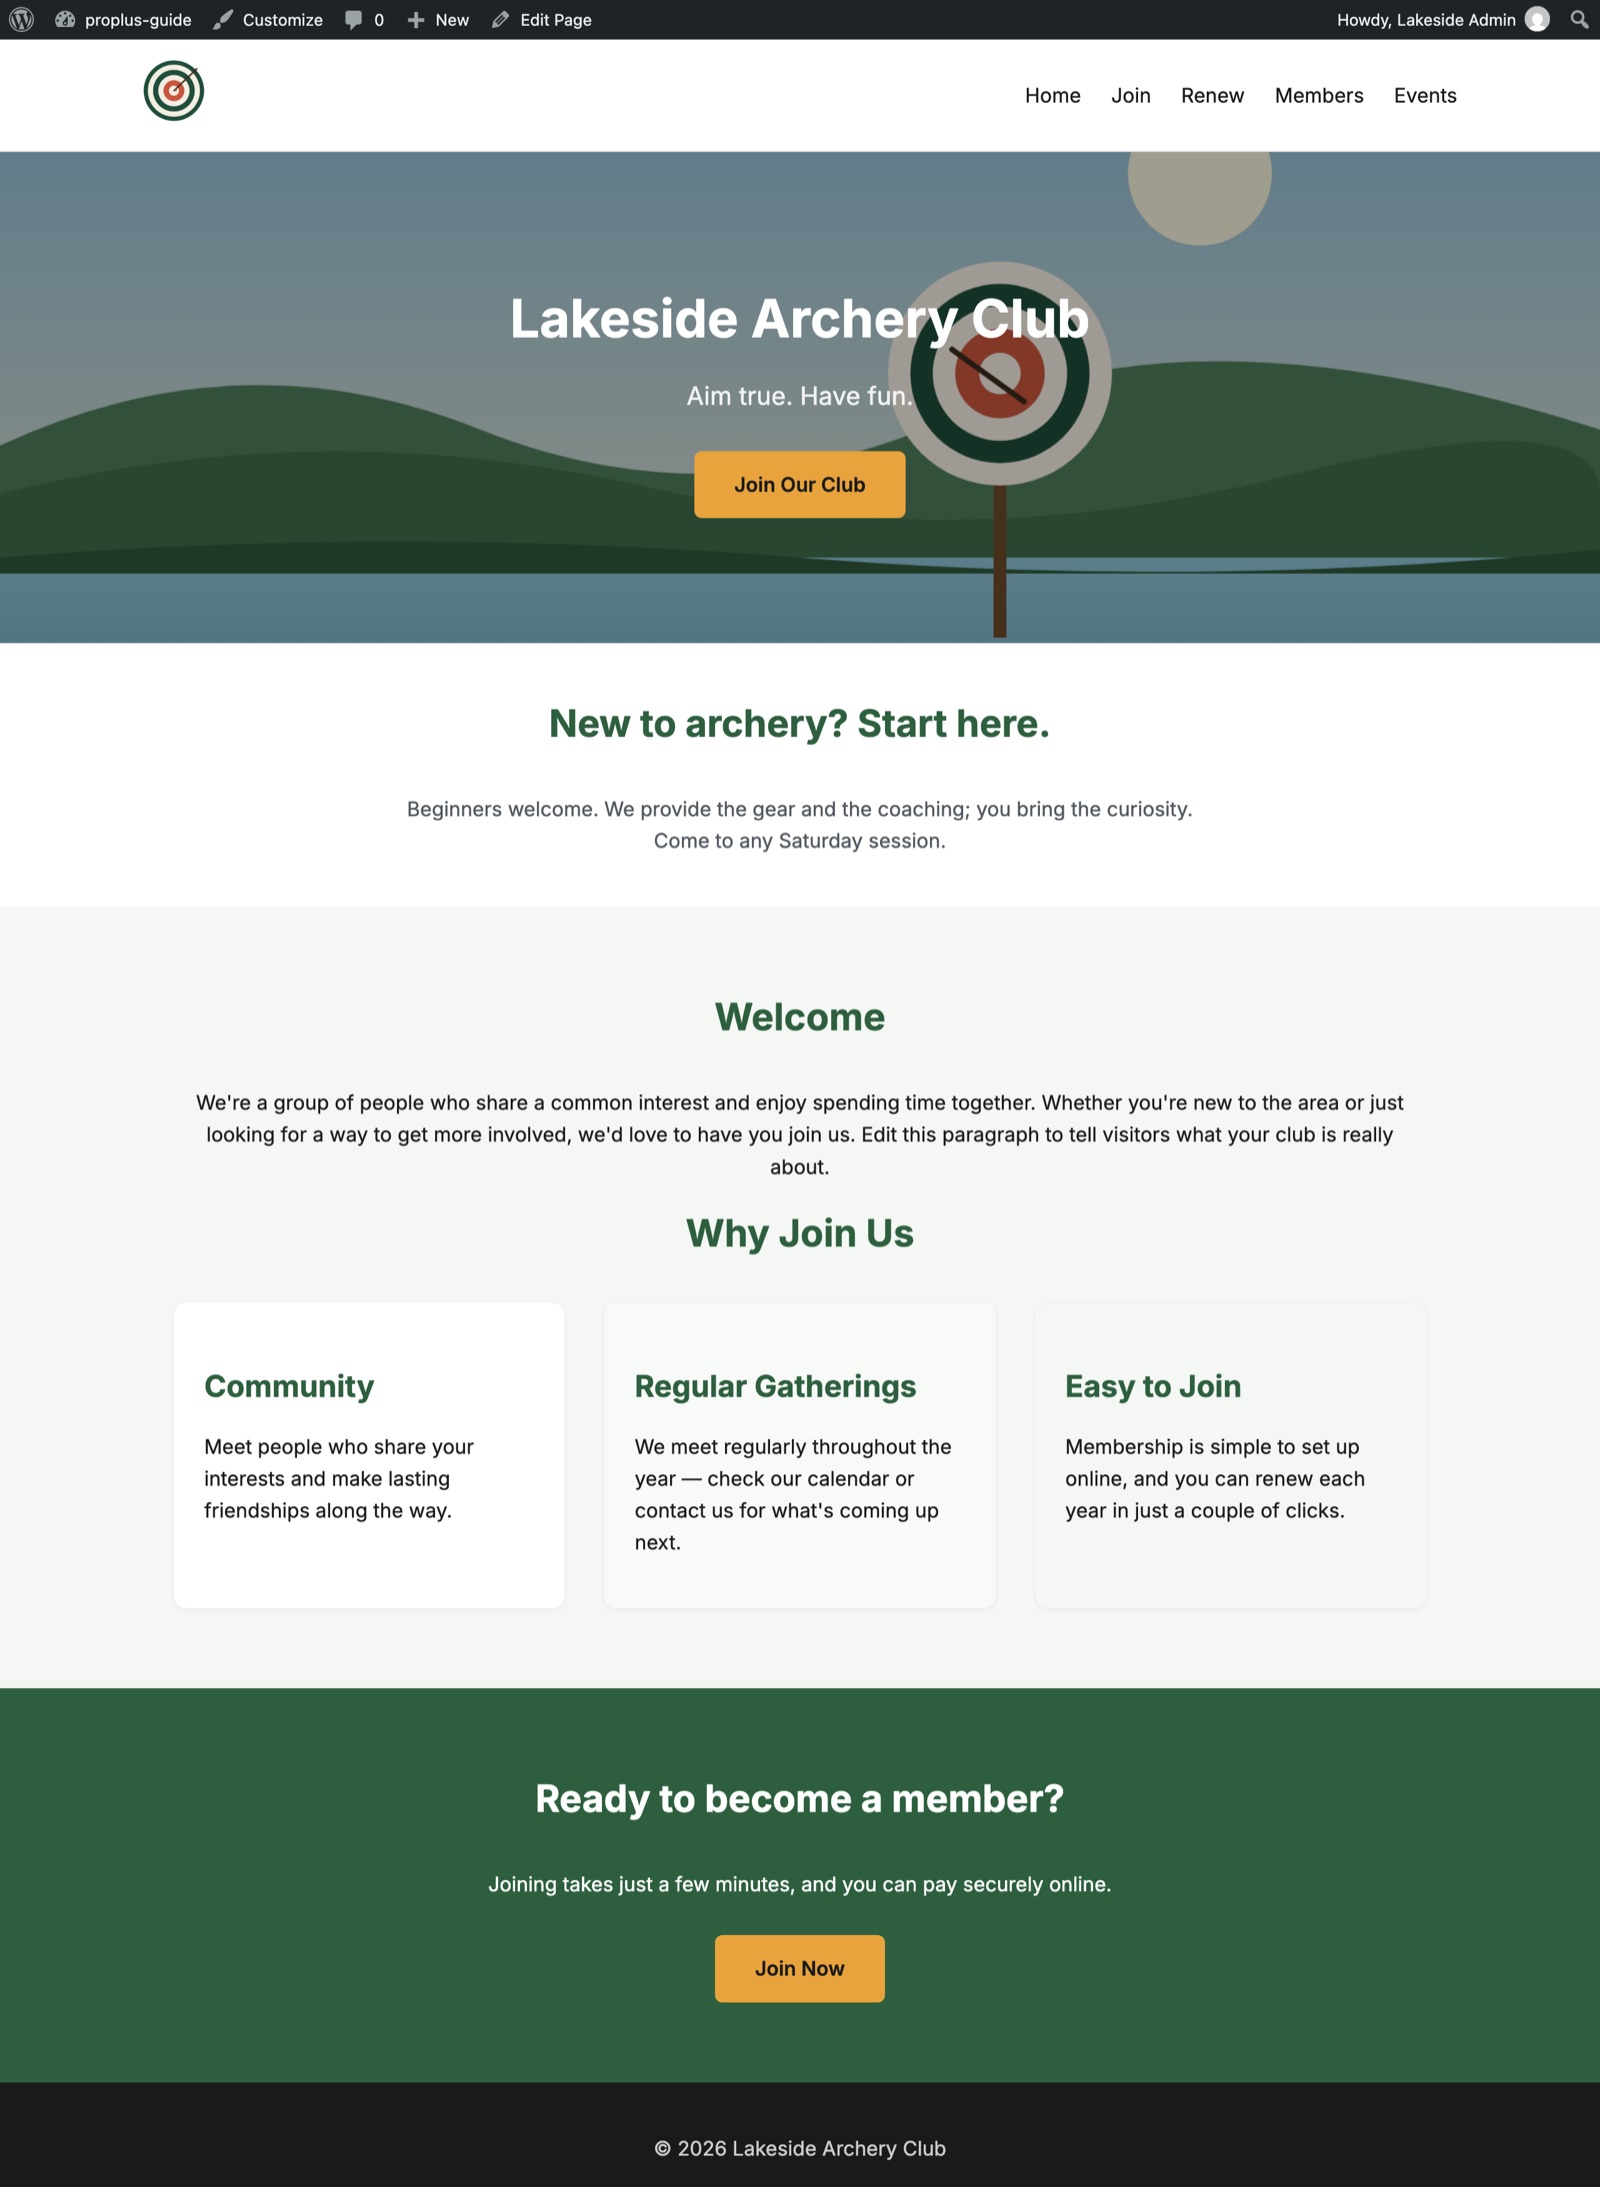
The last screen, You’re all set, lists what to check next. Click View Your Homepage to see the result. Whenever you reopen Club Site Setup later, you land on an Edit Your Site hub where you can jump straight to any single step (logo, palette, fonts, hero, layout) instead of running the whole wizard again.
Optional: add your social links
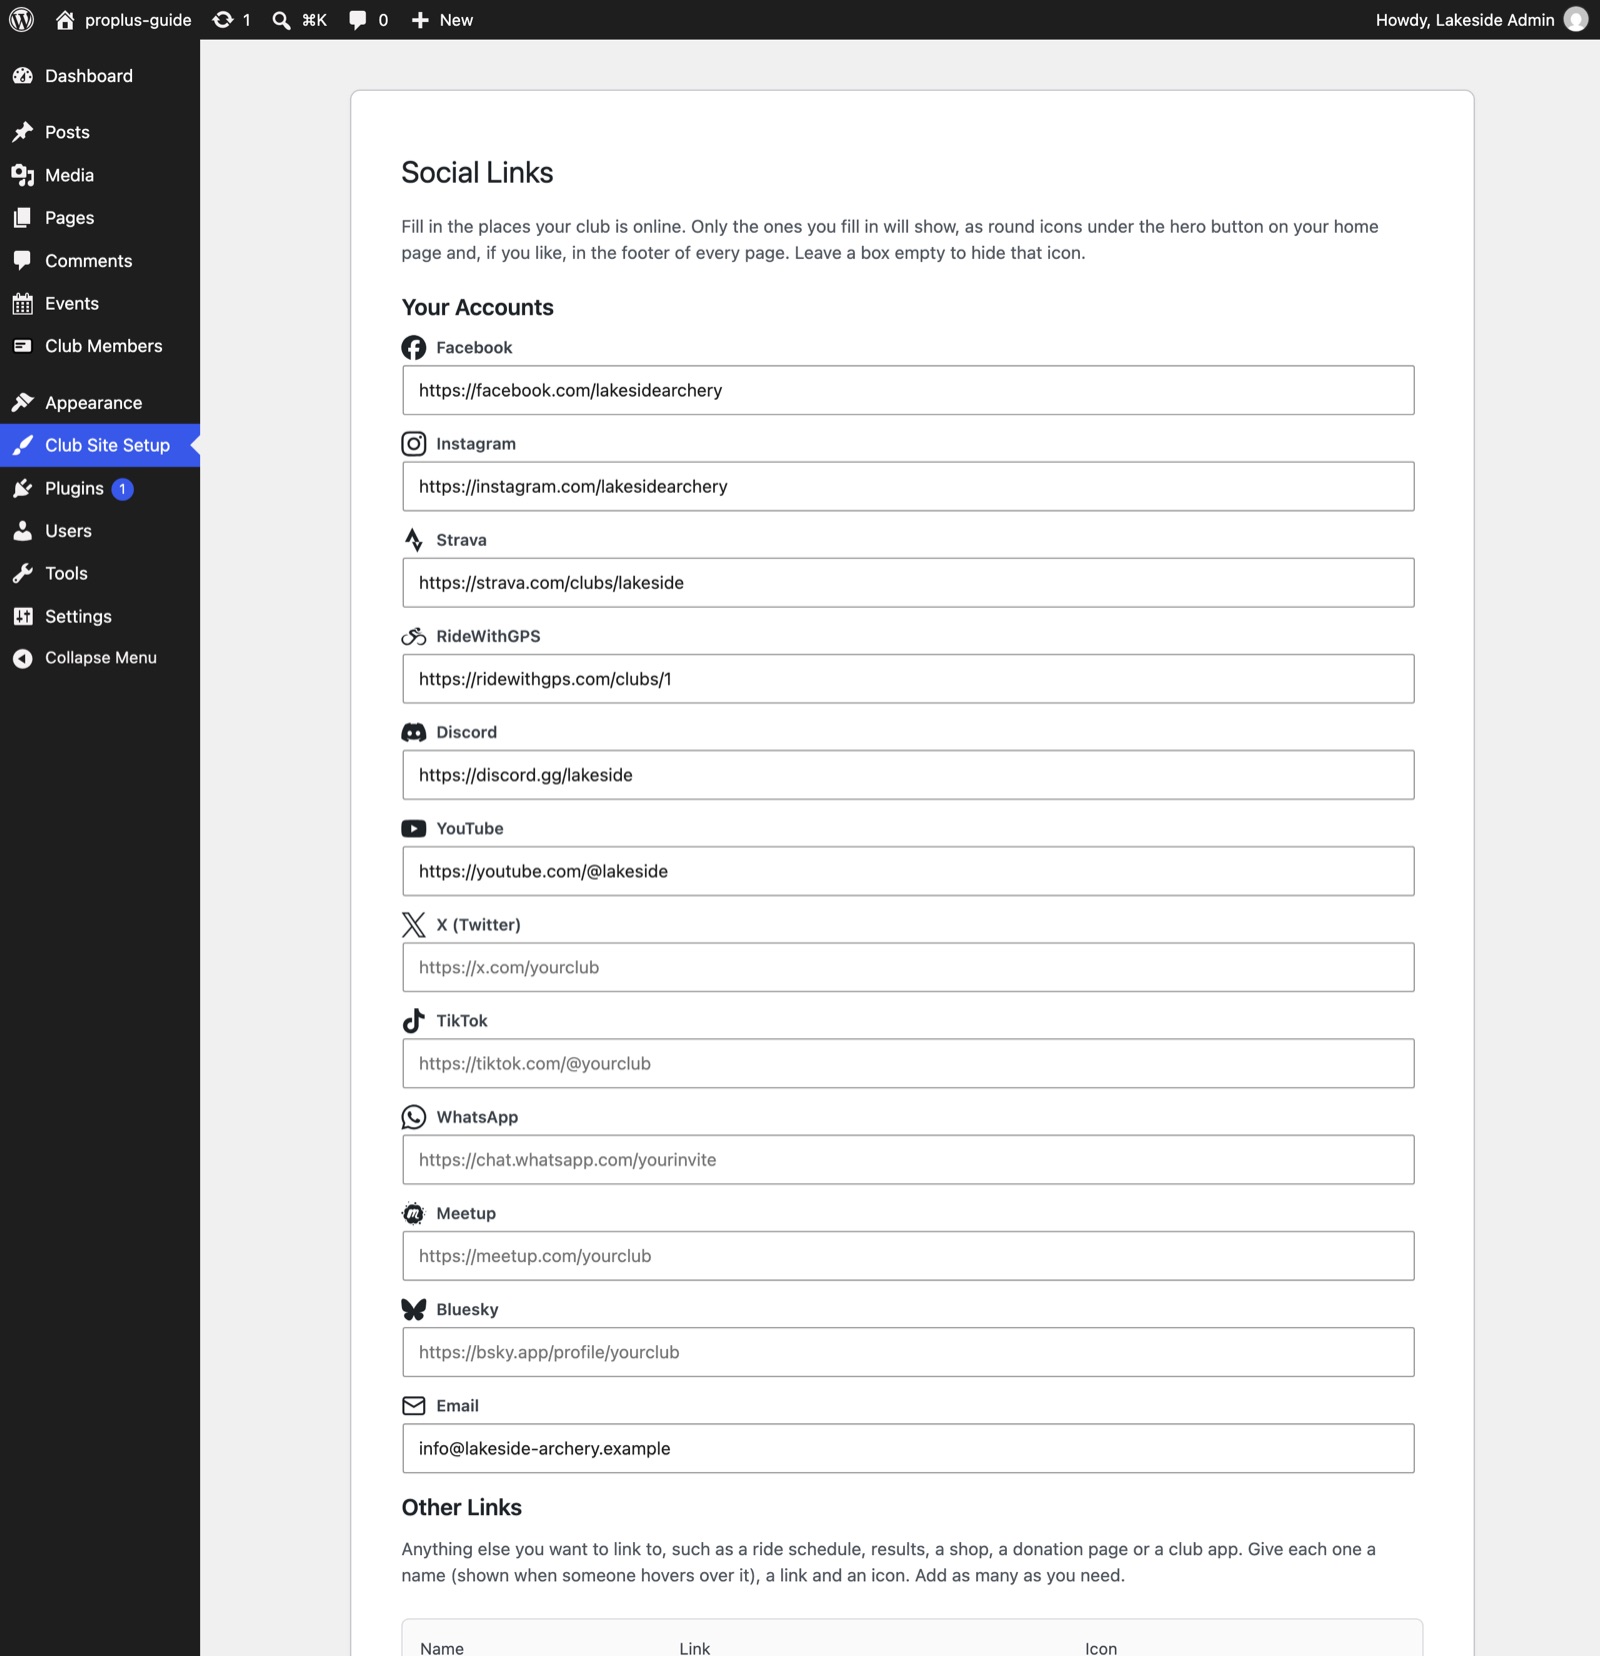
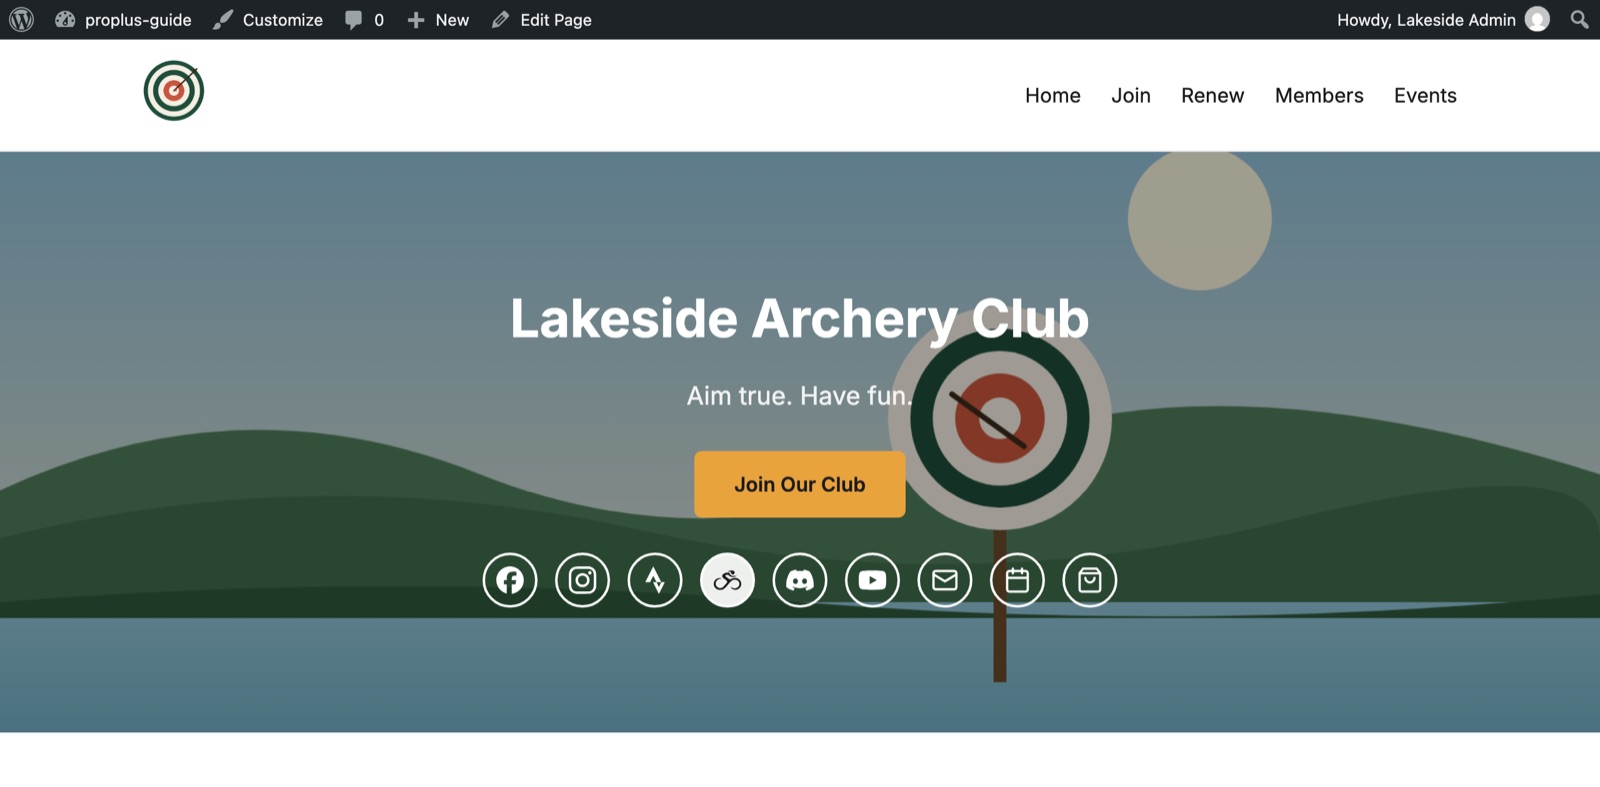
If your club is on Facebook, Instagram, Strava or other sites, you can show round icons for them in the header beside your logo, right under the Join button on your home page, and in the footer of every page. Visitors tap an icon and land on your page.
- Click Club Site Setup in the left menu. You will see the Edit Your Site screen.
- Click the Social Links card.
- Paste the web address of each account you have into its box, for example
https://facebook.com/yourclub. Leave the rest empty. Only the boxes you fill in will show an icon. The Email box takes an email address, so visitors can write to the club. - For anything else you want to link to, such as a ride schedule, results, a shop, a donation page or a club app, click Add Another Link under Other Links. Give each one a name, a link and an icon. Add as many as you need.
- Under Header and footer, leave Show these icons in the header, beside the logo and Also show these icons in the footer of every page ticked if you want them in both places. Untick either one to hide the icons there. Then click Save.
Set up your club
Go to Club Members → Settings. The tabs run across the top. Work through them left to right and click Save Settings at the bottom of each one before moving on.
General
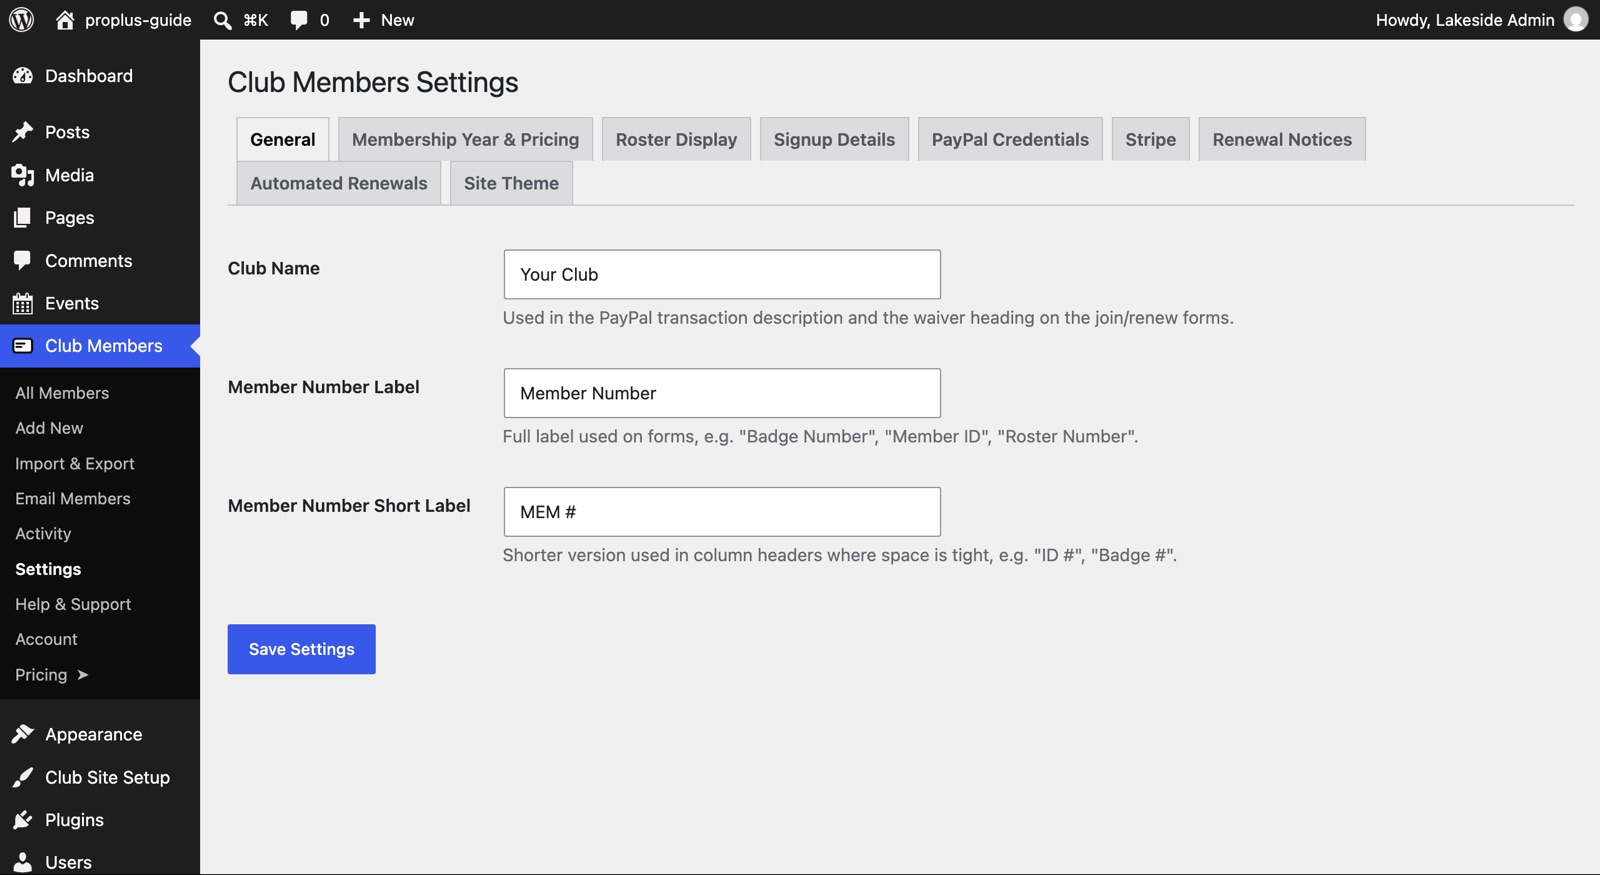
Check the Club Name, then decide what you call a member’s ID. The Member Number Label is the long wording used on forms (Member ID, Badge Number), and the short label is the compact version used in tables.
Membership Year & Pricing
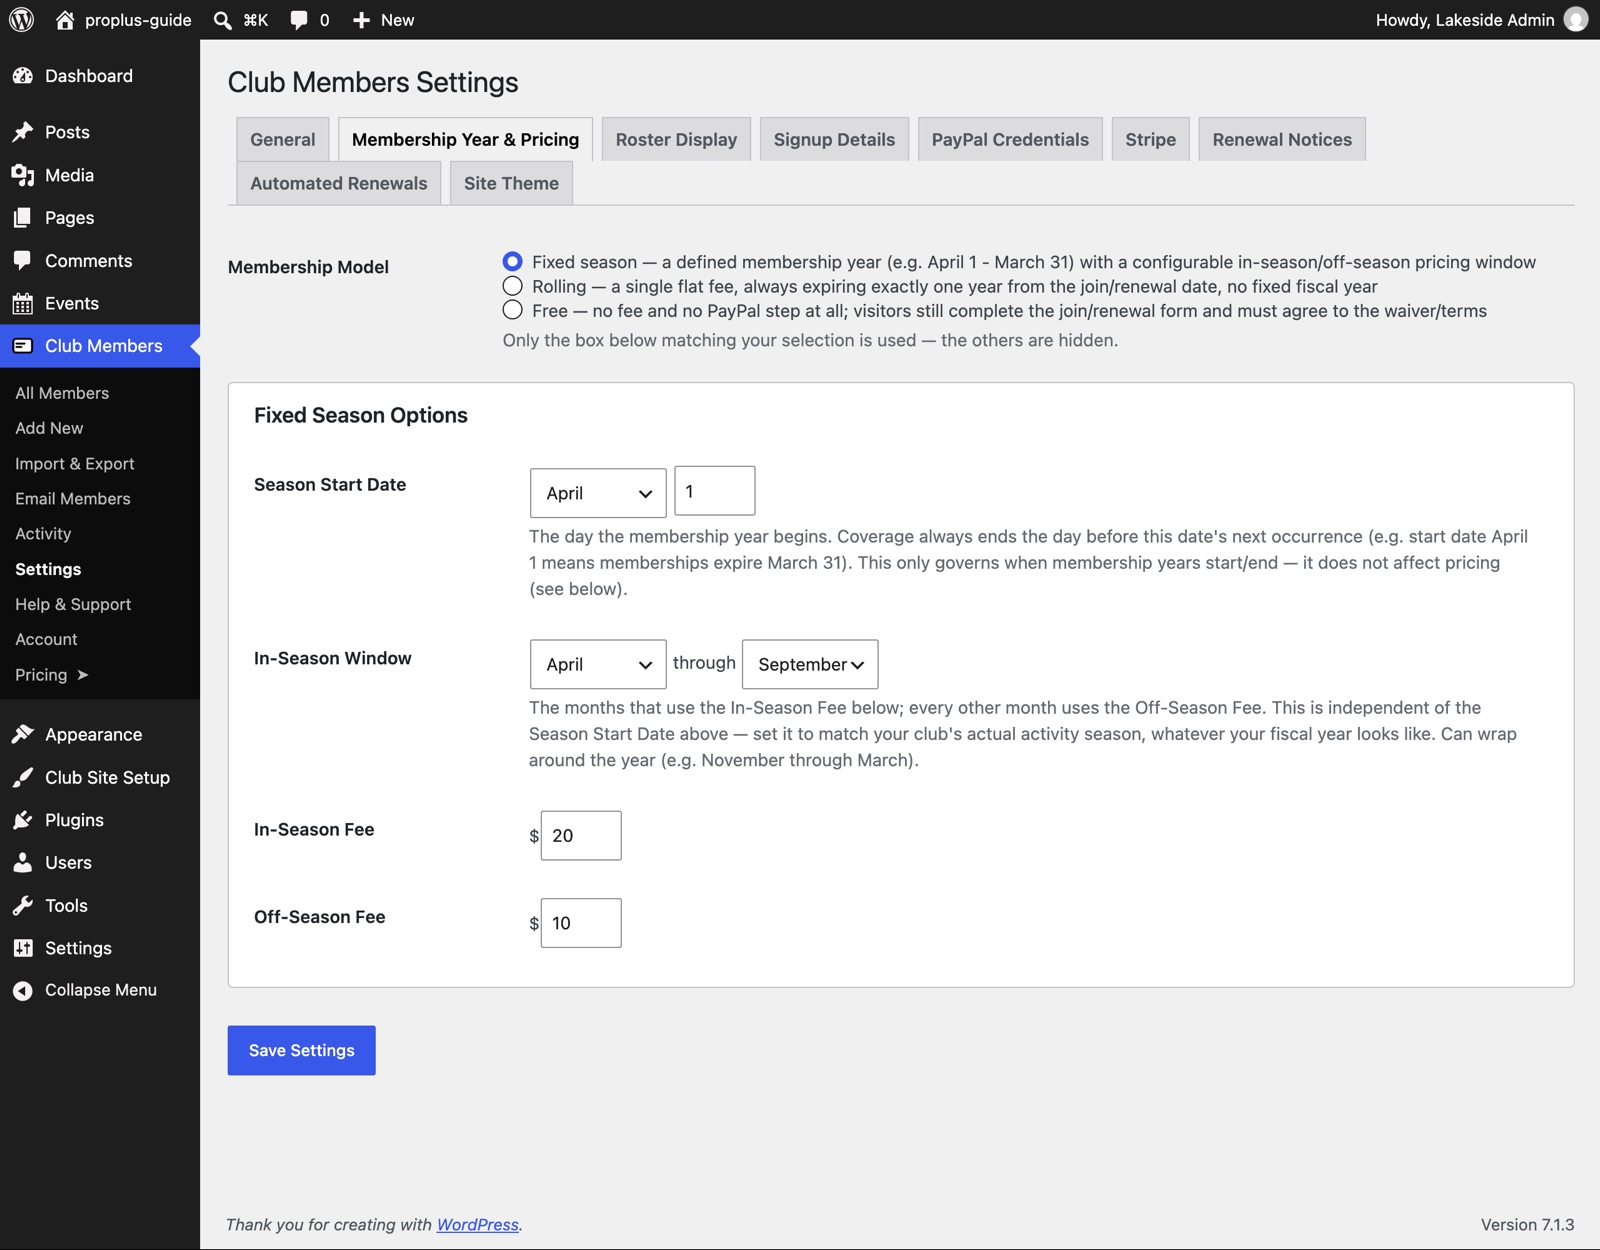
This is the most important tab. Start by choosing a Membership Model:
- Fixed season. Everyone’s membership runs on the same yearly calendar, for example April 1 to March 31. You can charge one price for members who join during your busy months (in-season) and a lower one for the rest of the year (off-season).
- Rolling. A single flat fee. Each membership lasts exactly one year from the day the person joins or renews, with no fixed year-end.
- Free. No fee and no payment step. Visitors still fill in the form and accept your waiver, which suits clubs that collect dues some other way.
The box underneath changes to match your choice. For a fixed season, set the Season Start Date (the month and day your membership year begins; coverage ends the day before), the In-Season Window (the months that use the in-season fee), and the In-Season and Off-Season Fee. For a rolling membership you enter one Flat Annual Fee.
Roster Display
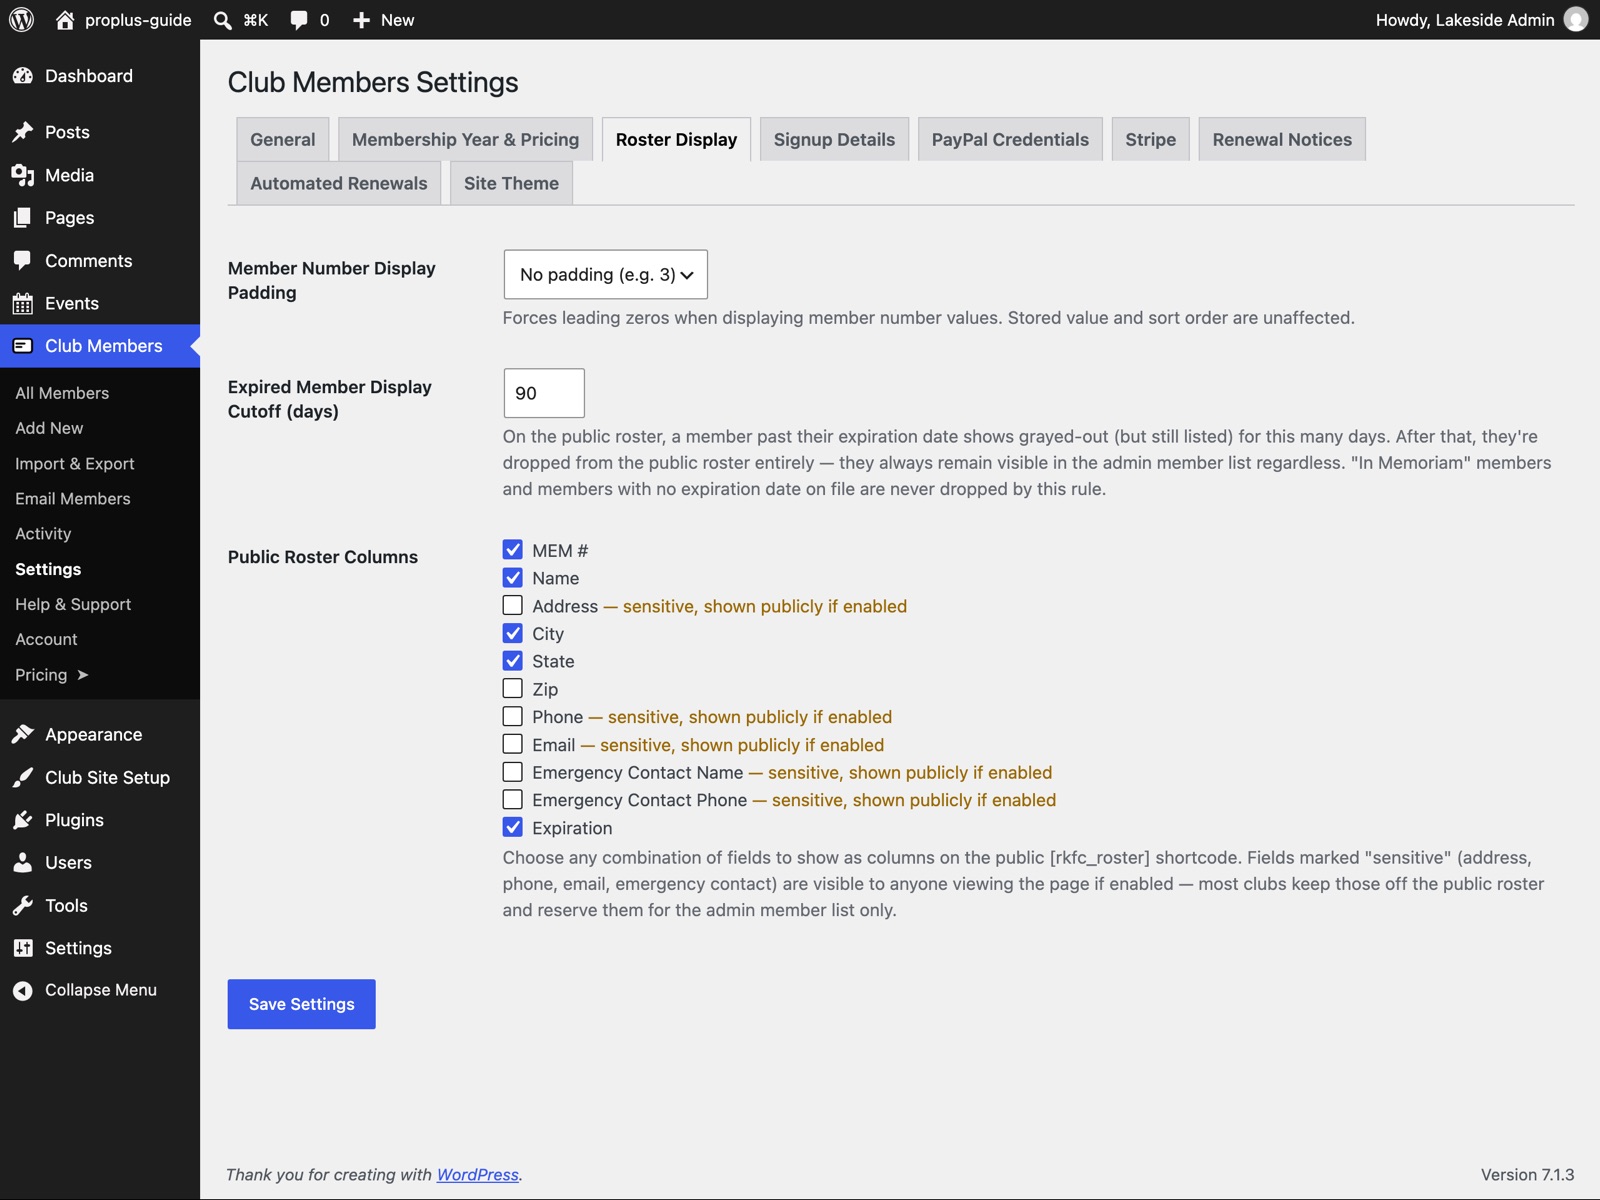
This controls what visitors can see on your public member list. Tick only the columns you want to be public. Address, phone, email and emergency contact details are marked as sensitive. For most clubs, a name and a member number are all that should be public. Members can also be hidden individually from the roster.
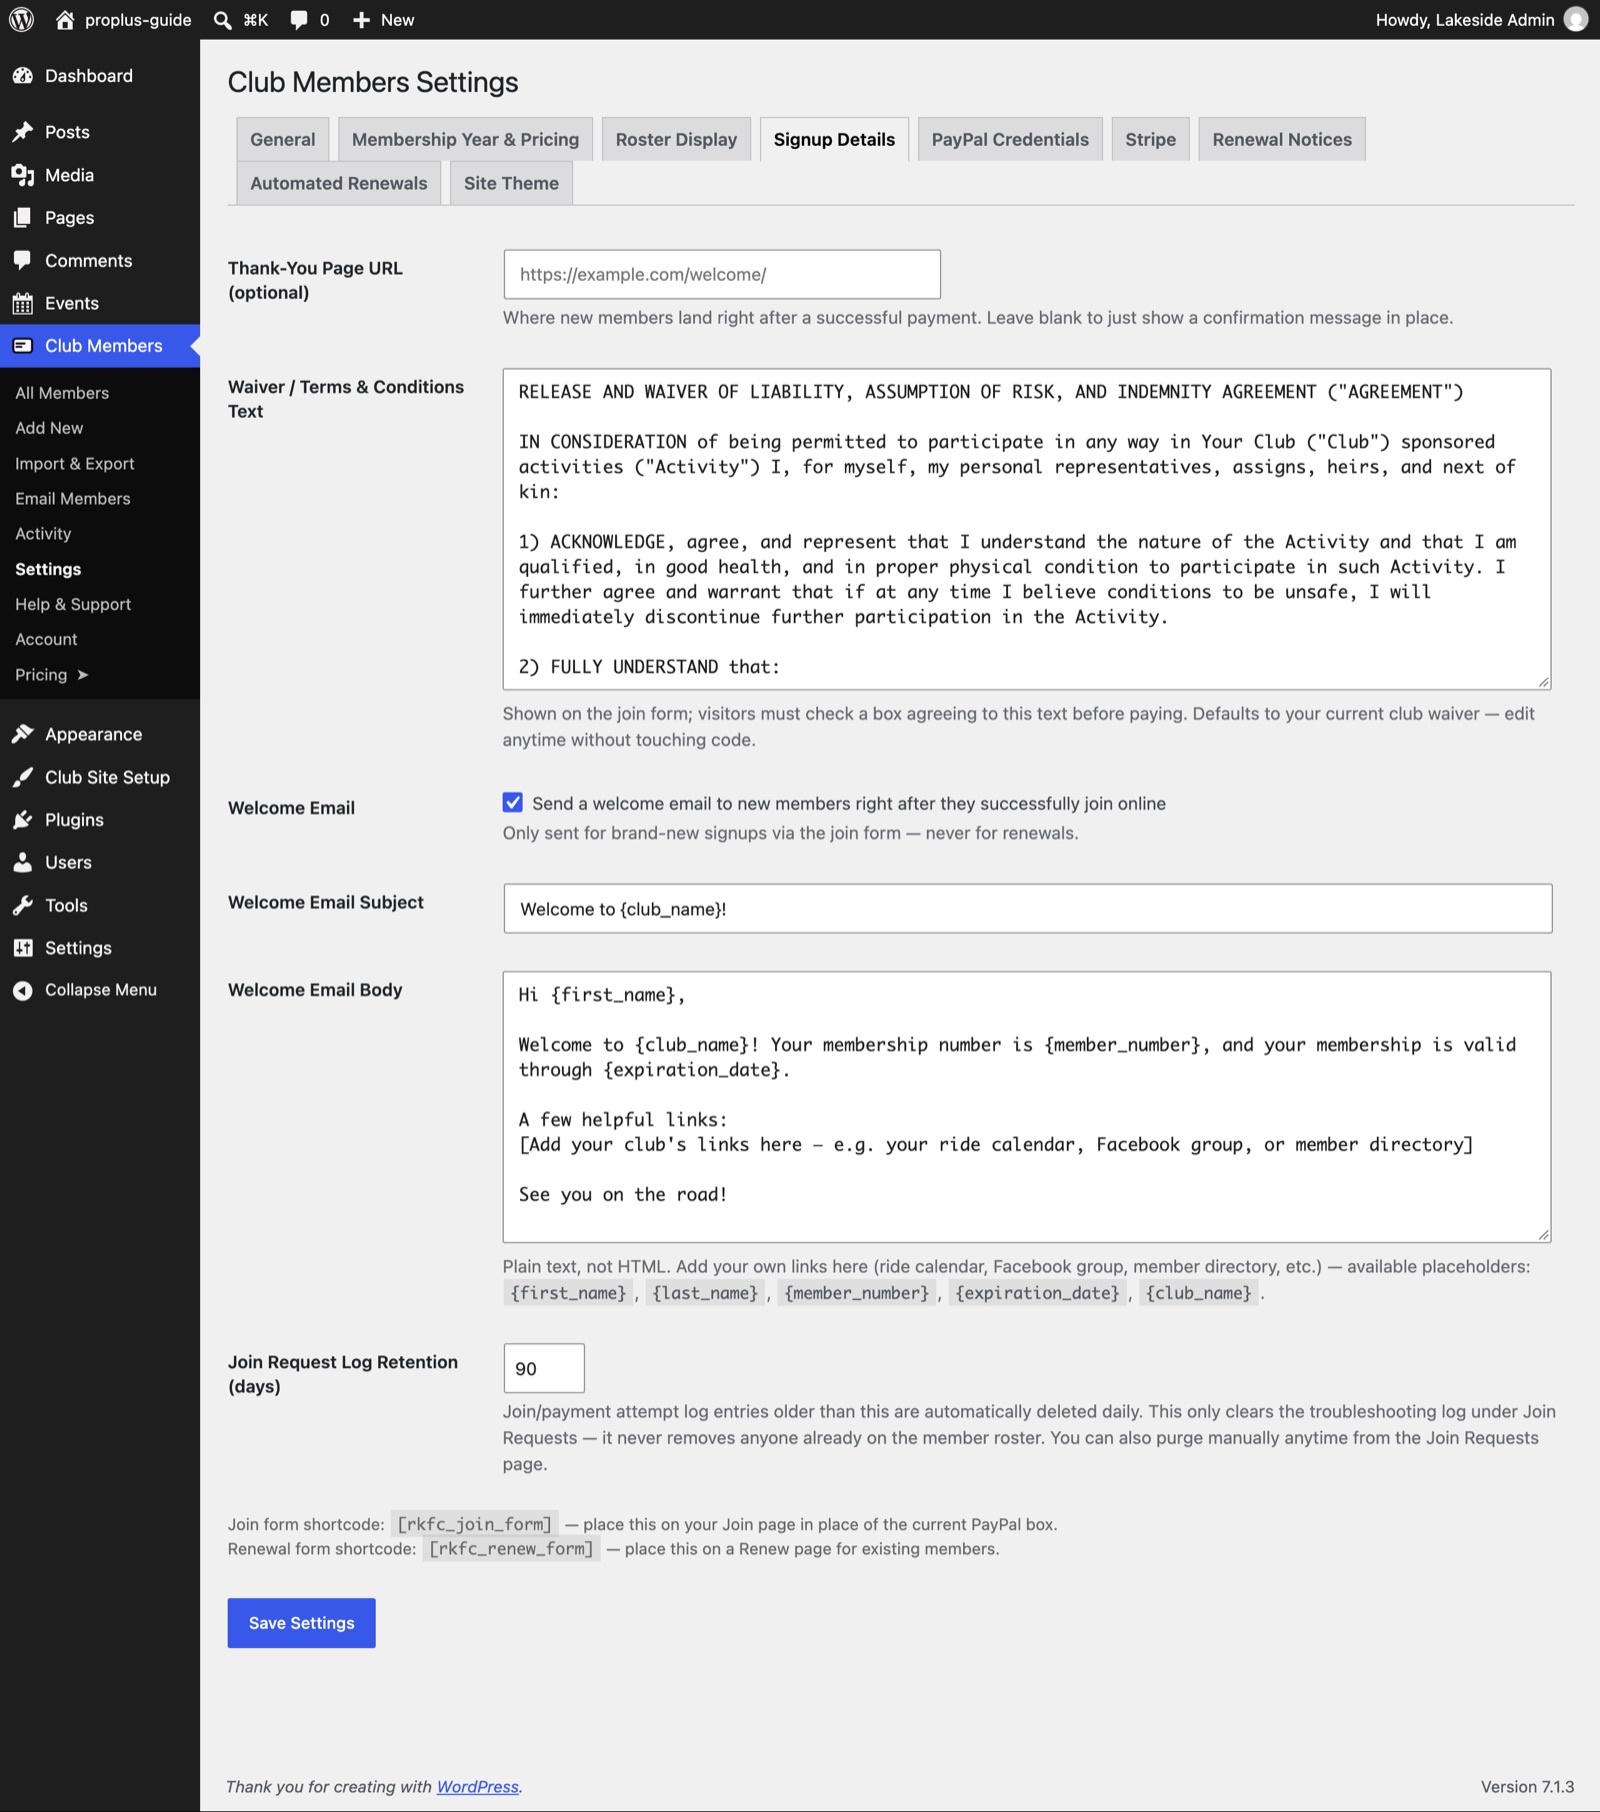
Signup Details
- Thank-You Page URL (optional): where new members land after they pay. Leave it blank to show the standard confirmation.
- Waiver / Terms & Conditions Text: replace the sample text with your own waiver. Members must tick a box to accept it.
- Welcome Email: the message sent when someone joins. Edit the subject and body to sound like your club.
- Join Request Log Retention: how long to keep the record of join attempts.
Renewal Notices
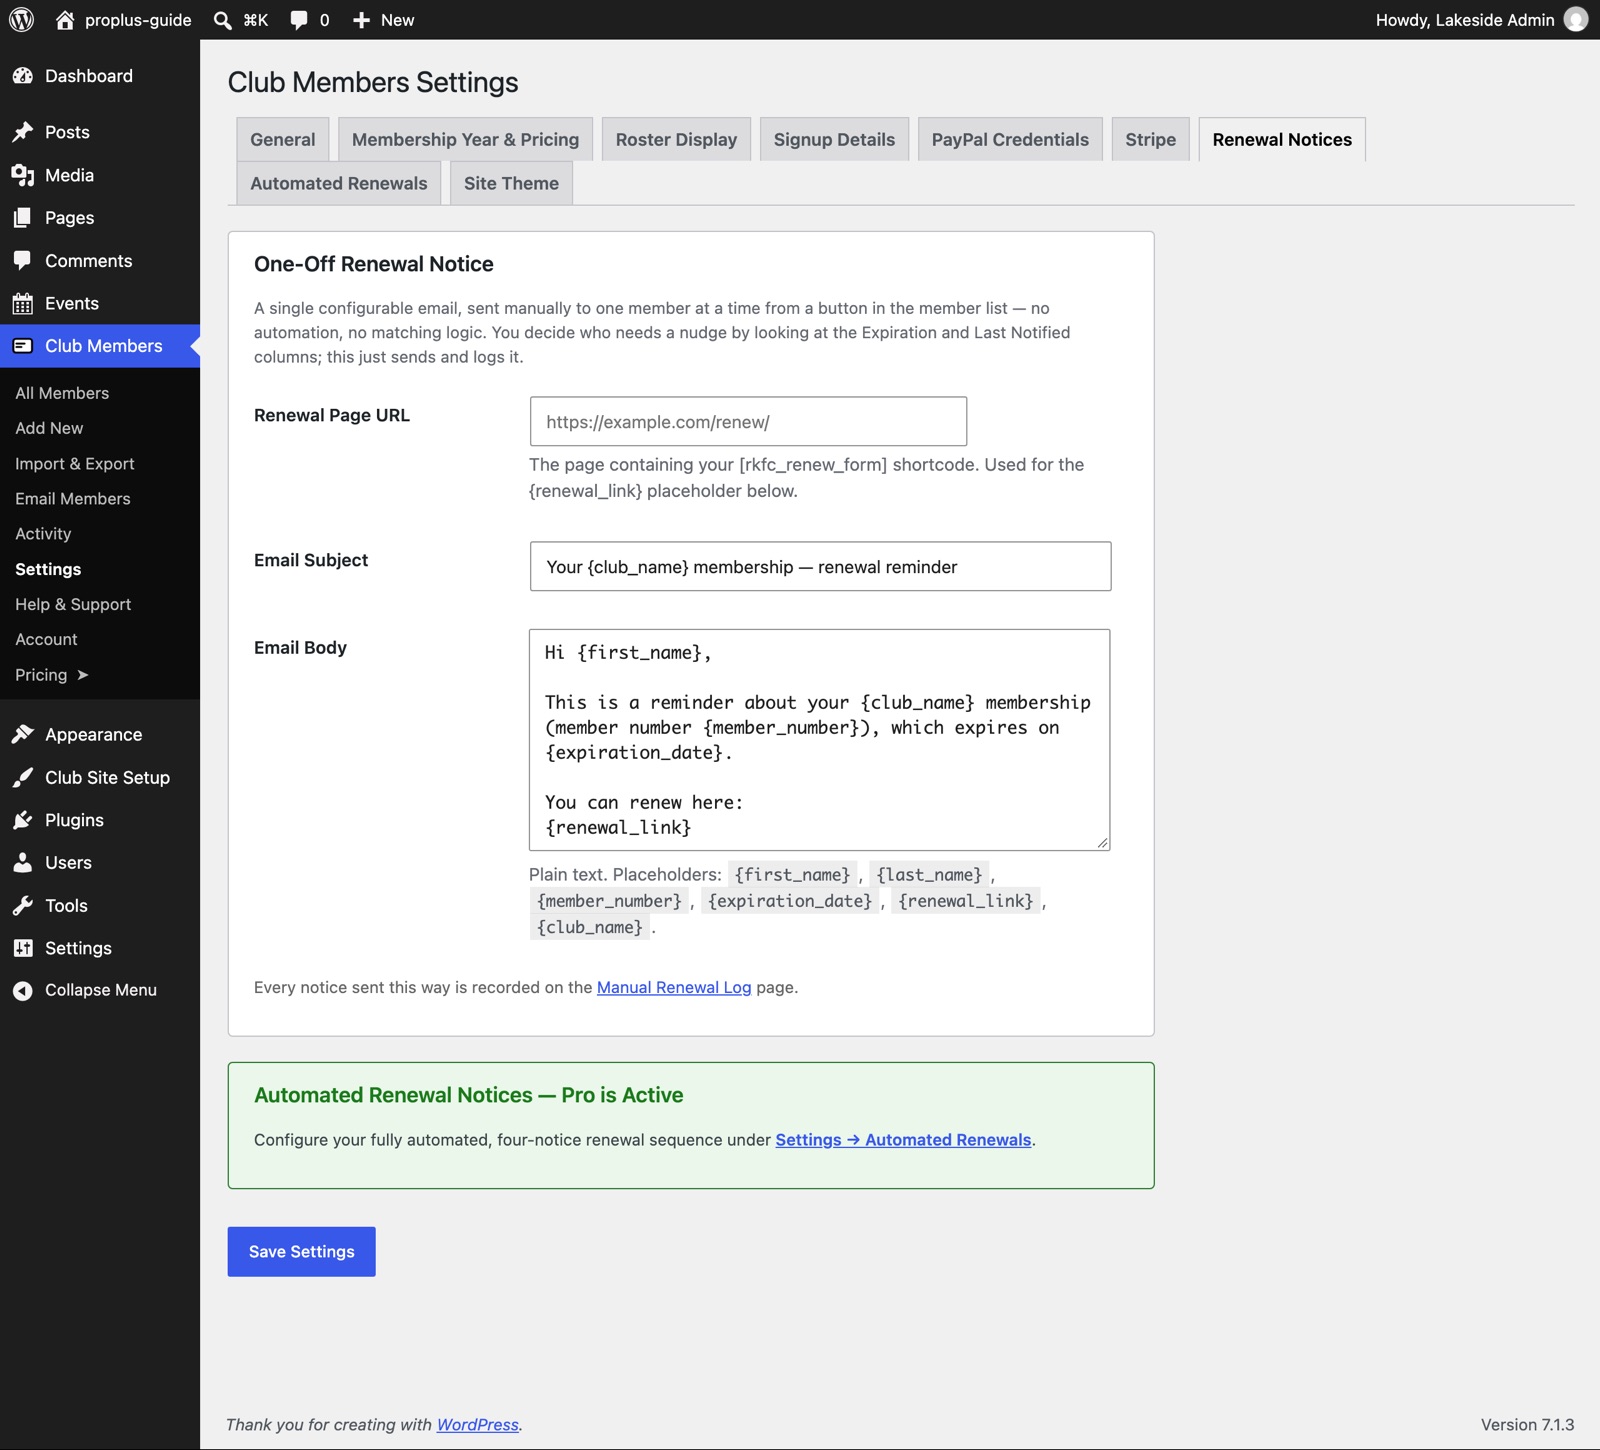
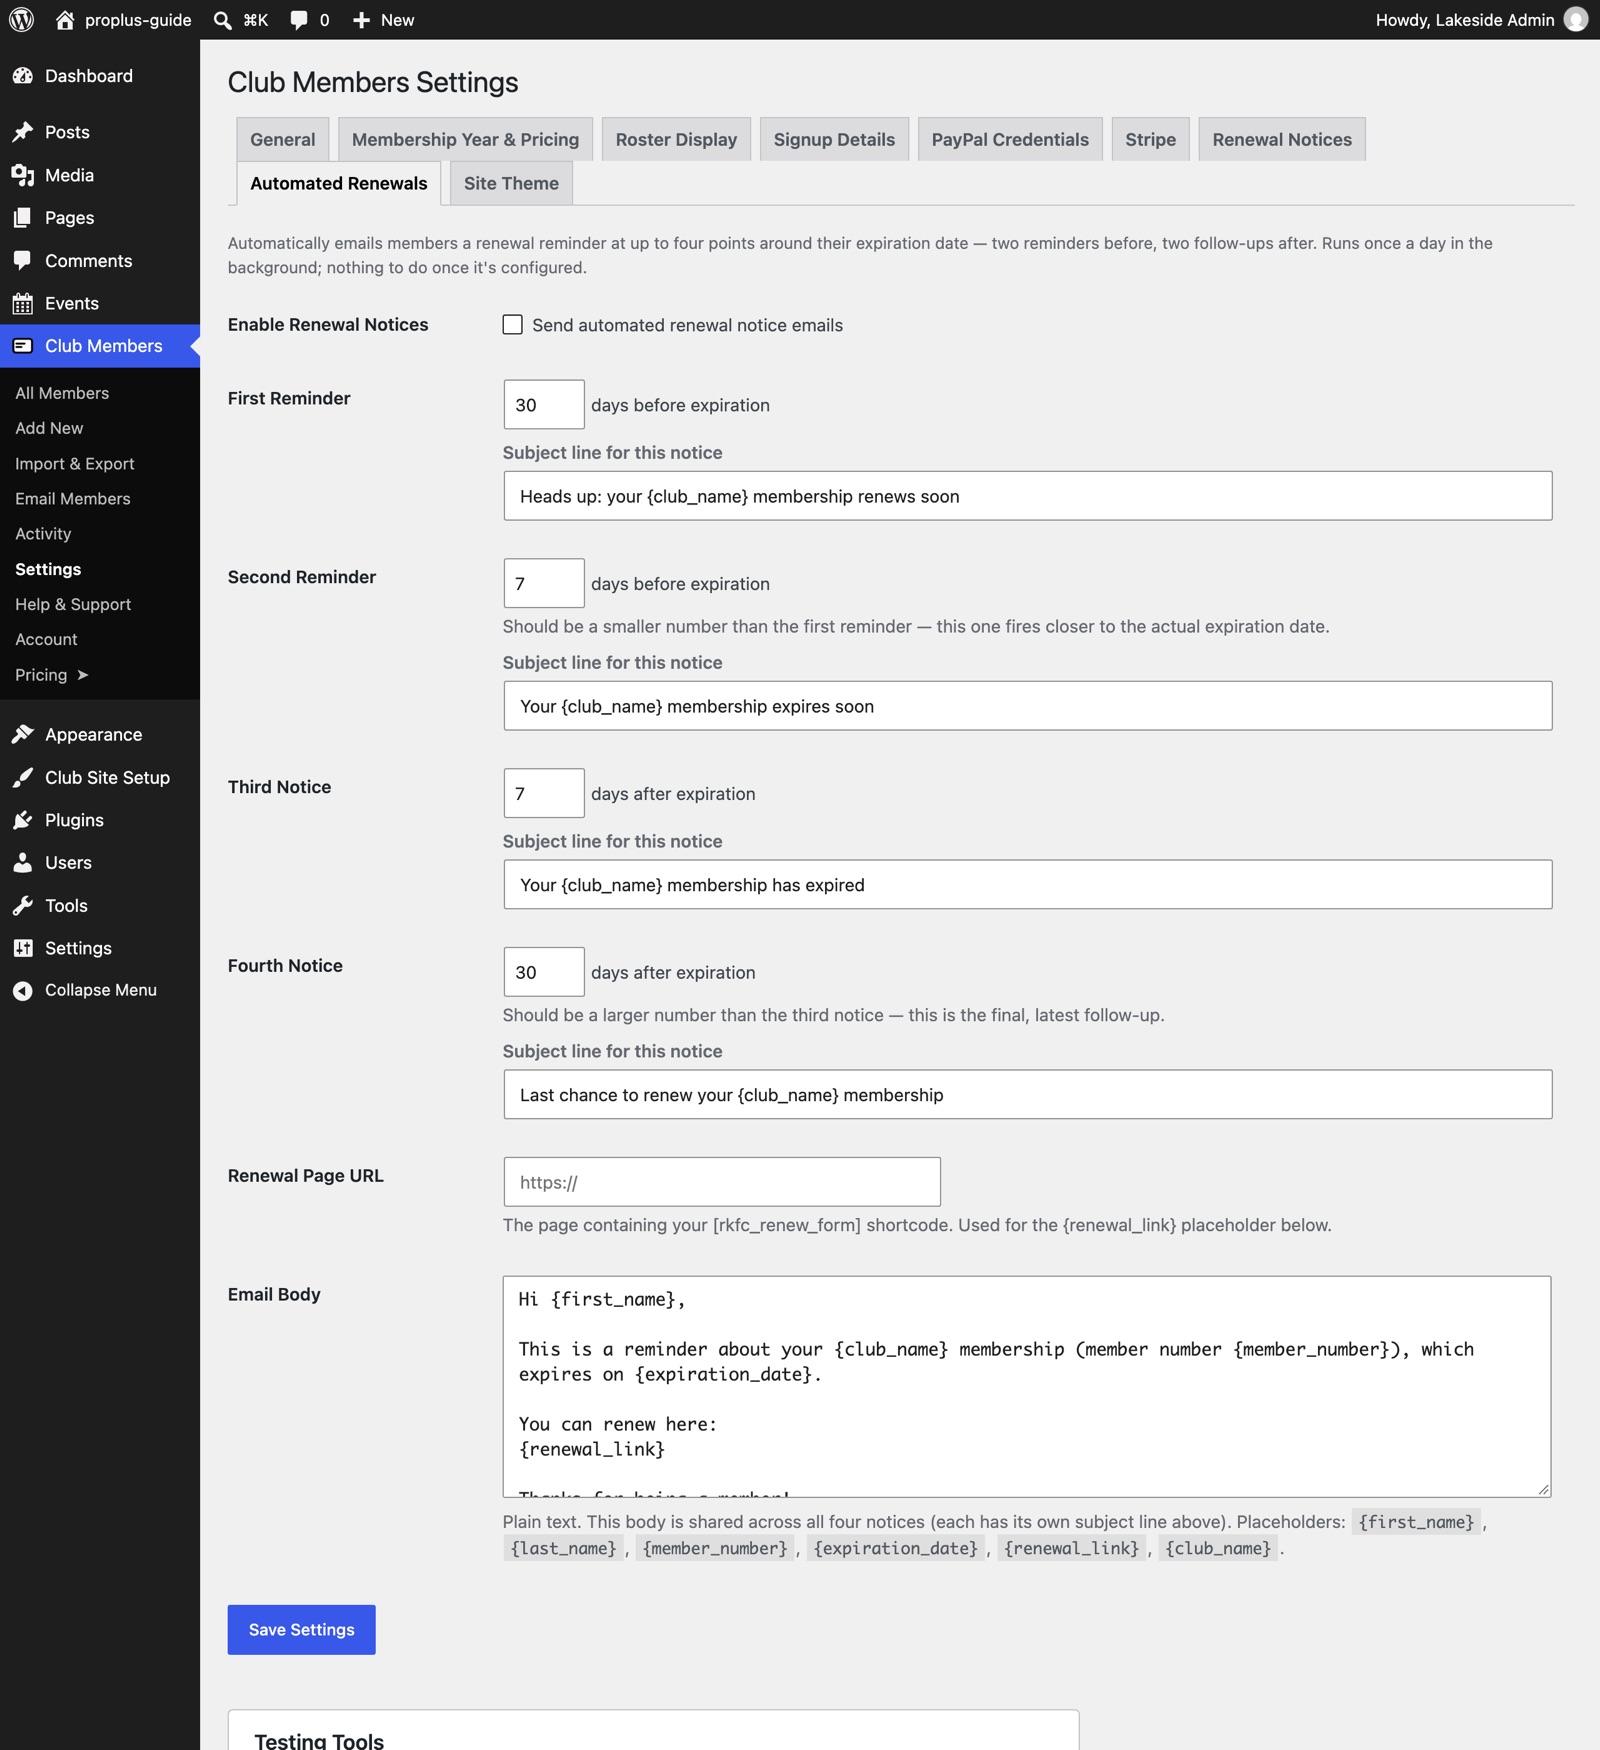
Set the Renewal Page URL to the page that will hold your renewal form (you will make it in the pages step, so come back to this after). The email subject and body are used when you send a renewal notice to a member. The Automated Renewals tab (a Pro feature) can send reminders for you before and after a membership expires.
Turn on online payments
Payments go straight from your member to your PayPal or Stripe account. Rosterkeeper never holds your money. Both start in a test mode where no real money moves, so you can try everything safely first. Set up one or both.
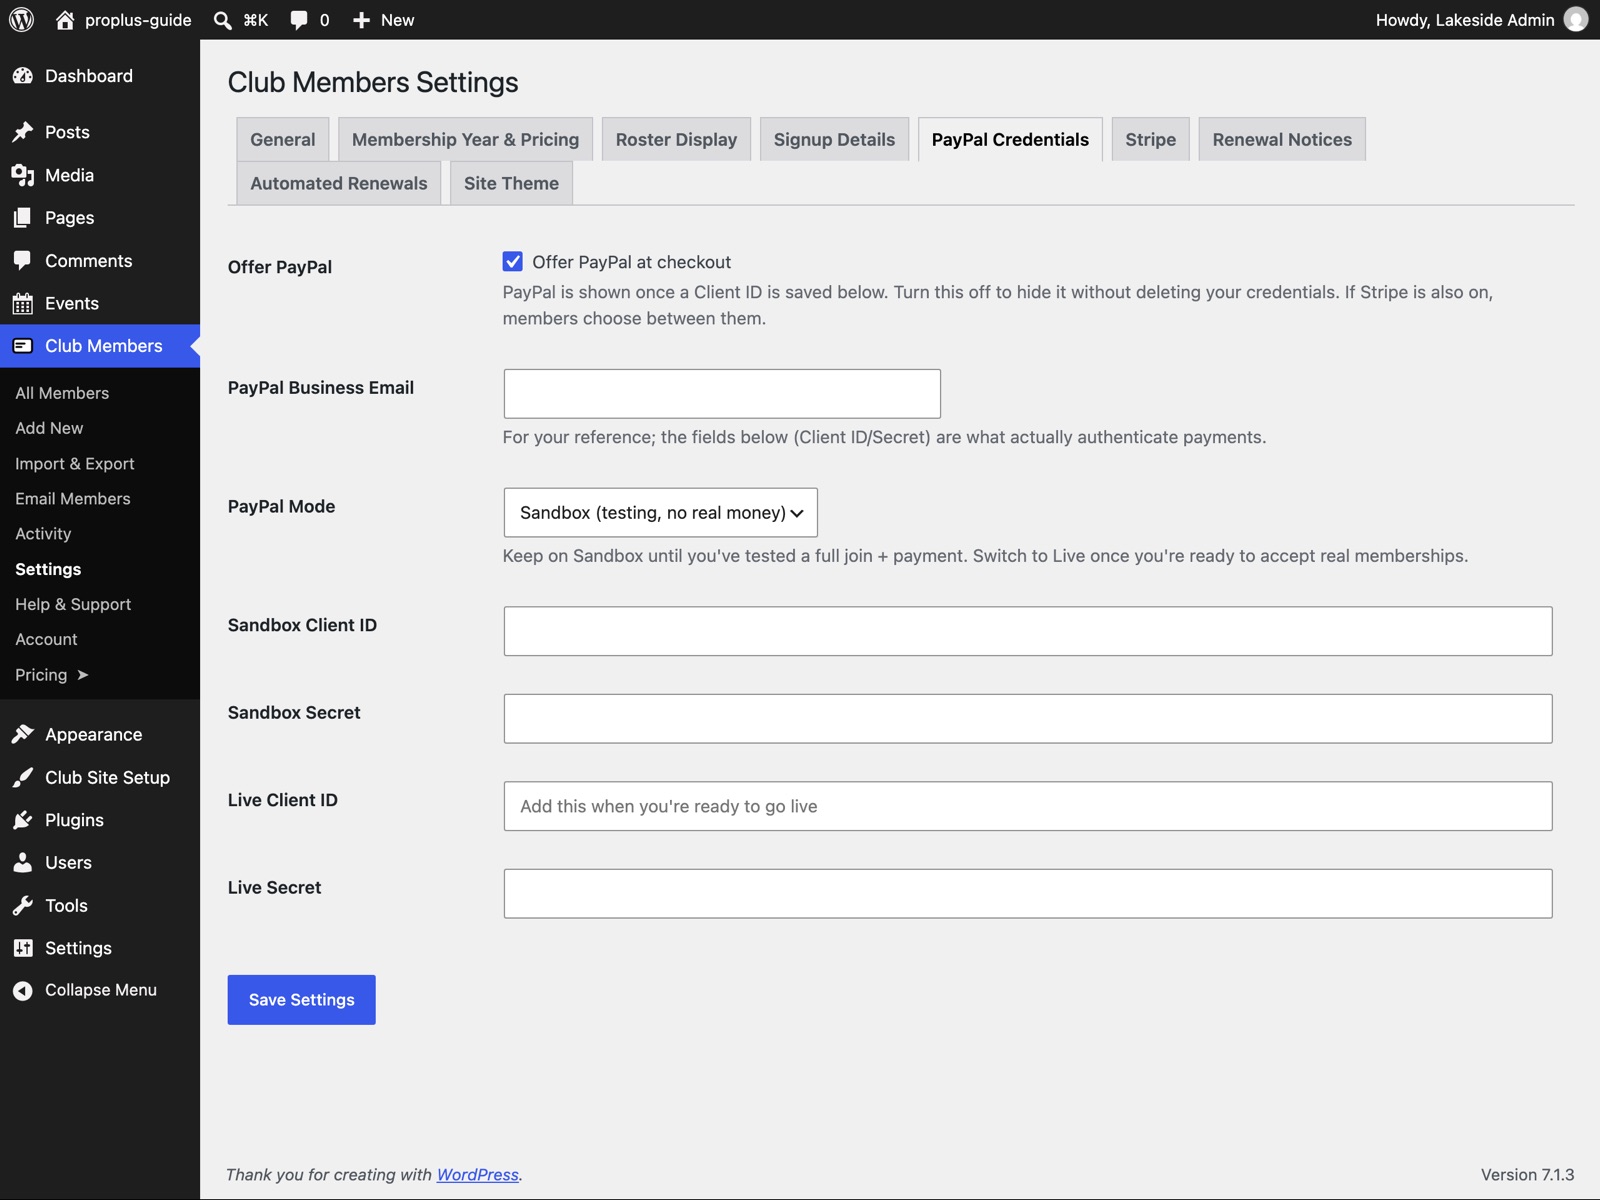
Option A: PayPal
- Go to Club Members → Settings → PayPal Credentials.
- In another browser tab, log in at developer.paypal.com and open Apps & Credentials.
- Create an app (any name, such as My Club Website) in Sandbox for testing. Copy its Client ID and Secret into the Sandbox Client ID and Sandbox Secret fields.
- Leave PayPal Mode on Sandbox and Offer PayPal at checkout ticked, then click Save Settings.
Option B: Stripe (card, Apple Pay and Google Pay)
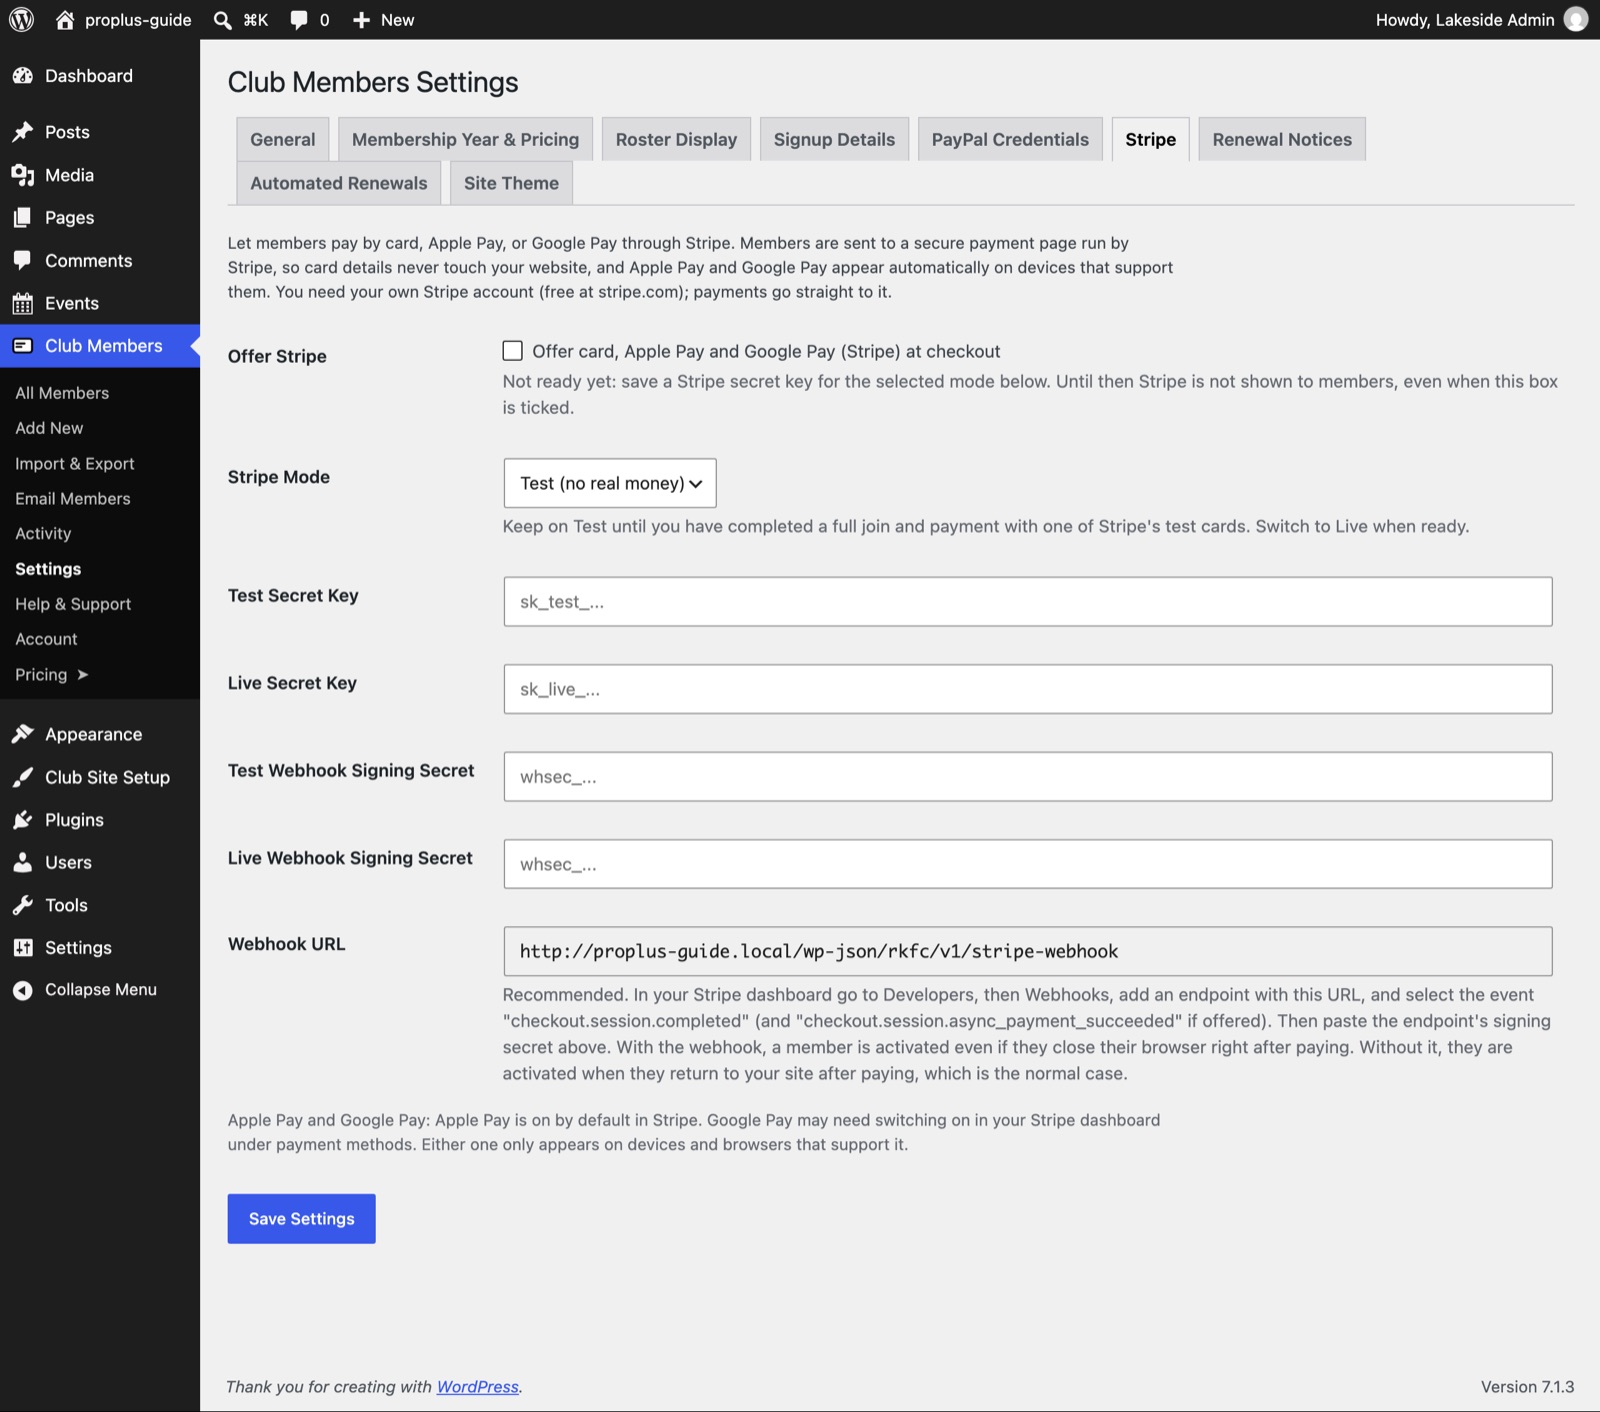
- Go to Club Members → Settings → Stripe.
- In another tab, log in at dashboard.stripe.com. Switch to Test mode, open Developers → API keys and copy the Secret key (it starts with
sk_test_). - Paste it into Test Secret Key, tick Offer card, Apple Pay and Google Pay (Stripe) at checkout, keep Stripe Mode on Test, and click Save Settings.
- Recommended: in Stripe, go to Developers → Webhooks and add an endpoint using the Webhook URL shown on this tab. Select the event
checkout.session.completed(andcheckout.session.async_payment_succeeded). Paste the endpoint’s signing secret (it starts withwhsec_) into Test Webhook Signing Secret and save.
Try it with a test payment
After you build the Join page in the next step, come back and try a test join. Use a real email address you can check, so you can see the welcome email.
- Stripe test card:
4242 4242 4242 4242, any future expiry date, any 3-digit CVC, any postcode. - PayPal: log in with a Sandbox personal account from the PayPal developer site (Testing Tools → Sandbox Accounts). Real PayPal accounts do not work in sandbox mode.
Then open Club Members → Activity. Your test shows up under Join Requests with its status, and the new member appears in All Members.
Add your pages and menu
The plugin gives you ready-made blocks of content, called shortcodes. You put each one on its own page. The table lists the pages for your plan.
| Page title | Put this on the page | What visitors get |
|---|---|---|
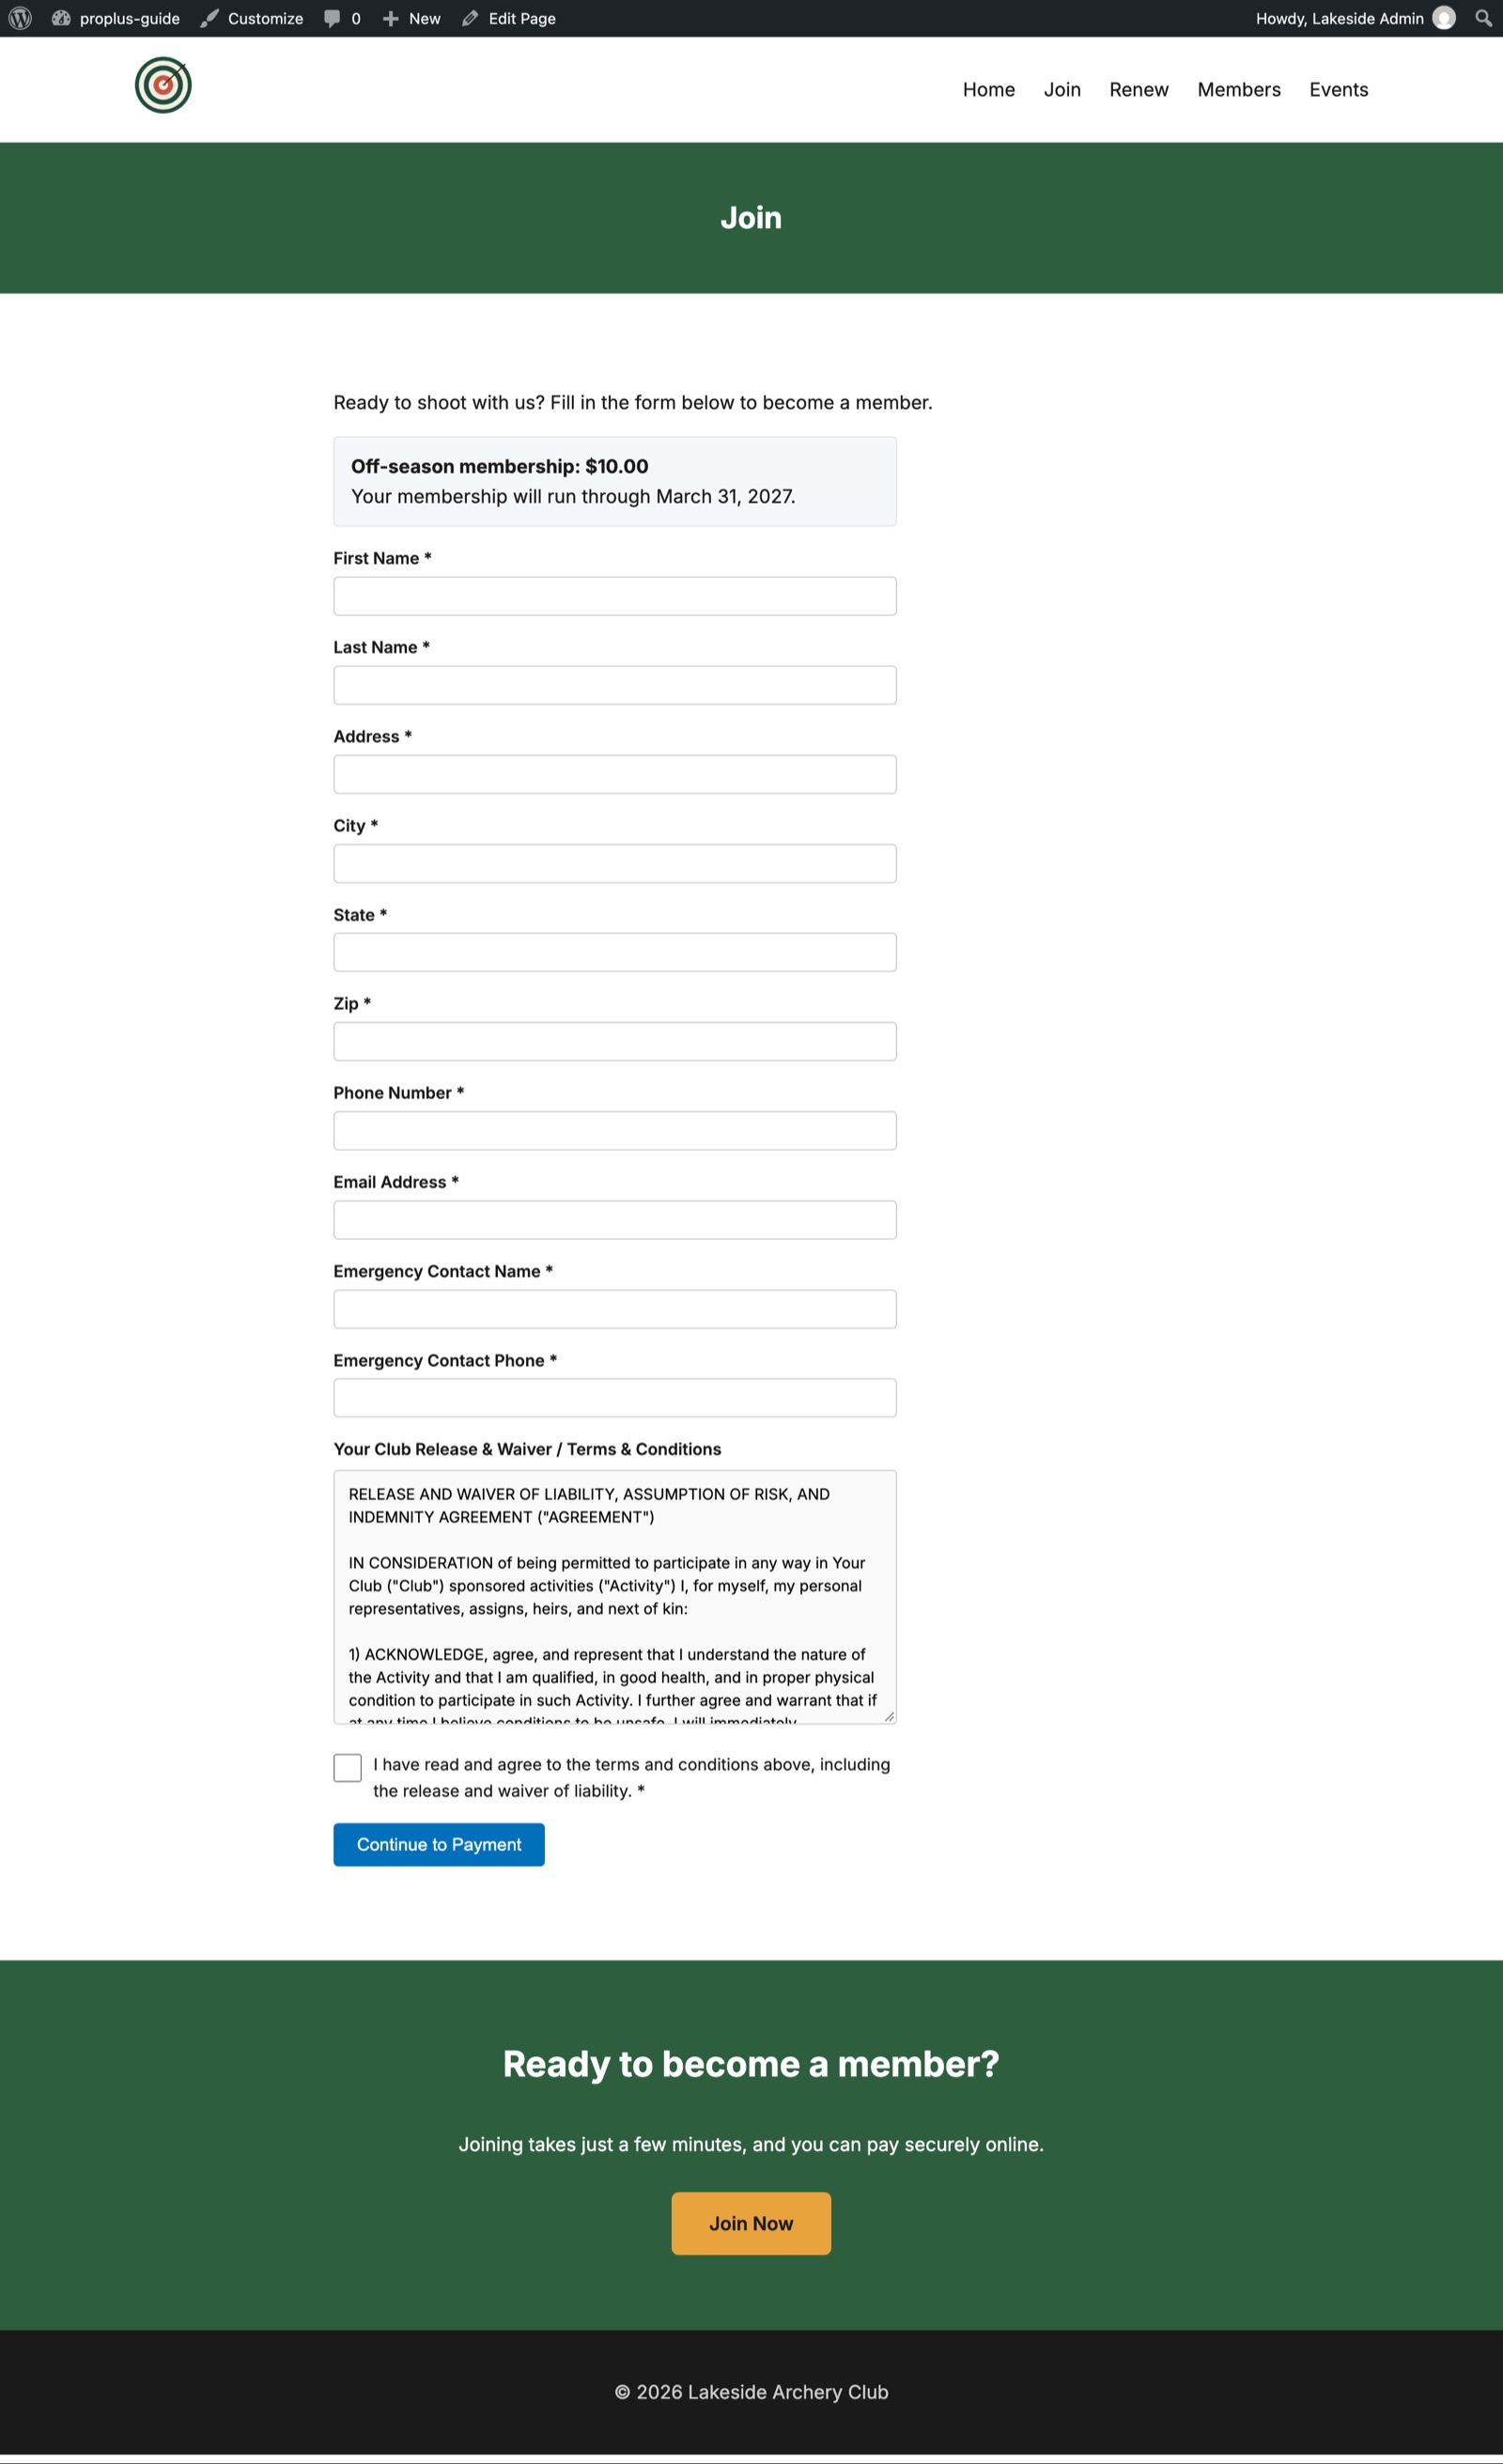
| Join | [rkfc_join_form] | The new-member form, with payment. |
| Renew | [rkfc_renew_form] | Existing members look themselves up and renew. |
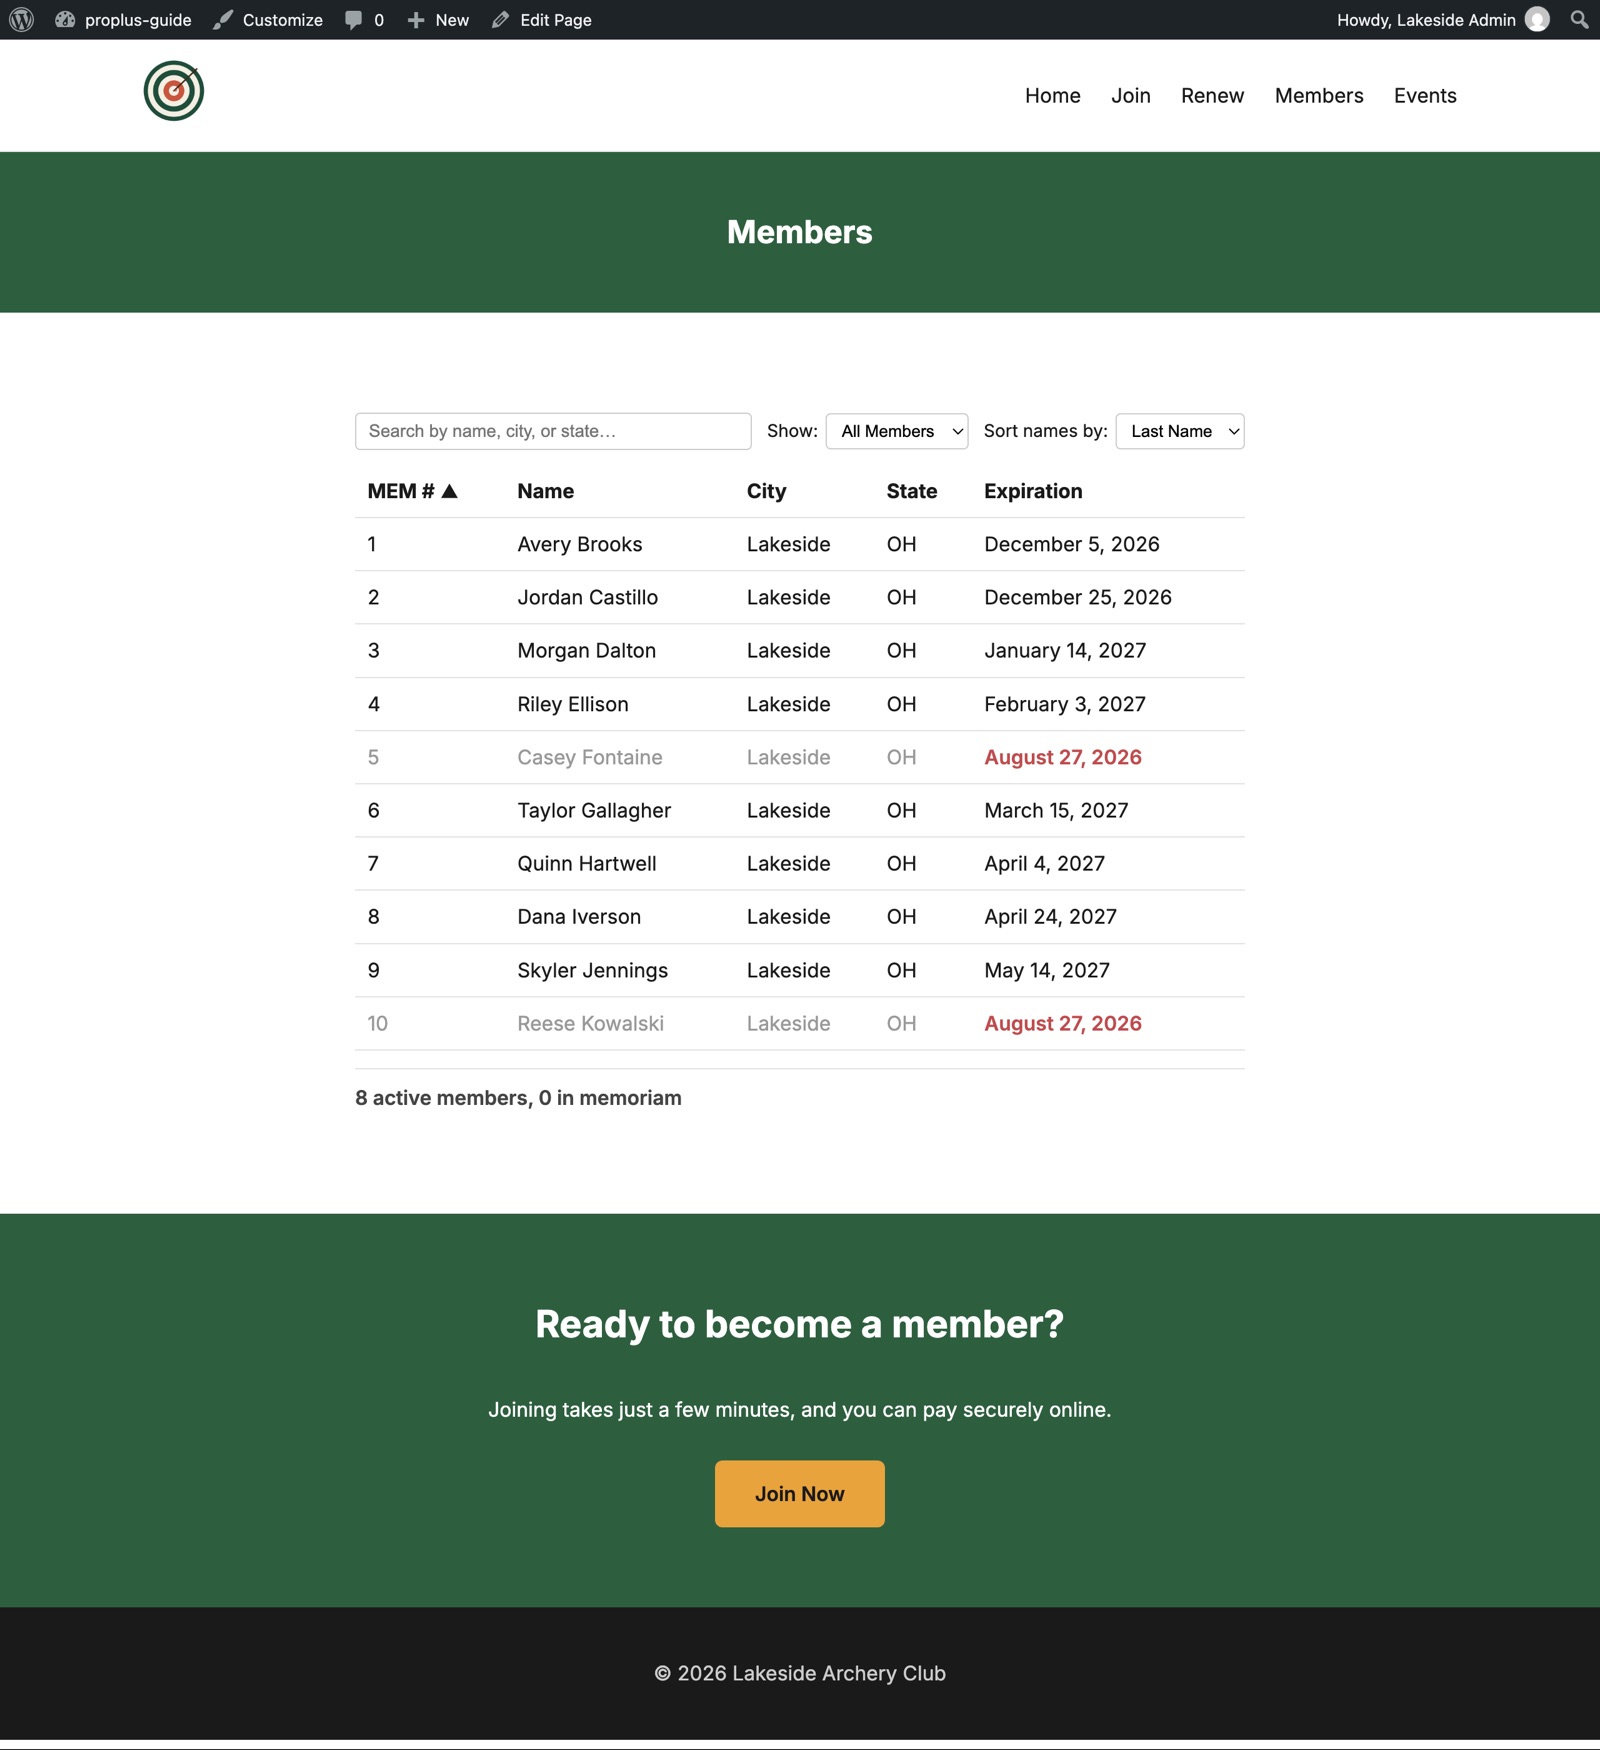
| Members | [rkfc_roster] | The public member list you set up in Roster Display. |
| Events | [rkfc_events] | Your upcoming events (Pro+). |
| Newsletters (one page per category) | [rkfc_documents category="newsletters"] | Your PDF newsletters, minutes or other files, by year (Pro+). Made for you in Add your documents. |
| My card | [rkfc_member_card] | Each member’s digital membership card (Pro and Pro+). Made for you in Give members a digital card. |
| Activity | [rkfc_activity] | Starting, joining and running club activities (Pro and Pro+). Made for you in Give members a digital card. |
The quick way: one click per page
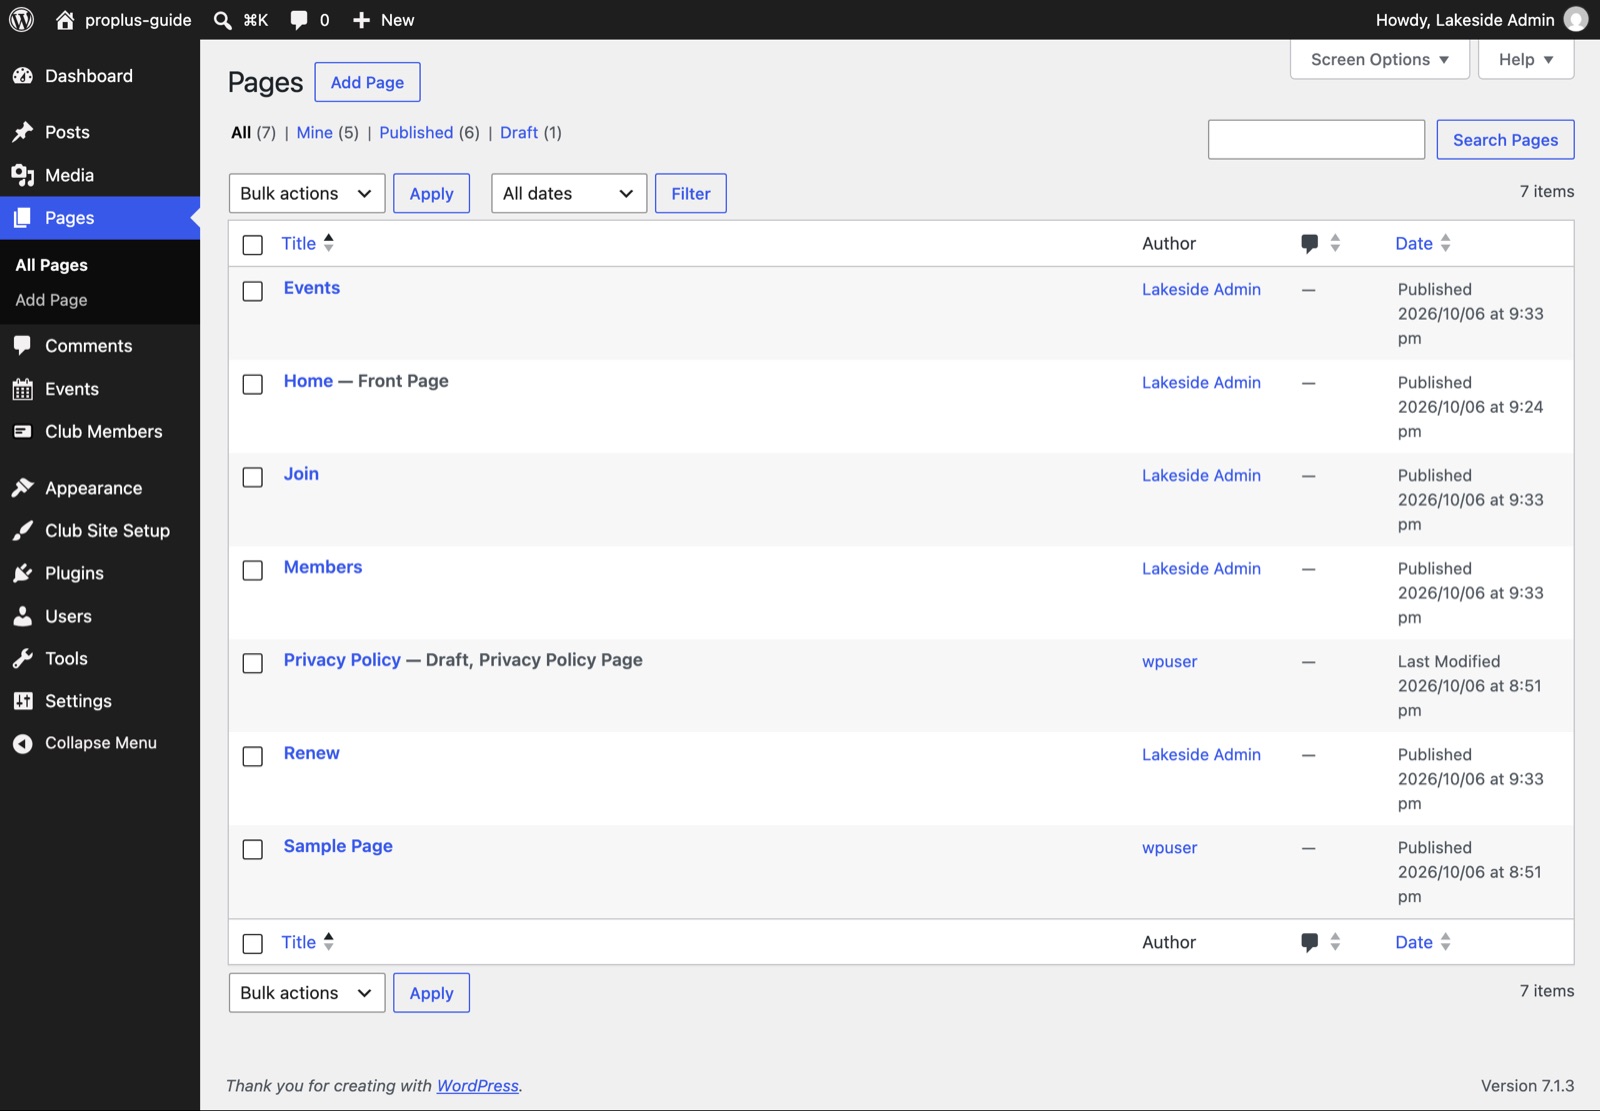
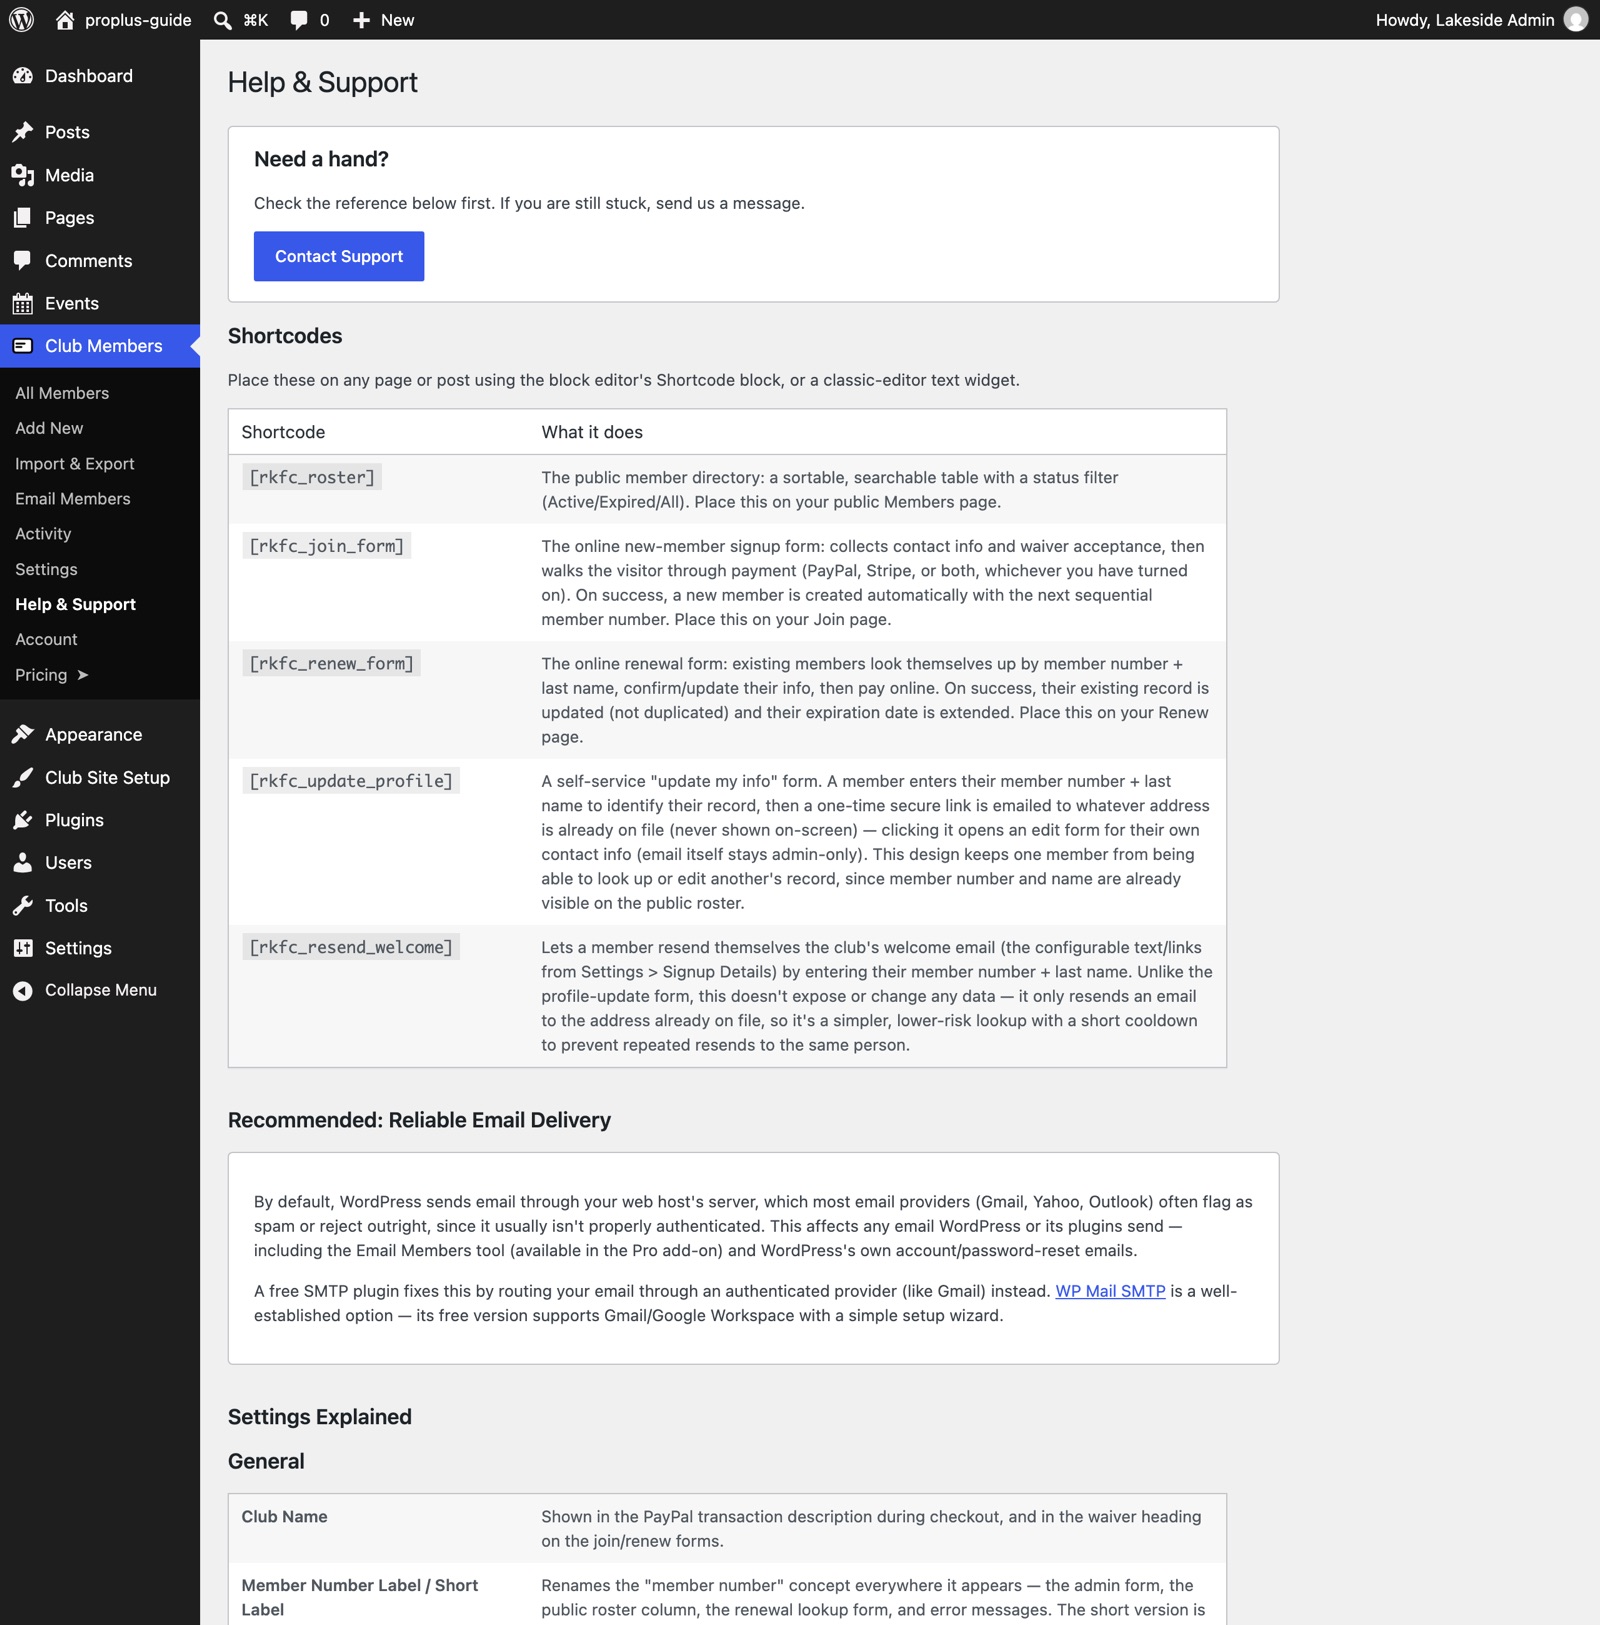
The plugin can build these pages for you. Go to Club Members → Help & Support and scroll down to the Shortcodes table. Every row has a Create page button.
- Click Create page next to the shortcode you want, for example
[rkfc_join_form]. - The plugin makes a published page with the right title and the shortcode already on it, then brings you back to Help & Support. A green message says Page “Join” created and published and gives you View page and Edit page links.
- Repeat for the other rows. Once a page exists, its row shows View page | Edit instead of the button, so you can never make a duplicate.
You get buttons for Join, Renew, Members, Update my info and Resend welcome email, plus My card and Activity, plus Events. The Join page is named Join, so the big Join Now button on your home page finds it at /join/. Pages for your documents are made from the Documents → Categories screen instead (see Add your documents).
Or create each page by hand
- Click Pages → Add Page.
- Type the page title from the table. Name the first one exactly Join. The big Join Now button on your home page points to
/join/. - Click the + button, search for Shortcode, add that block, and paste the shortcode into it. You can add a sentence of your own above it.
- Click Publish. Repeat for the other pages in the table. (My card and Activity are made for you later.)
Build your menu
Until you make one, your site header only shows Home.
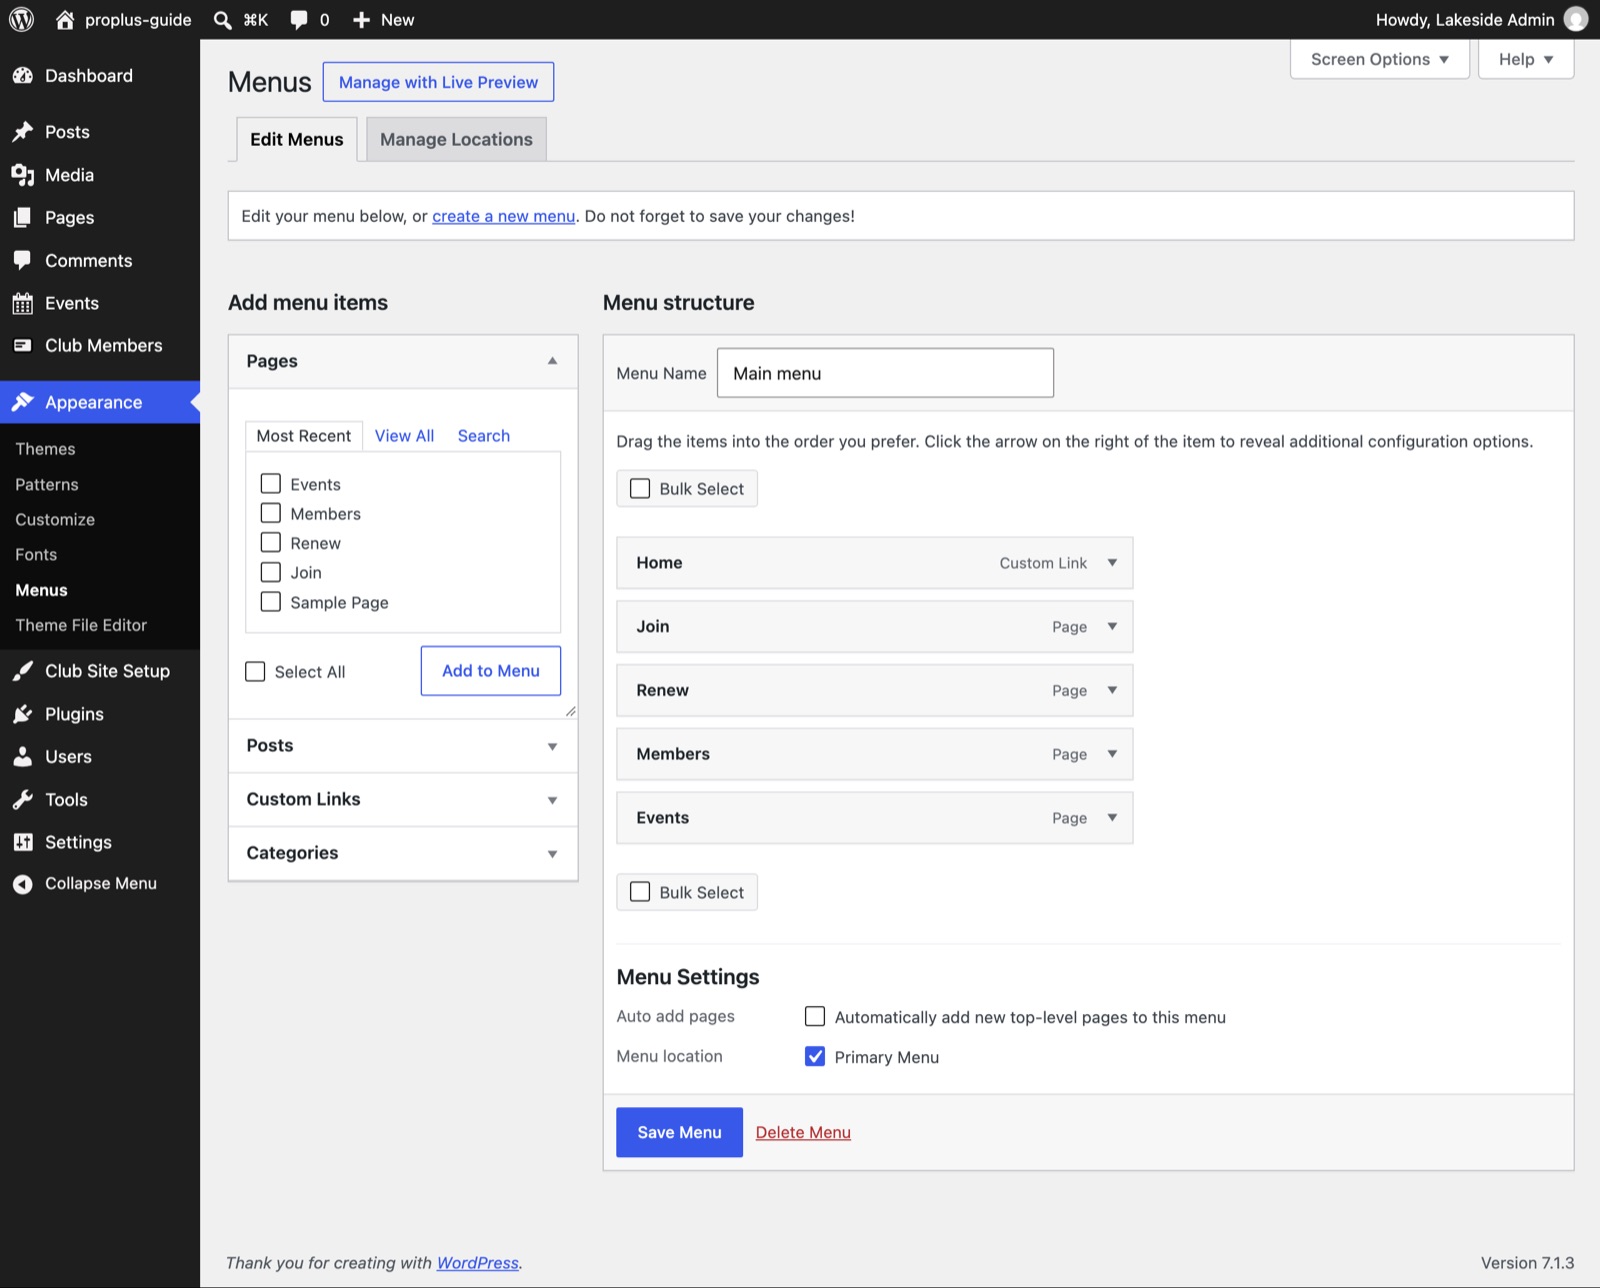
- Click Appearance → Menus.
- Type a menu name such as Main menu and click Create Menu.
- On the left, tick your pages (and Home if you want it) and click Add to Menu. Drag them into the order you want.
- Under Menu Settings, tick Primary Menu, then click Save Menu.
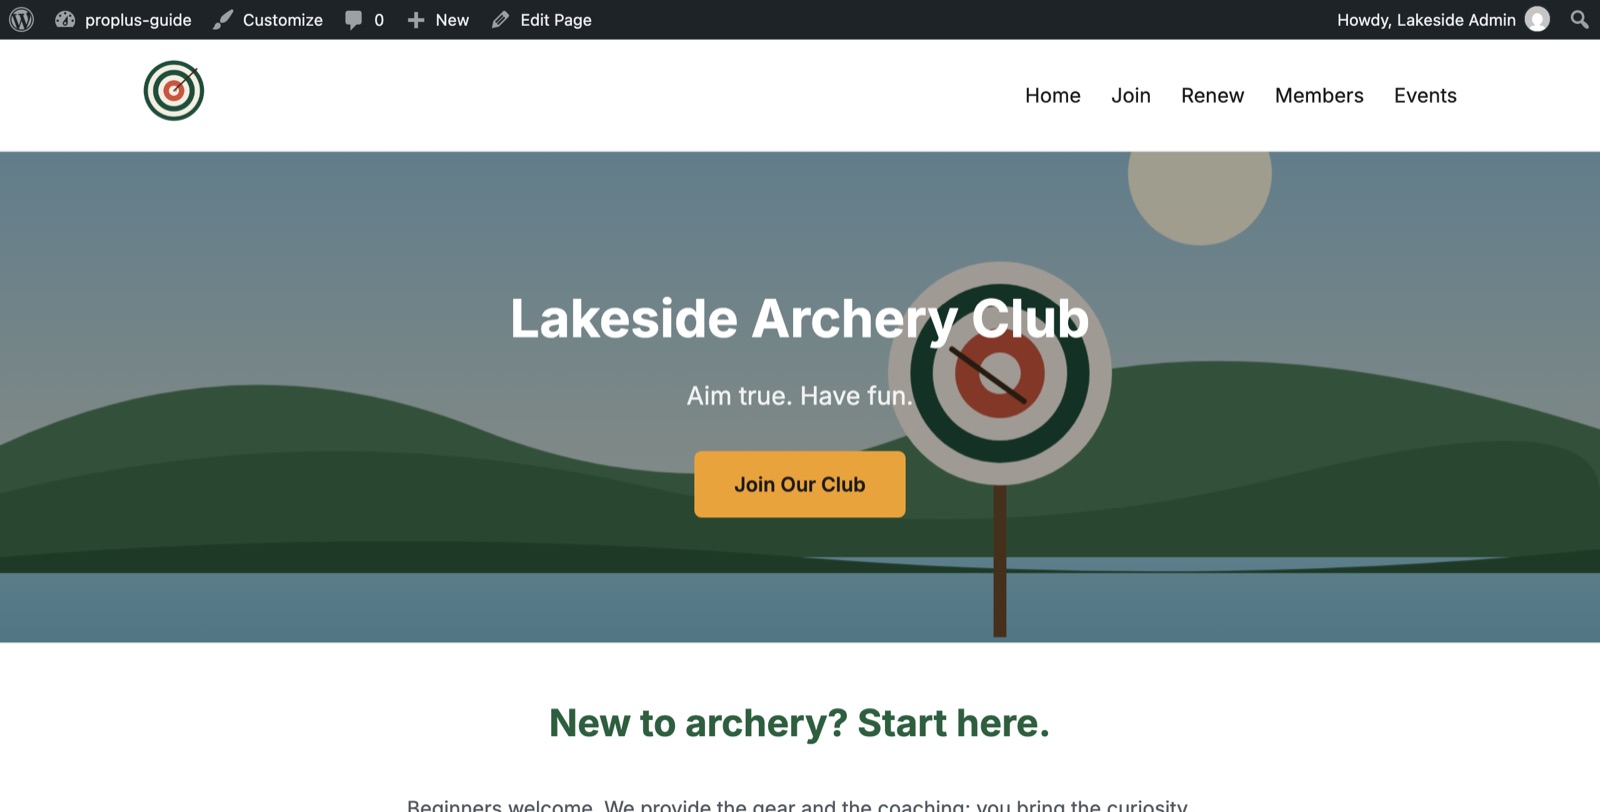
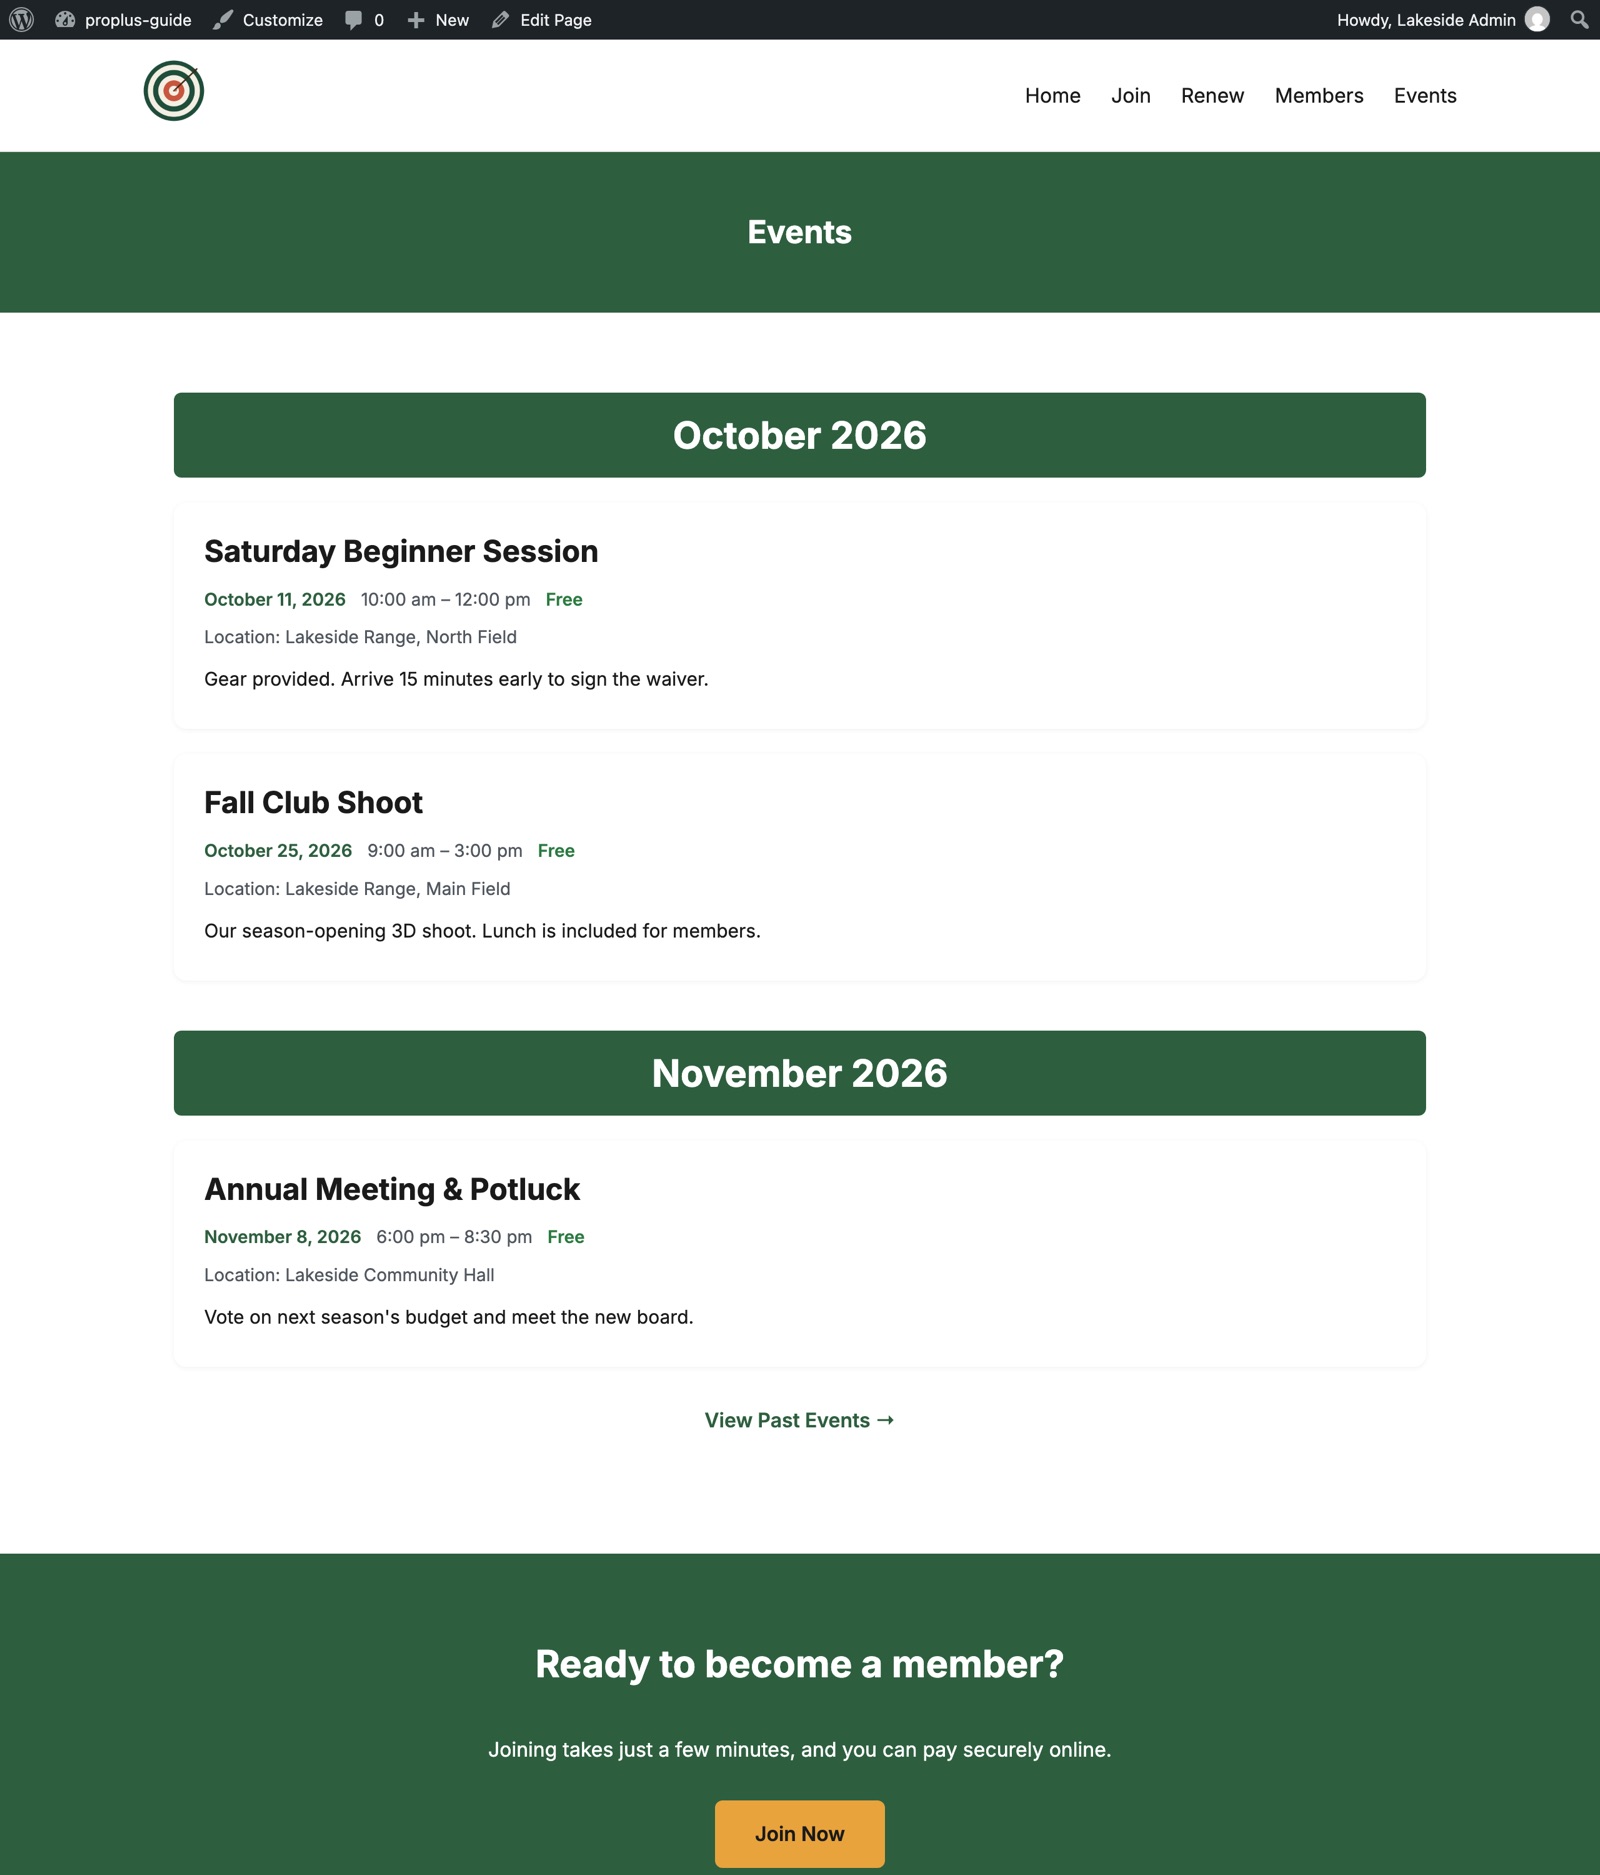
See what your visitors see
Add your events
Events is a Pro+ feature and has its own menu.
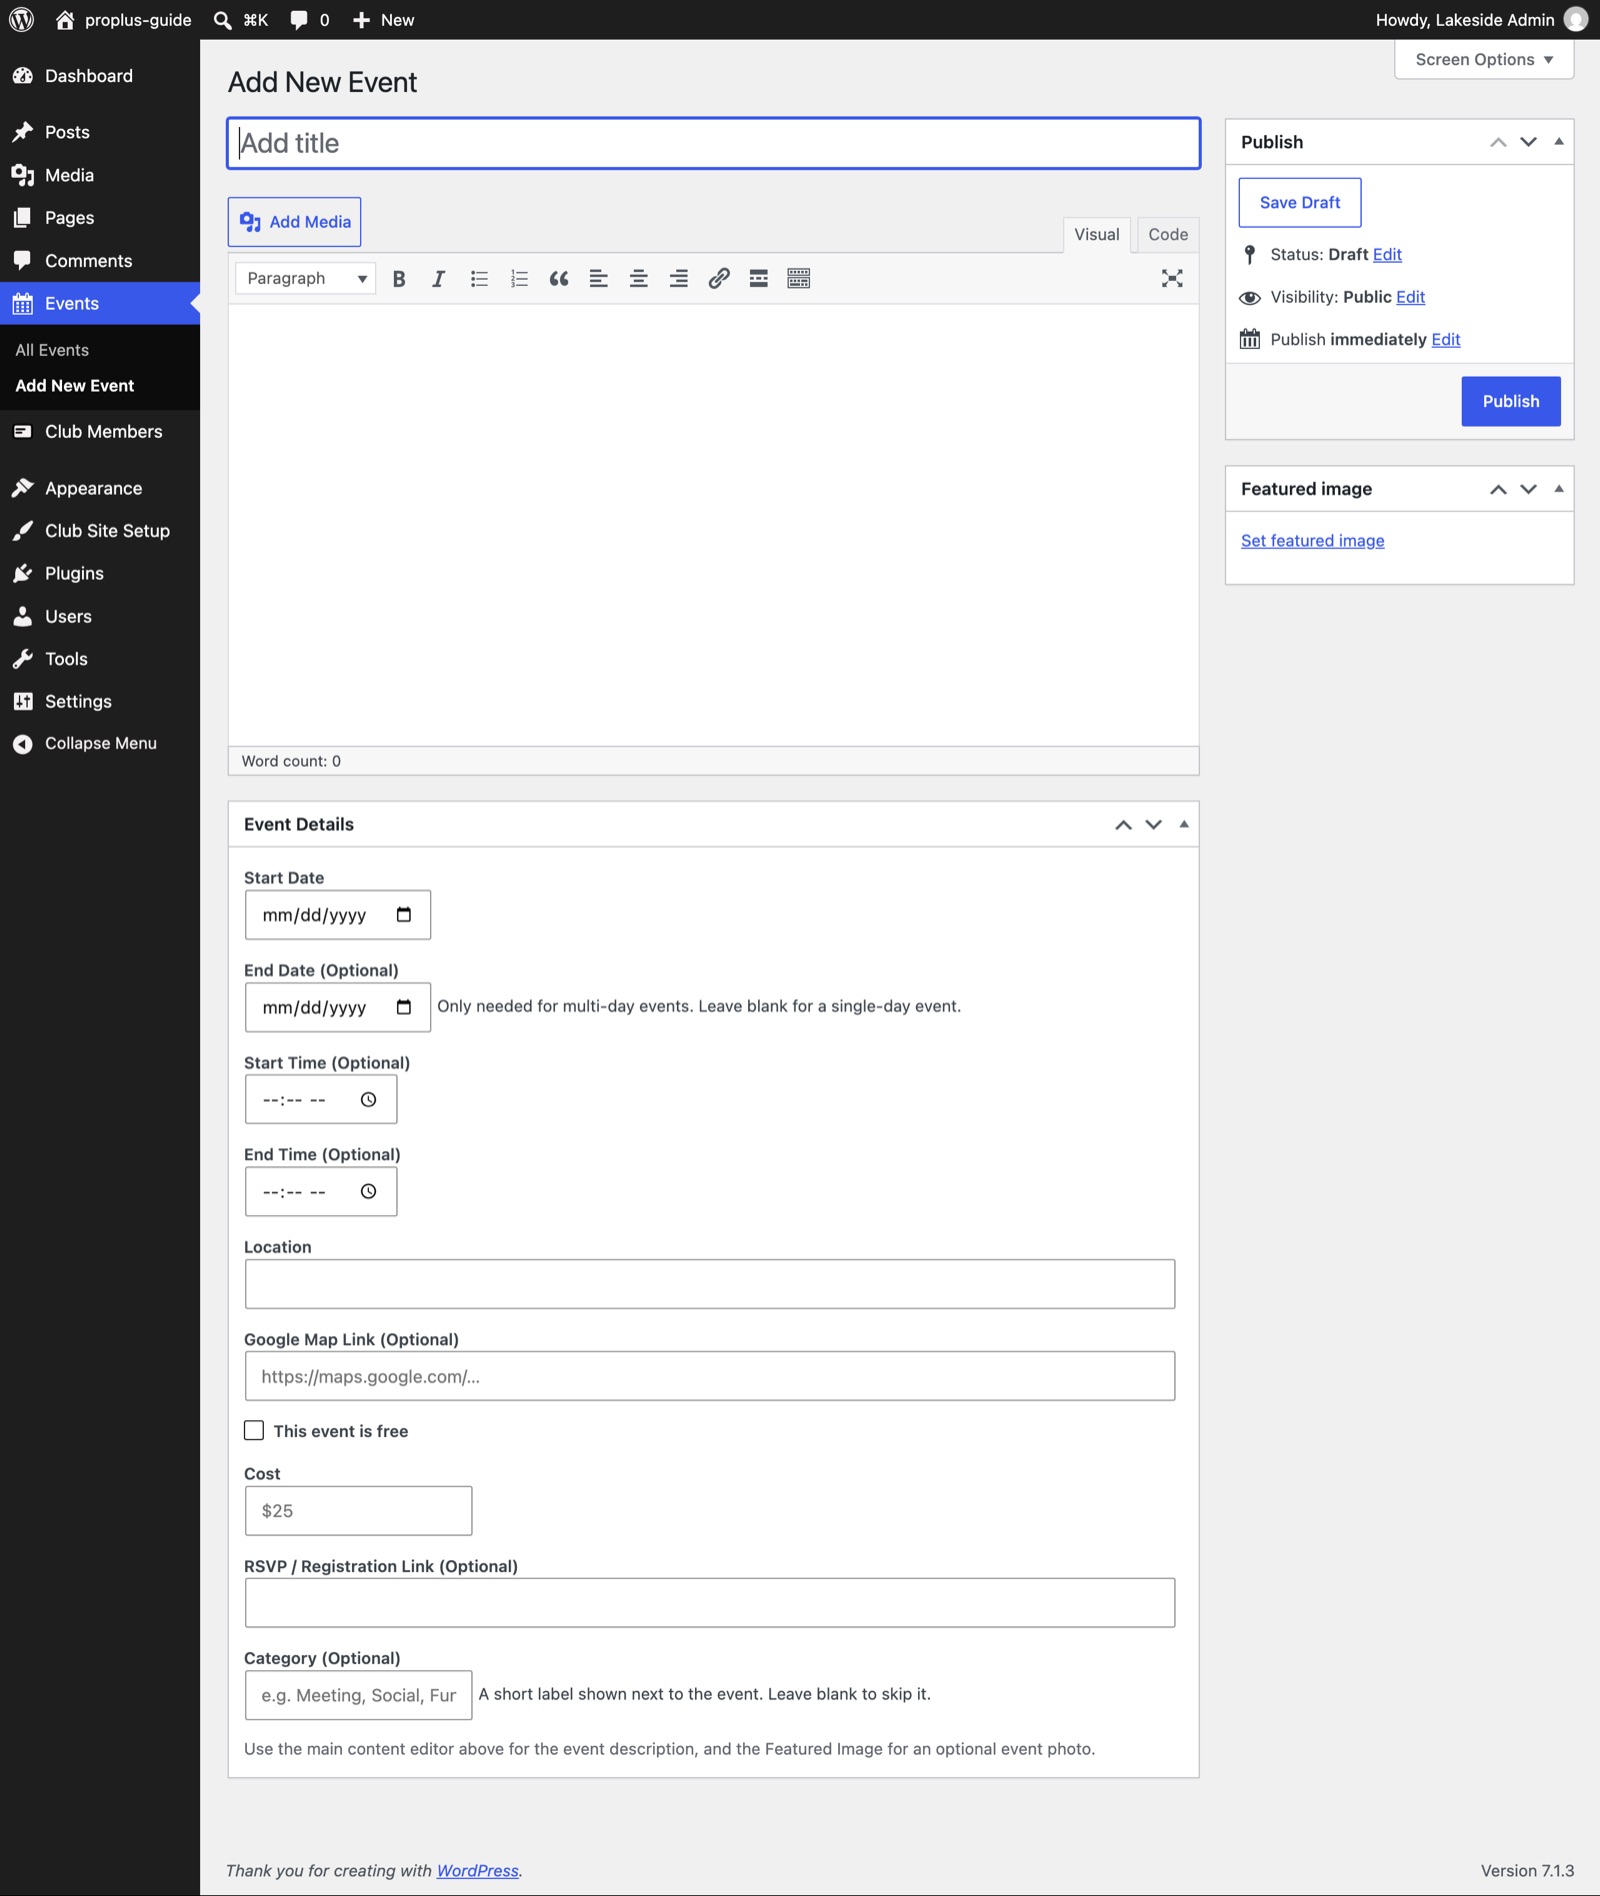
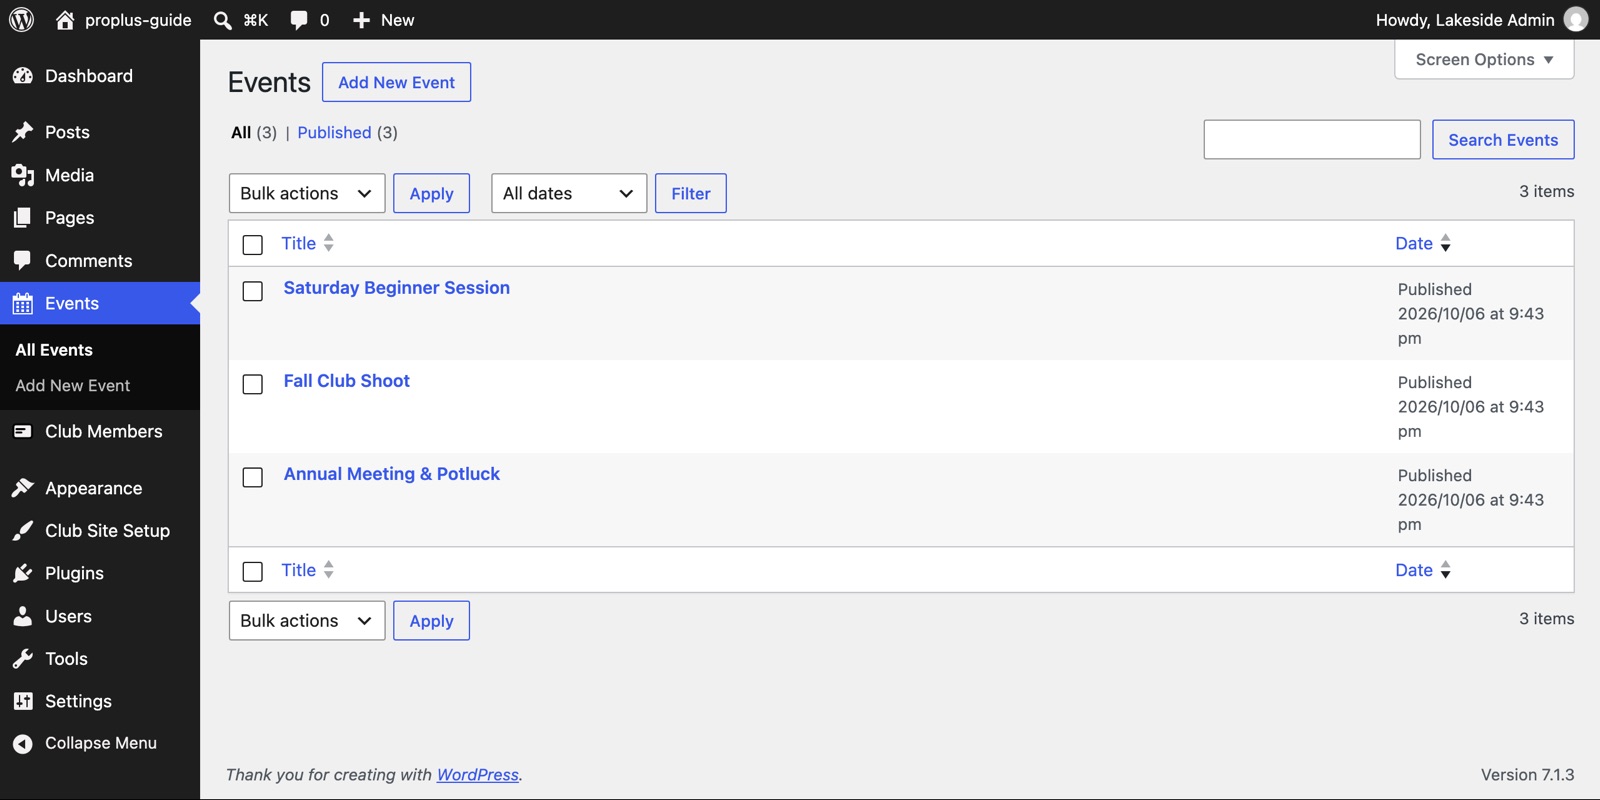
- Click Events → Add New Event.
- Give it a title, and describe it in the main box.
- In the event details, set the Start Date. Optionally add an end date, start and end times, a Location, a Google Map Link, tick This event is free or enter a Cost, add an RSVP / Registration Link, and pick a Category.
- Click Publish.
Repeating events
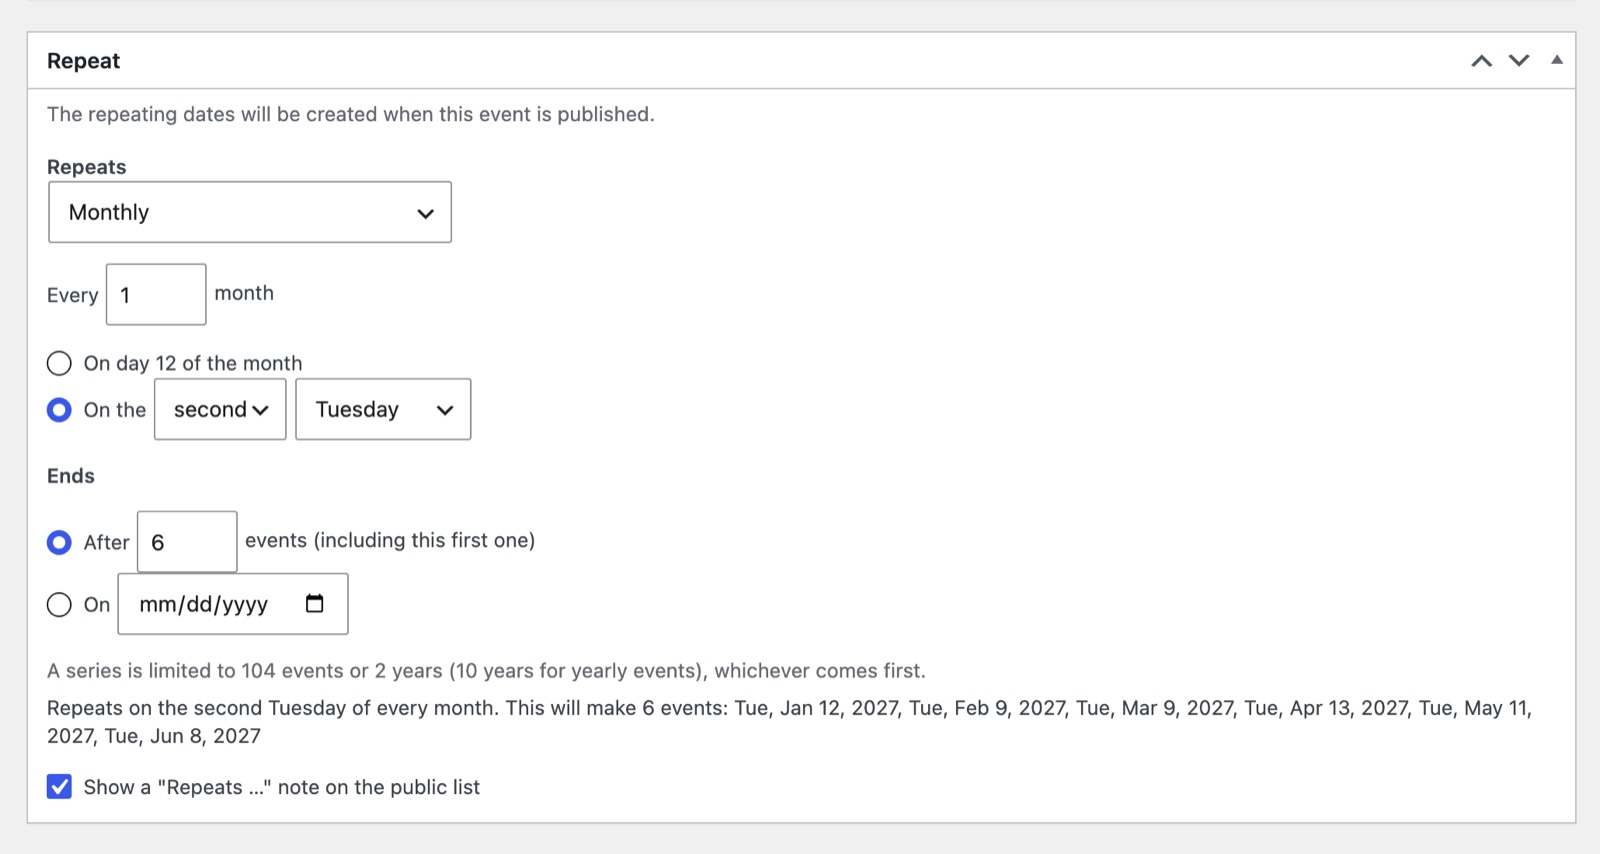
For a meeting or practice that happens on a schedule, set it up once and let it repeat. Scroll down to the Repeat box under the event details.
- Under Repeats, choose Daily, Every weekday, Weekly (tick the days), Monthly or Yearly. Use Every to skip periods, such as every 2 weeks.
- For monthly events, pick the same date each month, or a pattern such as the first Tuesday or the last Friday.
- Under Ends, choose a number of events or an end date. Every series needs an ending.
- Check the preview, which lists the exact dates that will be created, then click Publish.
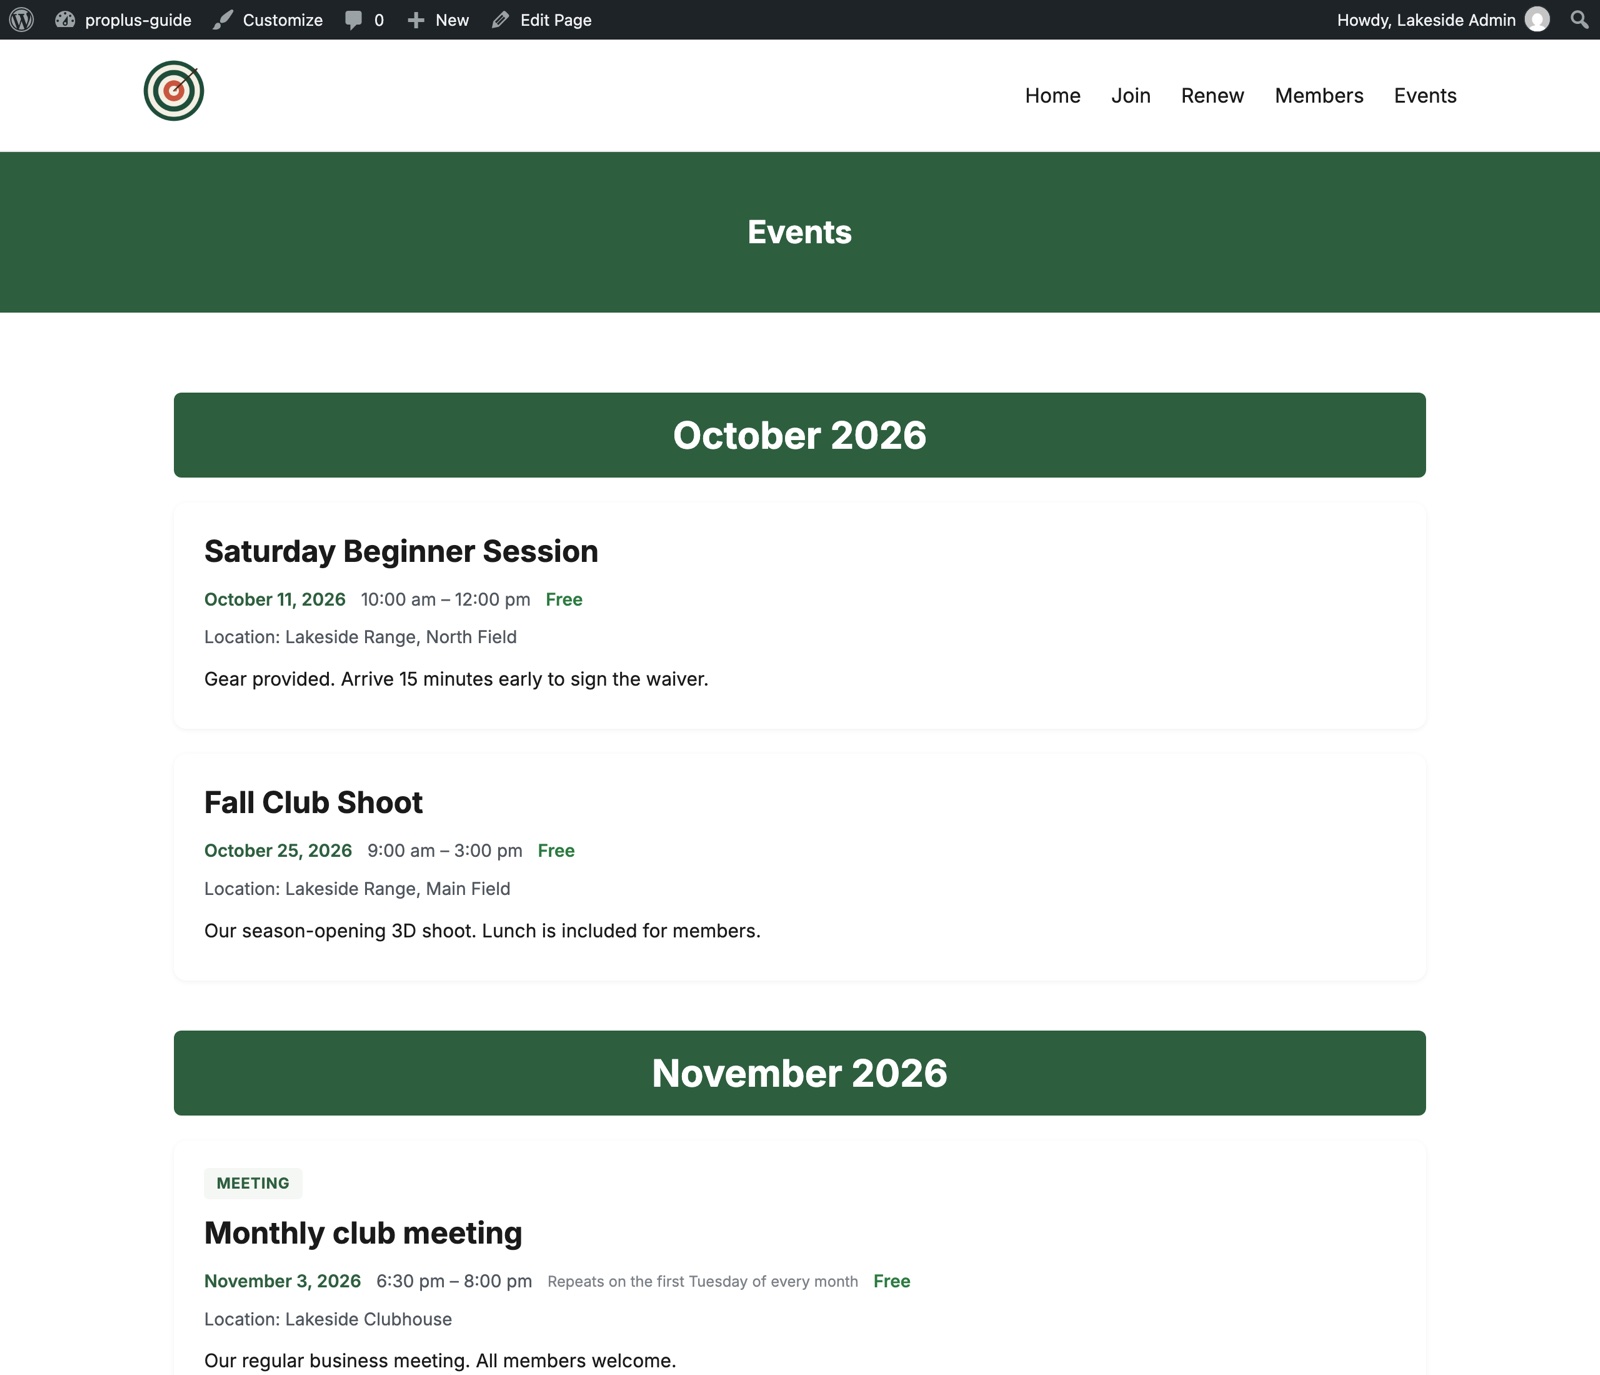
Each date becomes its own event, so you can open any one of them. When you save a change, choose whether it applies to this event only, this and all following events, or all events in the series. A date you delete stays deleted. The list shows an Event date column so you can tell repeats apart.
Add your documents
The document library is a Pro+ feature with its own Documents menu. It keeps your PDF newsletters, meeting minutes and other files in one place, sorted into categories. Each category gets its own page, which lists the files by year (the newest year open, older years folded away) with a search box for visitors.
1. Make a category and its page
- Click Documents → Categories.
- Type a name, such as Newsletters or Meeting Minutes, and click Add New Category. Make one for each kind of document.
- In the list, click Create page next to a category. The plugin makes a published page with the right list on it, then shows View page and Edit page links. Once a page exists, the button turns into View page | Edit, so you cannot make a duplicate.
- Add the new page to your menu, the same way you did for your other pages.
2. Add one document
- Click Documents → Add New.
- Type a title, such as Newsletter – October 2026.
- Under Document Details, click Choose PDF, then upload your file or pick one from your Media Library.
- Set the Document date. This is the meeting date or the issue date, not today. It decides which year the file is listed under.
- Optional: add a short description, and tick the category on the right. Then click Publish.
3. Move a whole backlog over at once
Have years of old newsletters or minutes to bring over from an old website? Use Bulk Upload instead of adding them one by one.
- Click Documents → Bulk Upload.
- Choose the Category these files belong to, or type the name of a new one.
- Click Choose PDFs, drag all your files into the window (or pick them from your Media Library), and click Add these PDFs.
- Each file appears as a row with a title and a date guessed from its file name. It understands names such as
2023-03-14 Minutes.pdf,March 2023 Newsletter.pdf,Newsletter_Feb_2016.pdfand06-2015.pdf, and it ignores the numbers some old website builders add to file names. - Look down the list. Rows highlighted in yellow had no clear date in the file name, so set the date yourself. Fix any title you like, and untick any file you do not want.
- Click Save documents. They are all added at once.
Keep a page private
Meeting minutes are often for members only. WordPress can lock any page with a password.
- Open the category’s page for editing (Documents → Categories, then Edit next to the page).
- In the page settings, find Visibility, choose Password protected, and type a password.
- Click Update. Visitors now see a password box instead of the list. Share the password with your members, for example in your welcome email.
Fine-tune how the list looks
The page that Create page makes holds a short code such as [rkfc_documents category="newsletters"]. You can add options to it:
year="2026"shows only one year.open="all"opens every year, andopen="none"keeps them all folded away. By default only the newest year is open.search="no"removes the search box.months="yes"ormonths="no"controls the month headings inside each year. By default they appear only in a year where some month has more than one file, so a newsletter a month stays a clean list.dates="no"hides the date on each row, handy when the title already says the month.- Leave out
categoryto list every category together, or give several separated by commas.
Give members a digital card Pro and Pro+
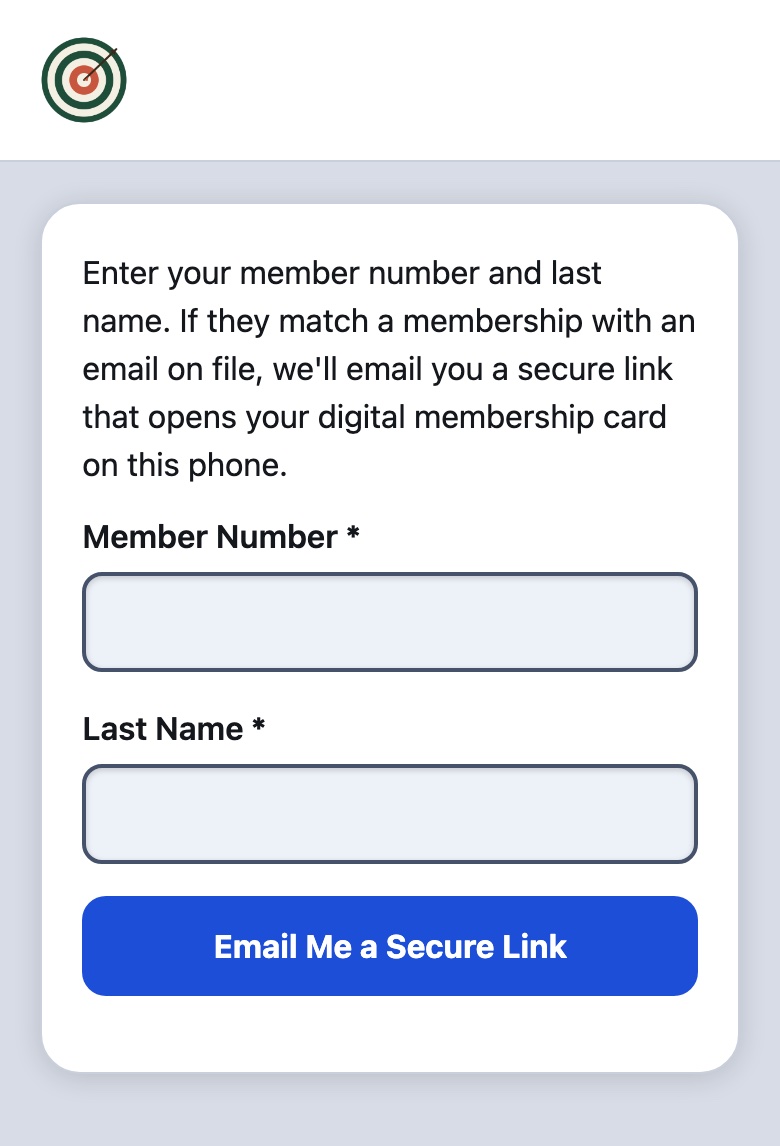
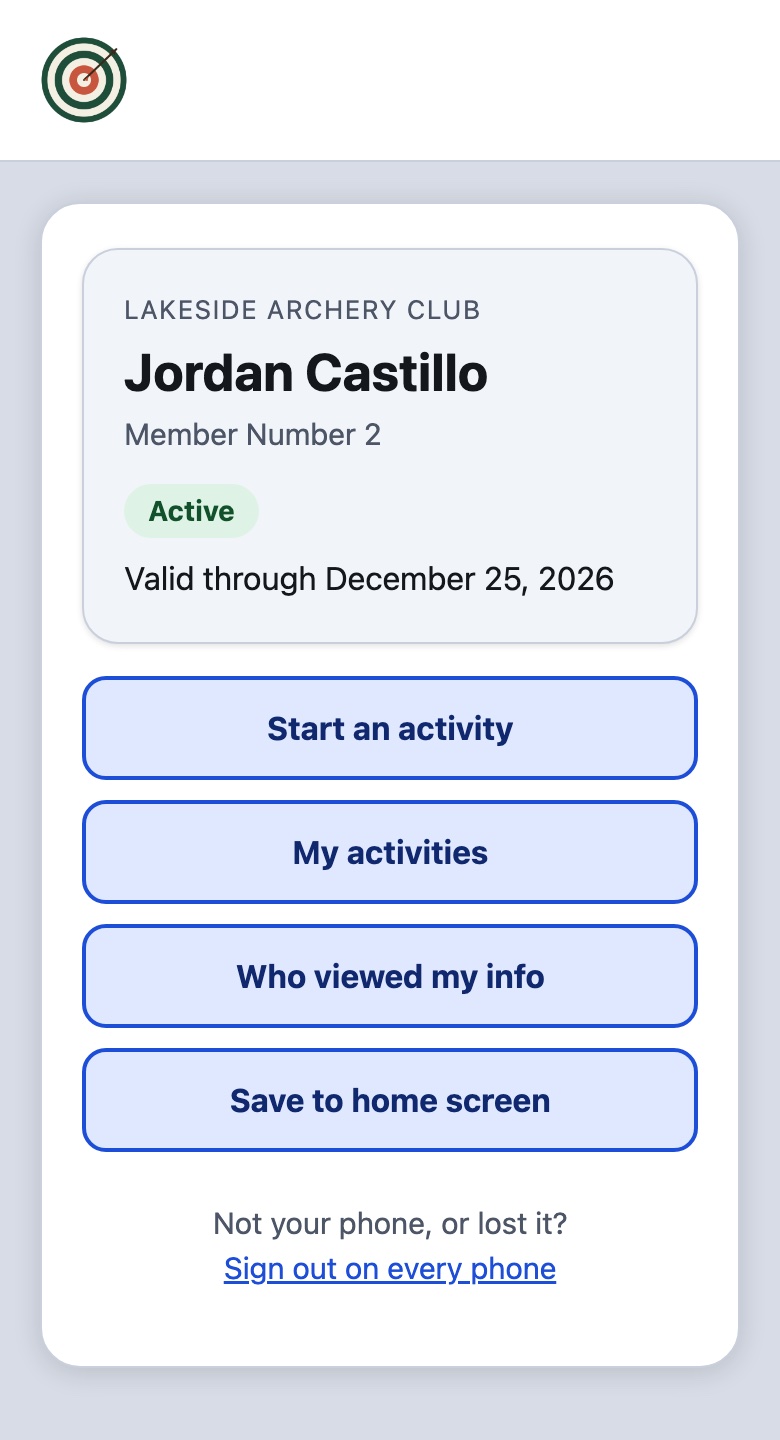
A digital card is a private page on a member’s phone. It shows their name, their status (Active or Expired), their valid-through date, and buttons for club activities. It is not an app, and members never need a password. They prove who they are the same way they already do to update their record: their member number and last name, then a one-time link sent to the email you have on file.
Watch it first: How to get your digital club card, join an activity, and host one →
Create the two pages
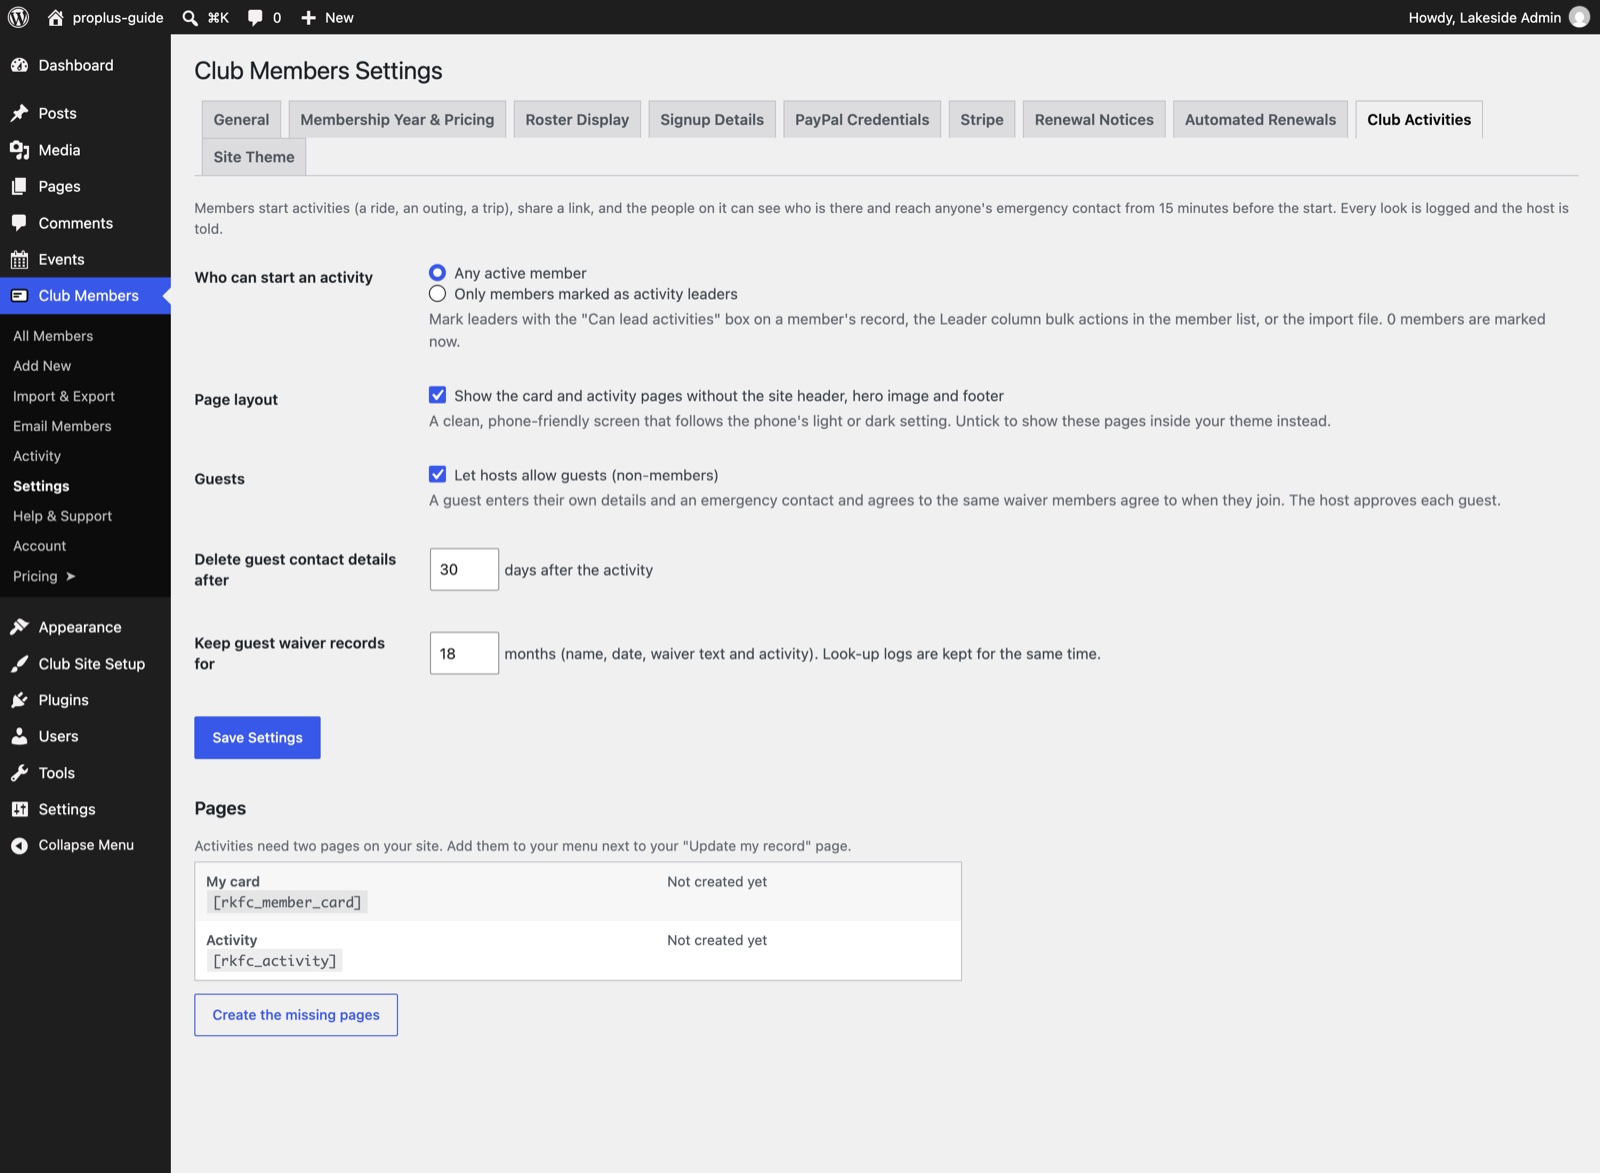
- Click Club Members → Settings, then the Club Activities tab.
- Under Pages, click Create the missing pages. This makes a page called My card and a page called Activity.
- Add both pages to your menu, next to your other pages, the same way you did in the pages step.
How a member gets their card
- The member opens your My card page on their phone.
- They type their member number and last name.
- They check their email. The message holds a secure link that works once and expires in 15 minutes. It is only ever sent to the address already on the member’s record.
- They tap the link, then tap Open My Card.
Saving the card to the home screen
The first time a card opens, a short panel shows exactly how to put it on the phone’s home screen, with the steps for that phone. It can be brought back at any time with the Save to home screen button.
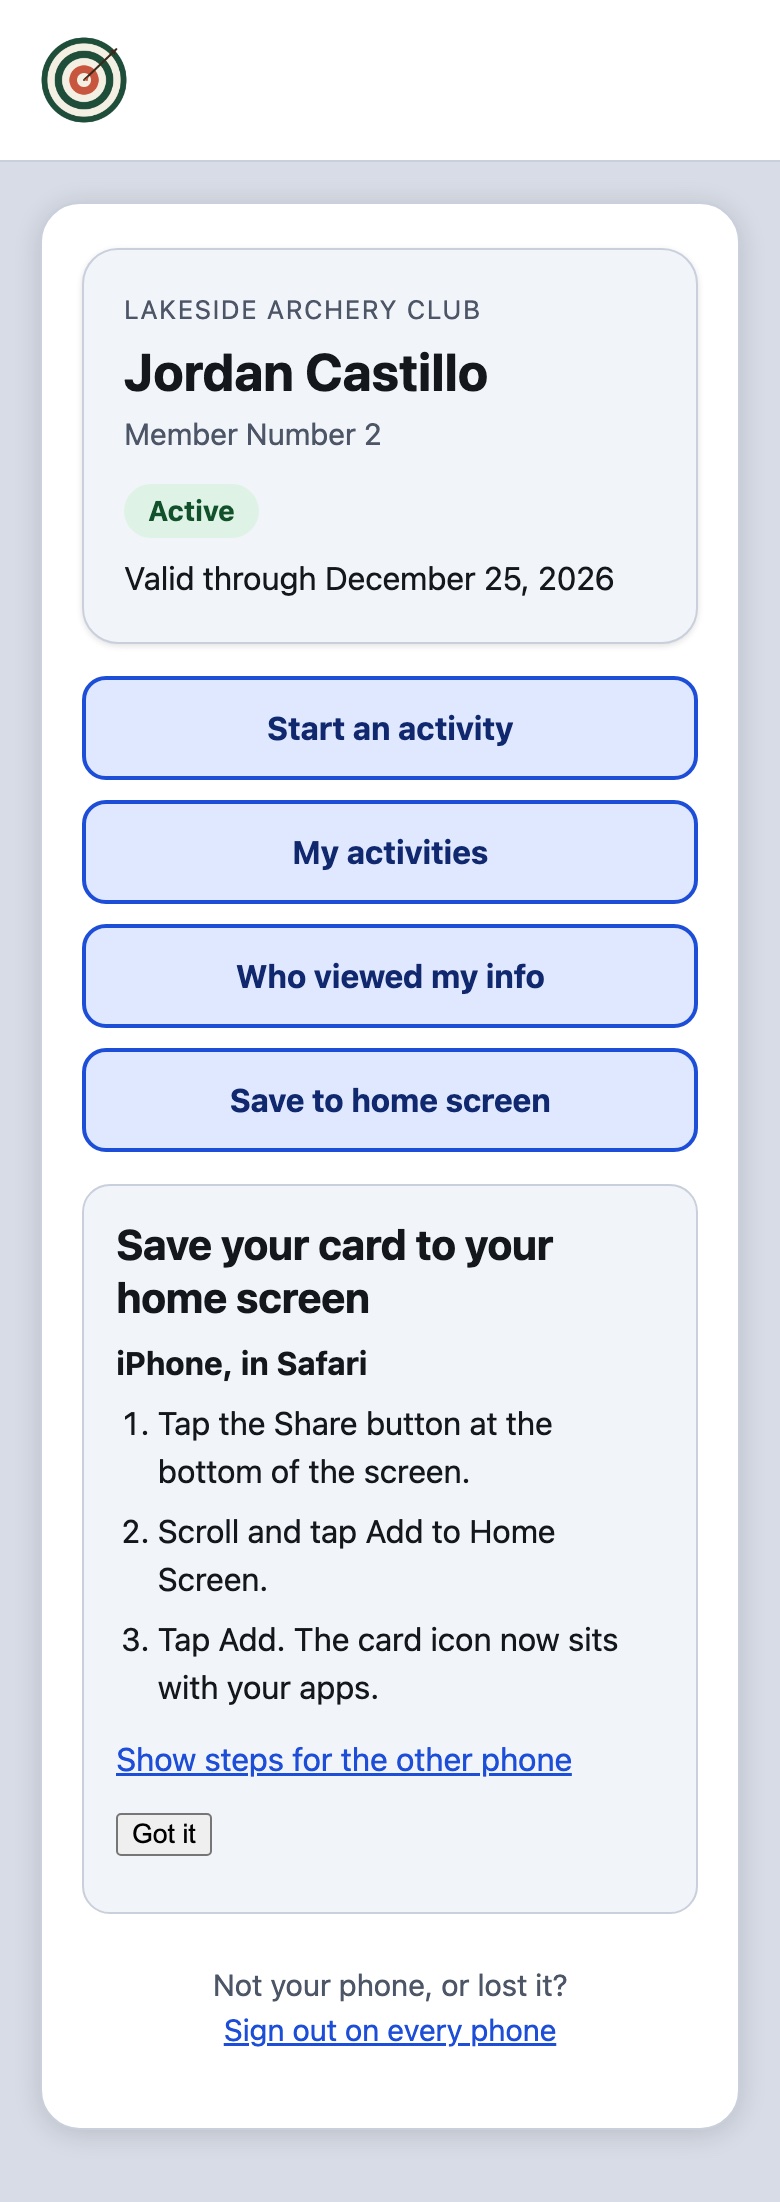
A member who loses a phone can tap Sign out on every phone on their card. You can also see and remove a member’s saved phones on their record under Club Members → All Members.
Start an activity and share it Pro and Pro+
An activity is anything your members do together: a ride, a practice, a work day, a trip. Any active member can start one (you can limit that to chosen leaders: see Choose who can lead). The person who starts it is the host.

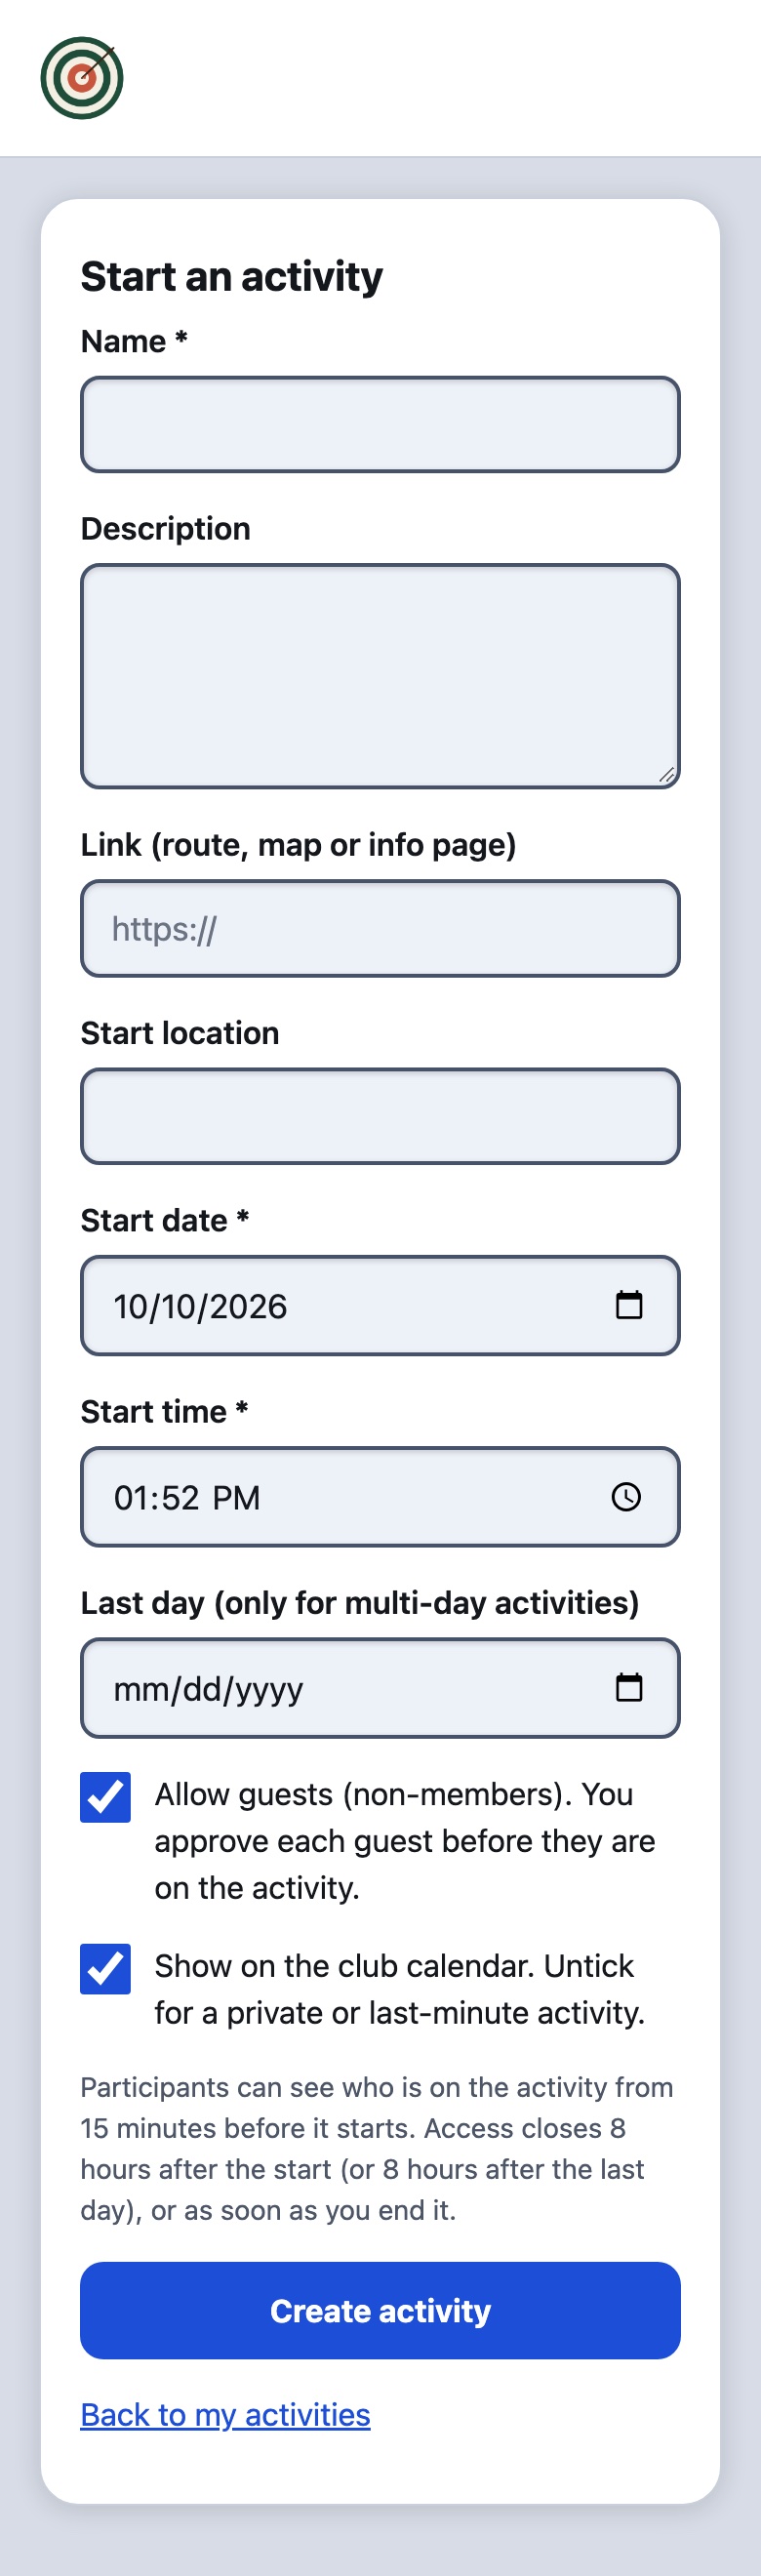
- On their card, the host taps Start an activity.
- They fill in a short form: a name, a description, an optional link (a route or a map), the start location, and the start date and time. For a trip that lasts more than a day they also enter the last day.
- Two tick boxes: Allow guests (non-members, see Guests and the waiver) and Show on the club calendar.
- They tap Create activity.
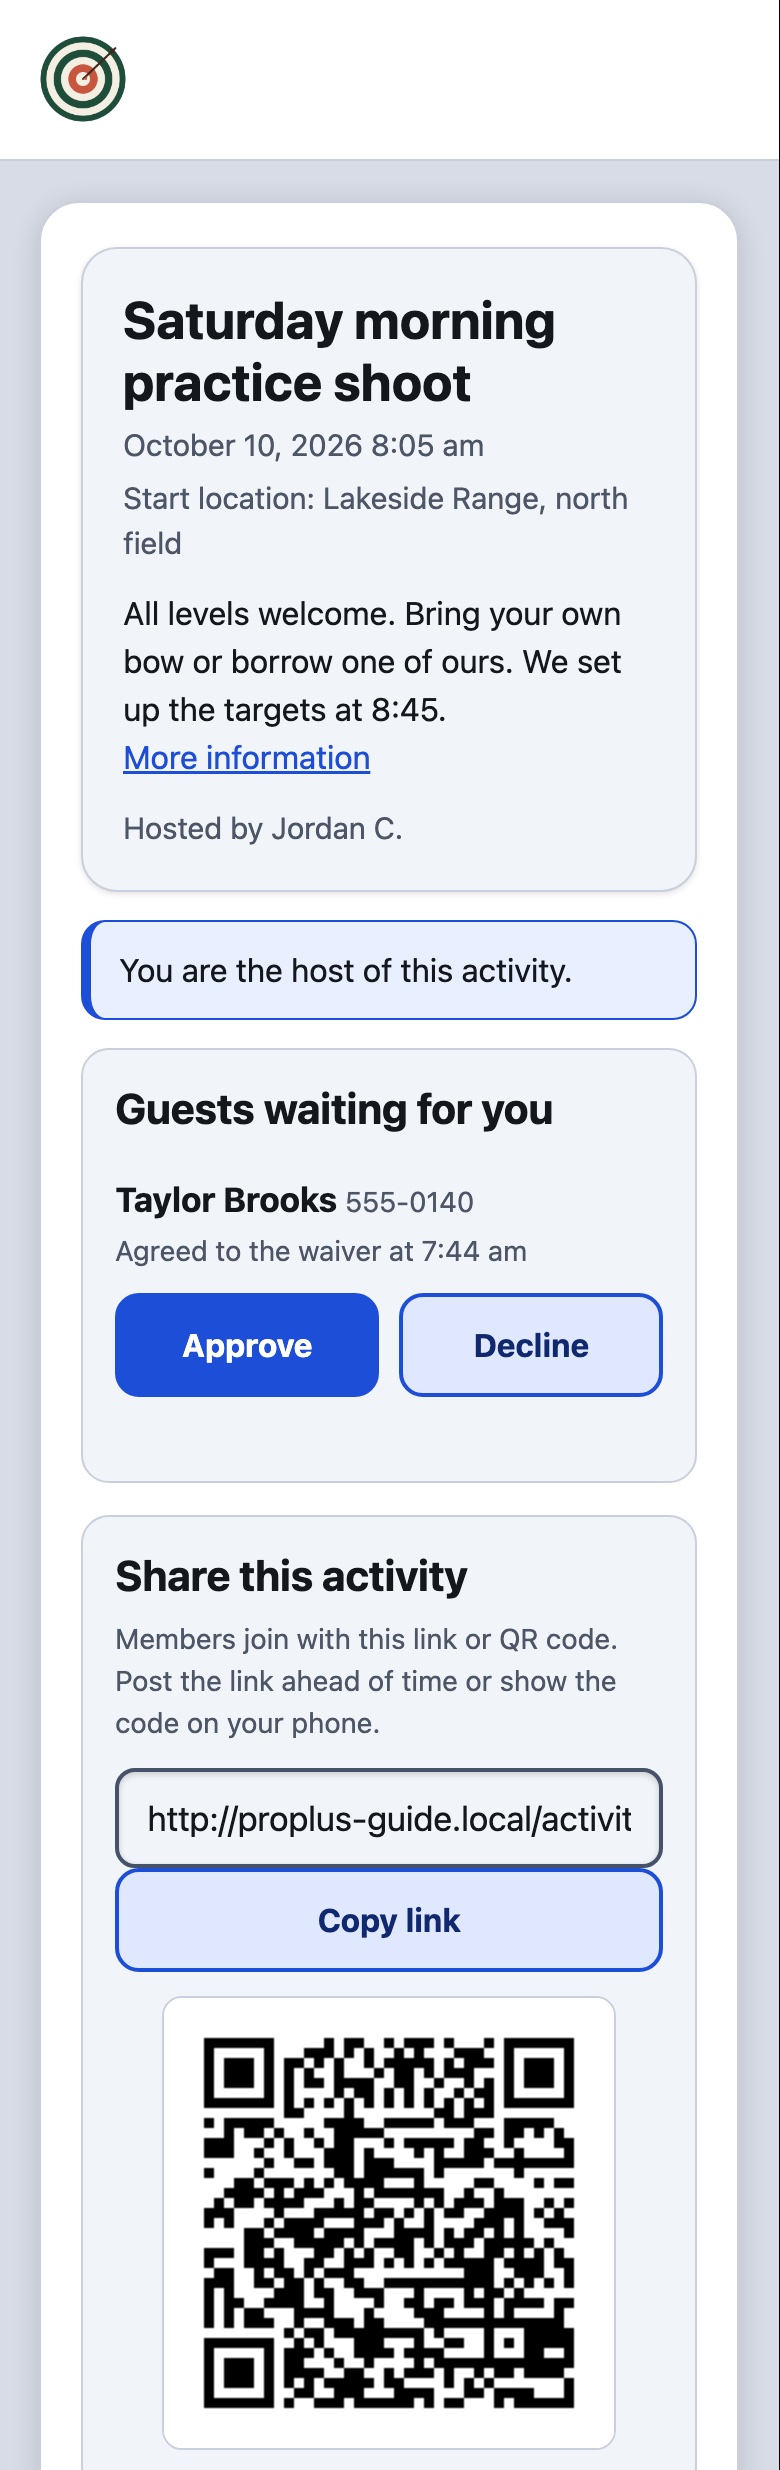
Share it
Joining opens the moment the activity is created. The host can Copy link and post it on social media or in a group message ahead of time, or show the QR code on their phone for people to scan at the meeting place. The link and the code open the same page.
Change plans
- Change details updates the time, place or description. The calendar entry updates itself.
- End activity closes the list and emergency information straight away. Otherwise they close on their own 8 hours after the start (8 hours after the last day for a trip).
- Cancel this activity removes it.
Hand off or share hosting
A host can add co-hosts: people who help run the activity or take it over. This is handy for handing an activity to someone else, or for a large group with several leaders.
- The member you want as a co-host joins the activity first, like anyone else (guests cannot be co-hosts).
- On the host’s page, find them in the list and tap Make co-host. A message explains what a co-host can do. Tap OK.
- They now have a Co-host tag. Next time they open the activity, it says You are a co-host of this activity.
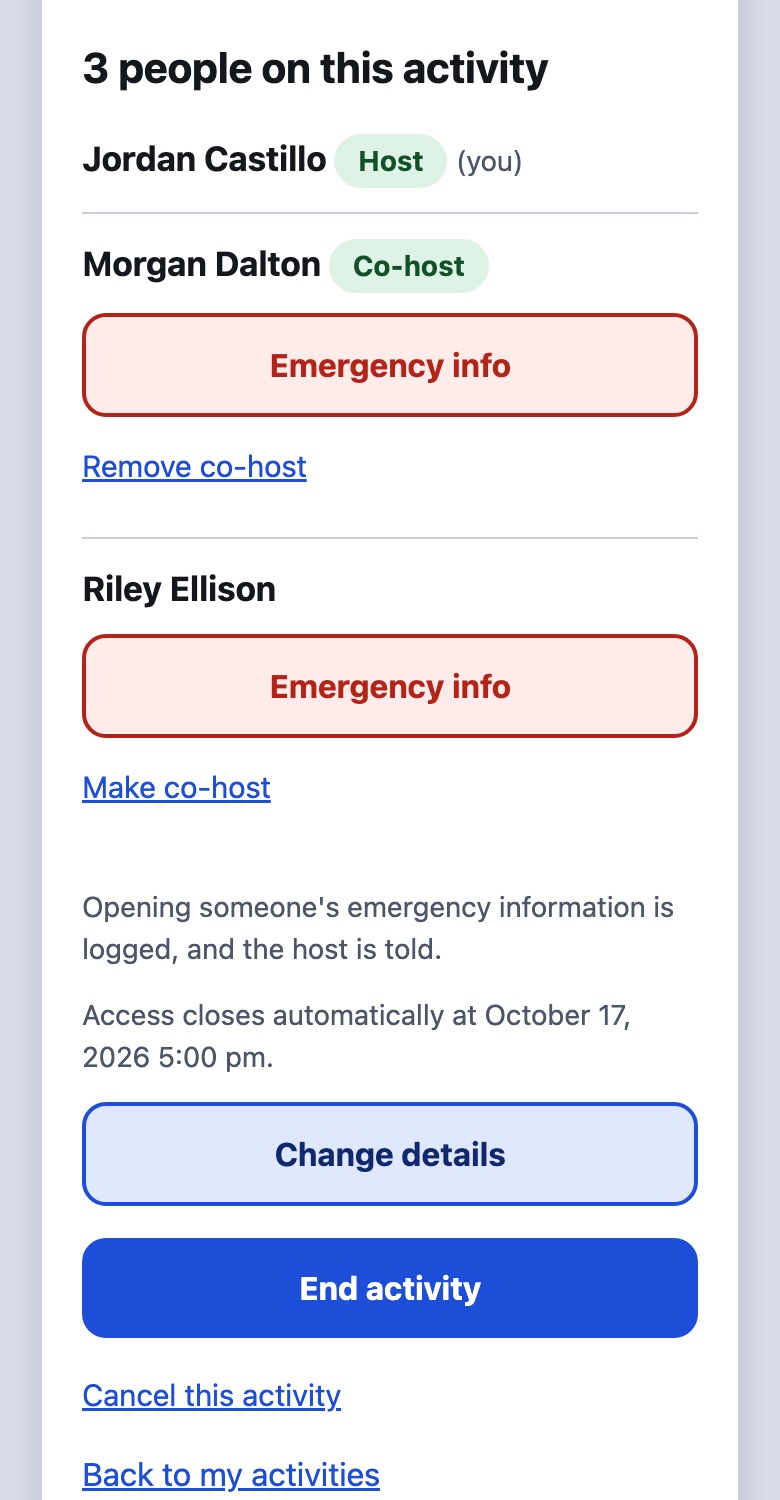
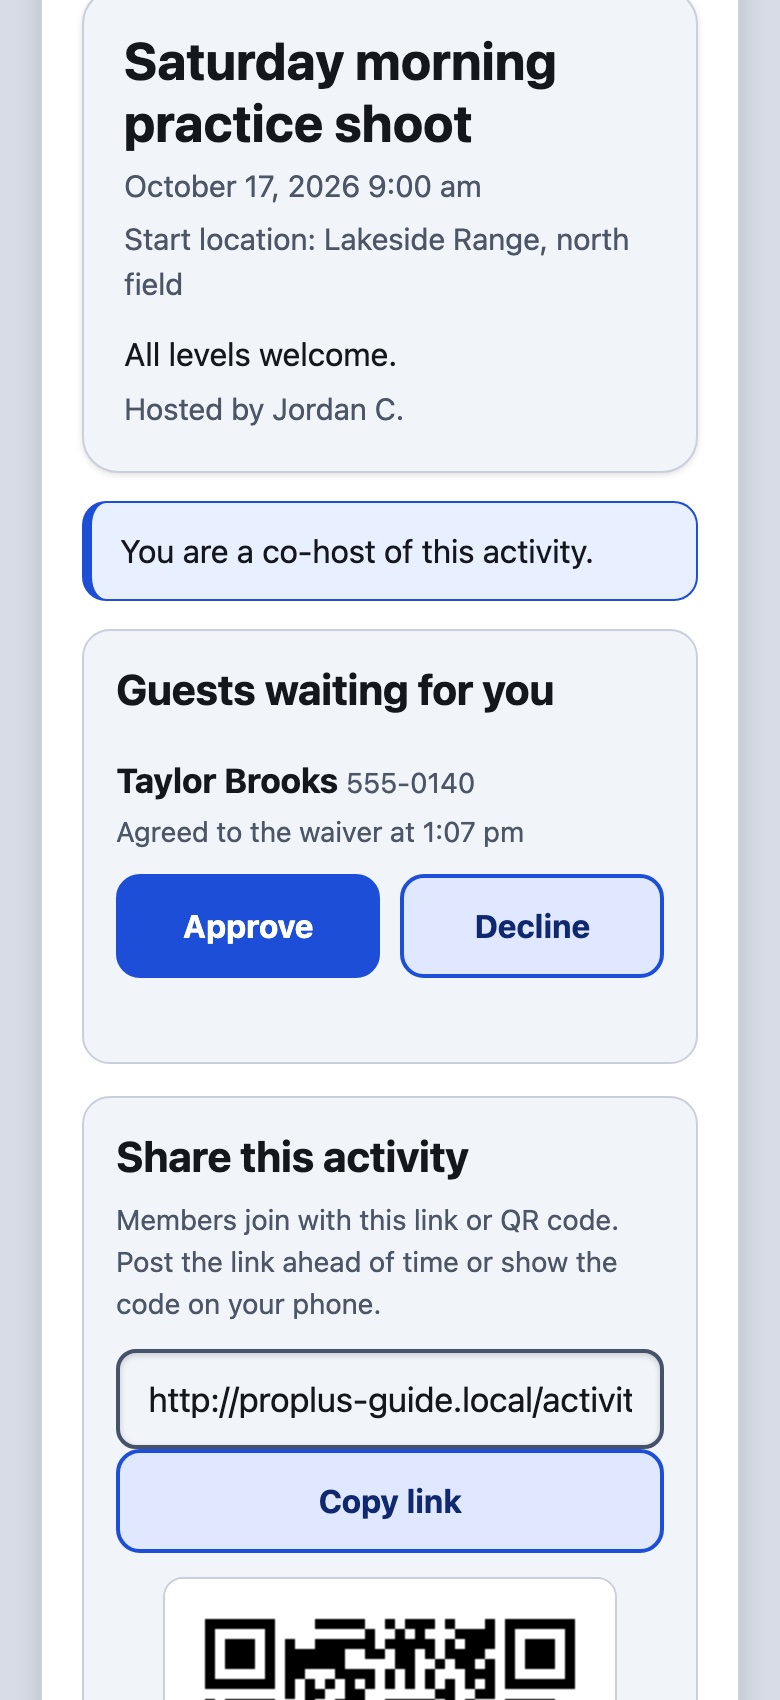
A co-host has full control, the same as the host. They can approve or decline guests, show the QR code and share the link, change details, end or cancel the activity, and make or remove other co-hosts. Only the person who started the activity is always a host and cannot be changed.
- The list: co-hosts can see who is on the activity at any time, like the host, not only from 15 minutes before the start.
- Emergency information: a look by a rider appears in the “Emergency information was viewed” box for the host and every co-host. The email notice still goes to the person who started the activity, and nobody is alerted when a host or co-host looks.
- Taking it back: tap Remove co-host next to their name. There is no limit on how many co-hosts an activity can have.
Joining, the list and emergency information Pro and Pro+
This is the reason activities exist. When someone is hurt far from the start, the people with them can reach the right emergency contact in seconds, and that private information stays hidden from everyone else.
Joining
- A member taps the link or scans the QR code. If their phone does not know them yet, they get the same member number and last name step as for the card, and come straight back to the activity.
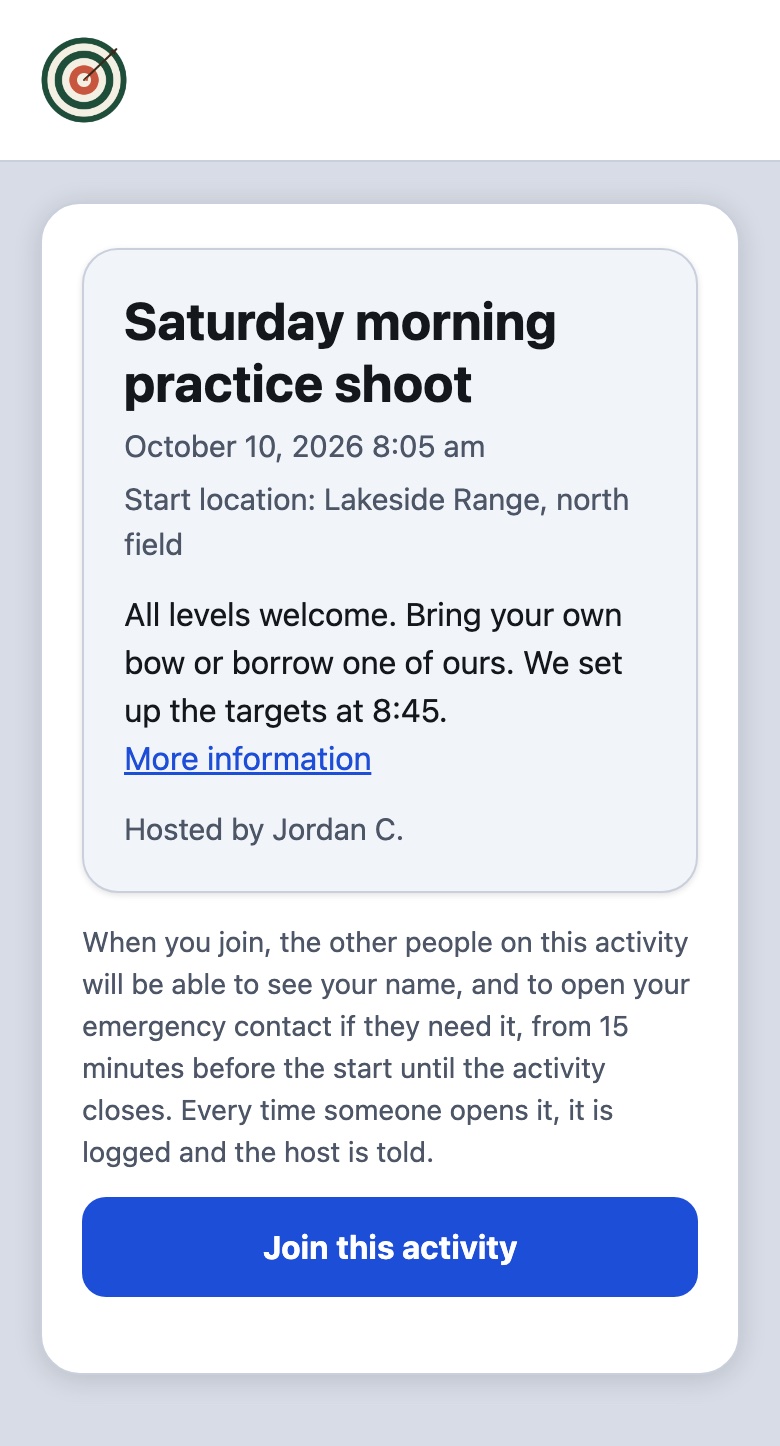
- They see the details and a short notice of what joining shares: their name, and their emergency contact if someone needs it, from 15 minutes before the start until the activity closes.
- They tap Join this activity.
The list and the emergency contact
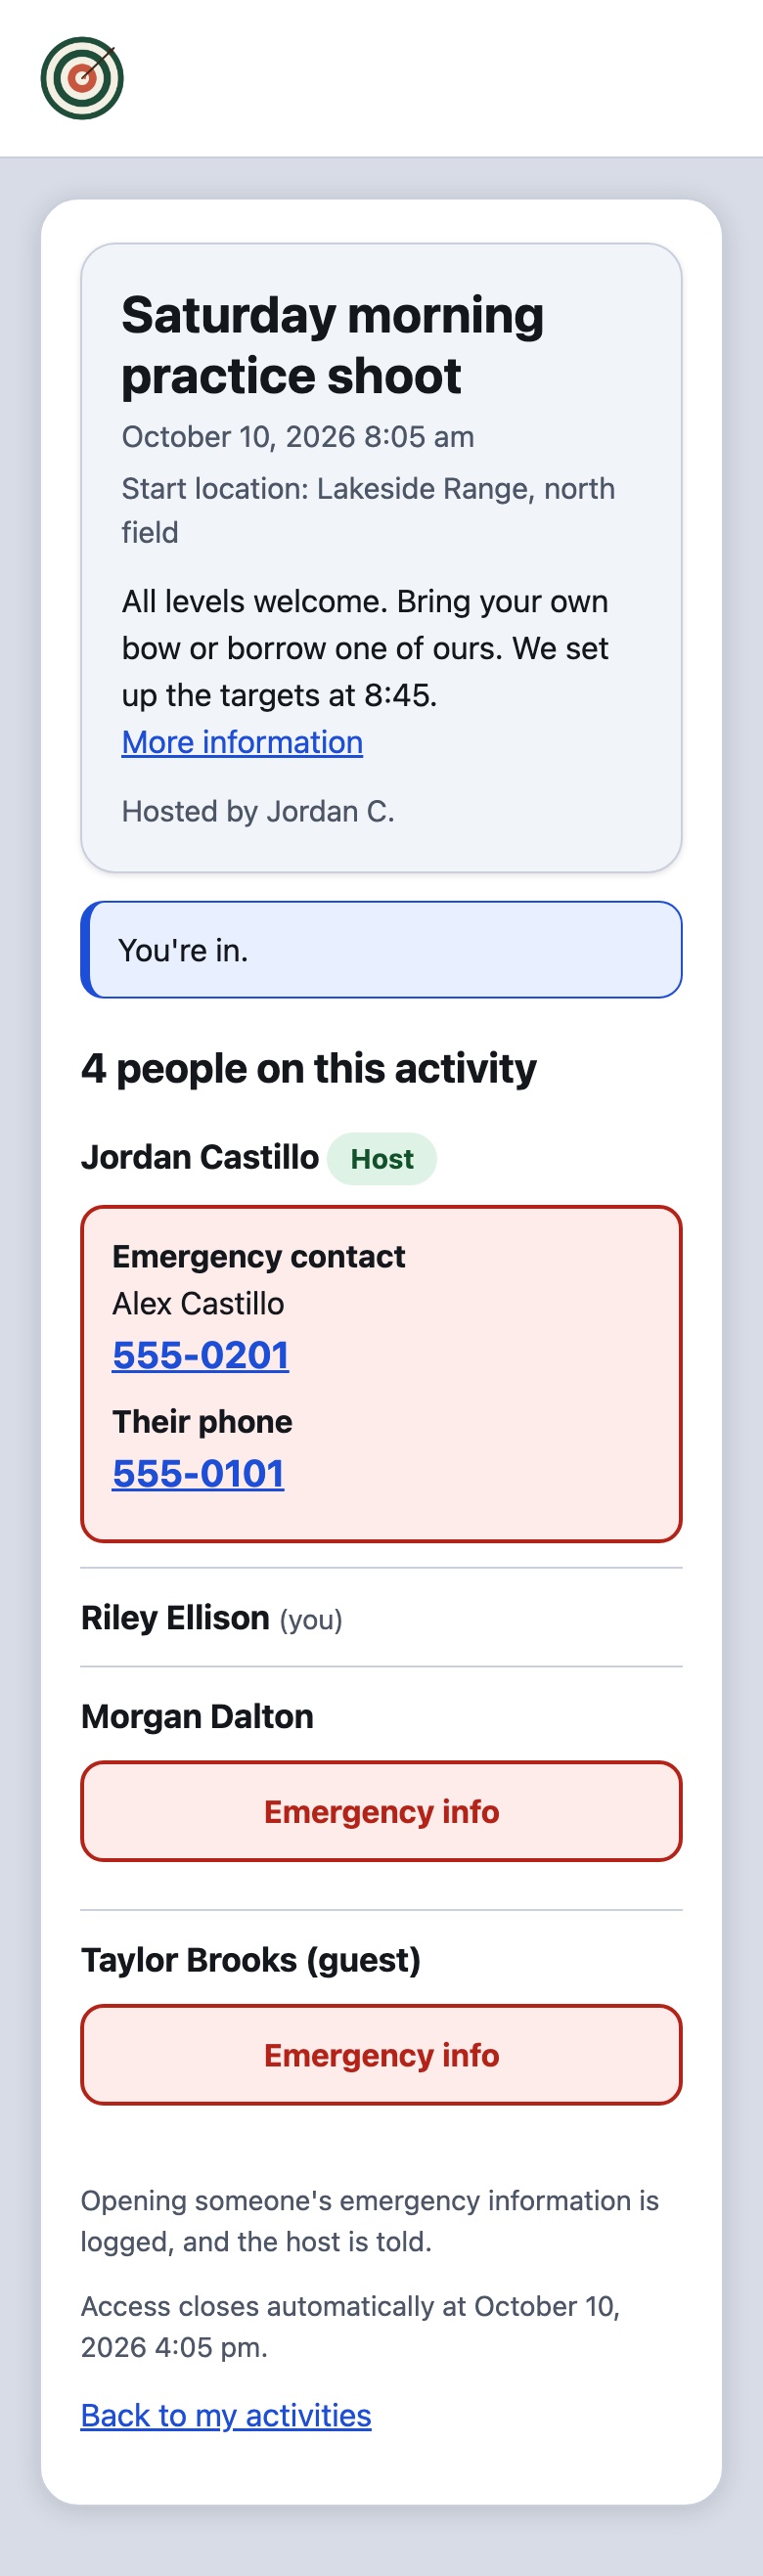
Until 15 minutes before the start, a member who has joined only sees You’re in, and when the list will open. This keeps names from being collected from a public link days ahead. From 15 minutes before, they can open the list from their card: My activities, then the activity.
Next to each person is an Emergency info button. Tapping it shows the person’s emergency contact and phone, and their own phone, as tap-to-call links. It hides again after 10 minutes.
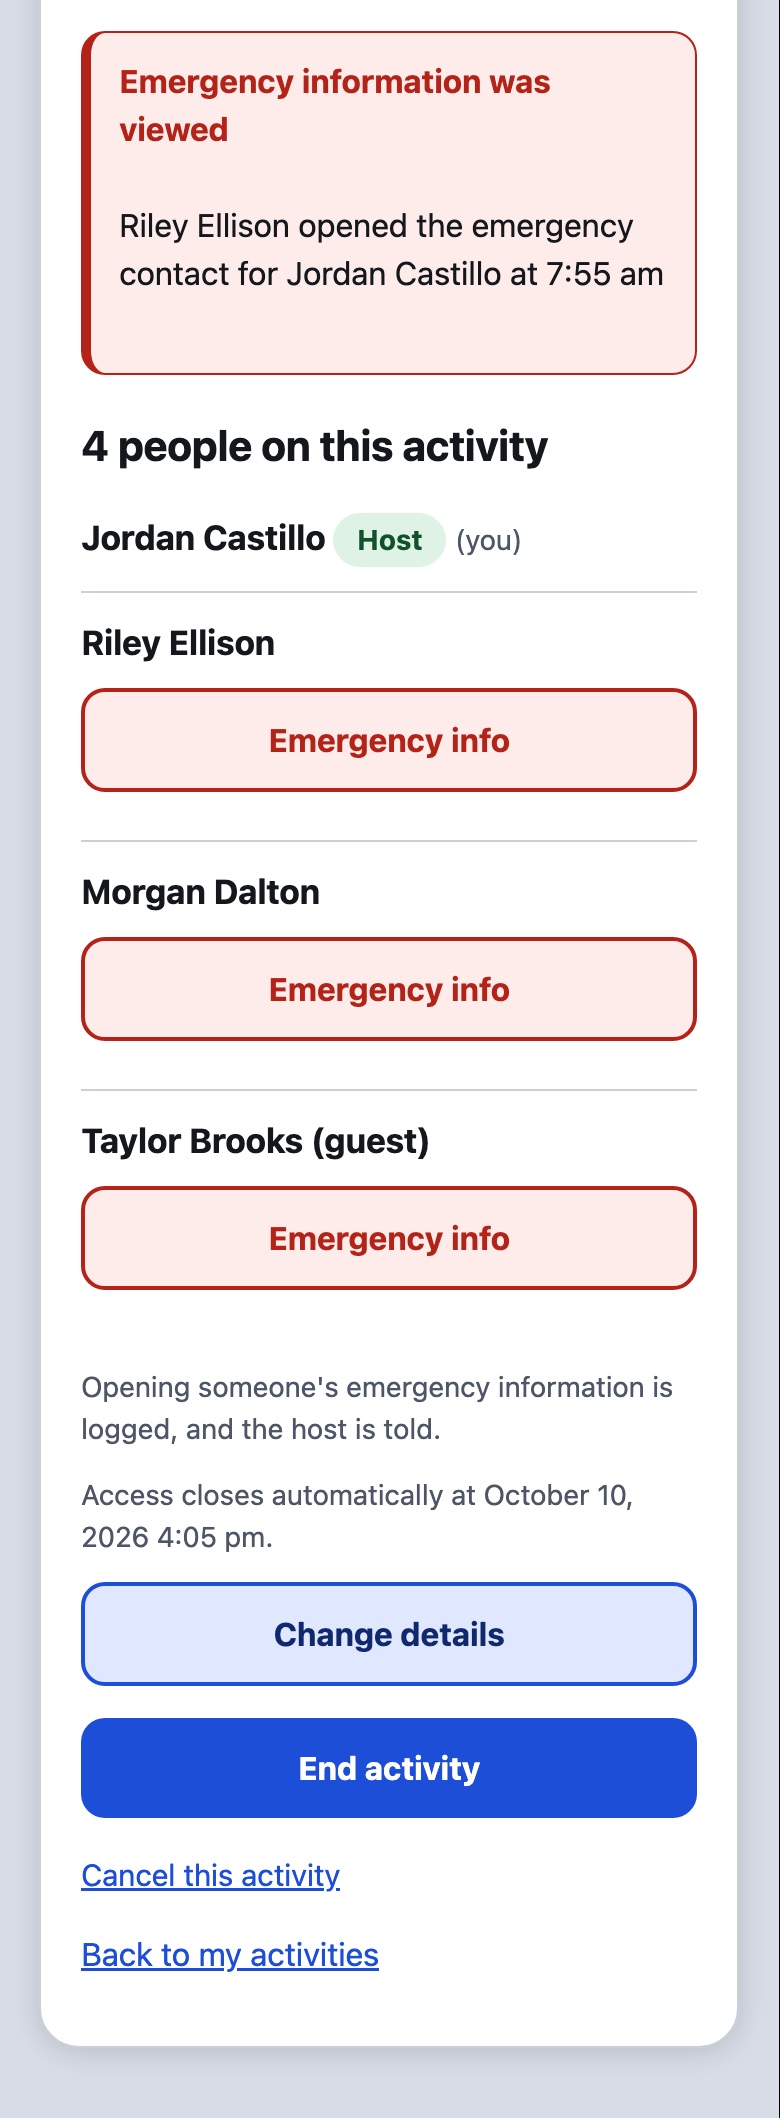
- Every look is logged, and the host is told by a banner on their page and by email.
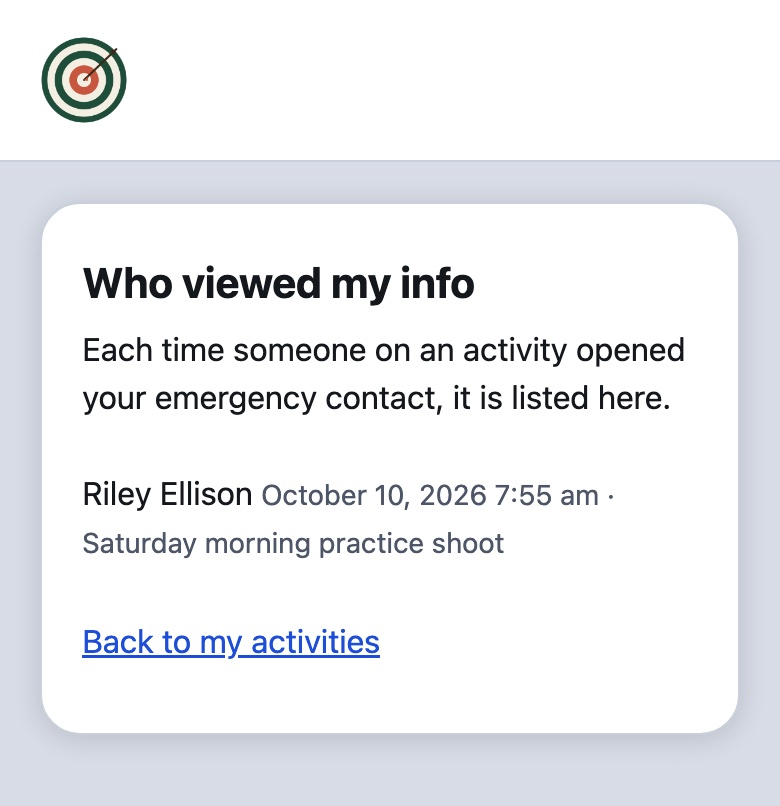
- Members can see who looked at their information with Who viewed my info on their card.
Guests and the waiver Pro and Pro+
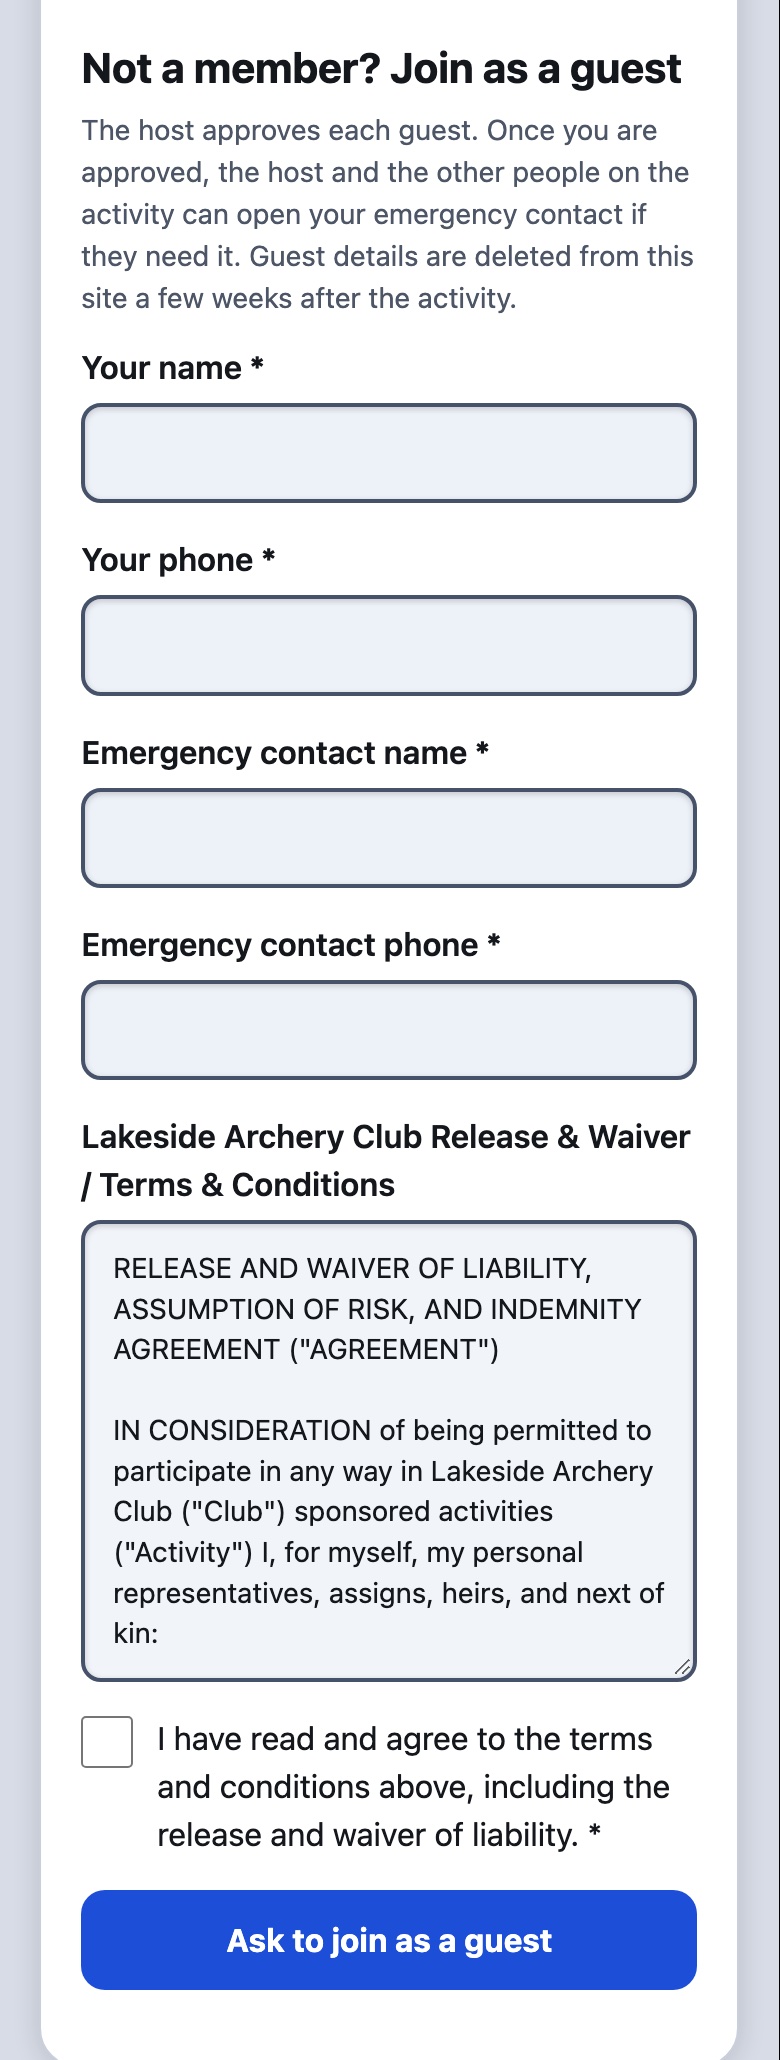
A friend who wants to try an activity does not have to be a member. If the host ticked Allow guests, a visitor who is not a member sees a guest form under the member sign-in.
- The guest enters their name and phone, and an emergency contact’s name and phone.
- They read your club’s waiver and tick the box to agree. It is the same waiver members agree to when they join. You edit it under Settings → Signup Details.
- The host sees them under Guests waiting for you and taps Approve or Decline. Every guest needs approval.
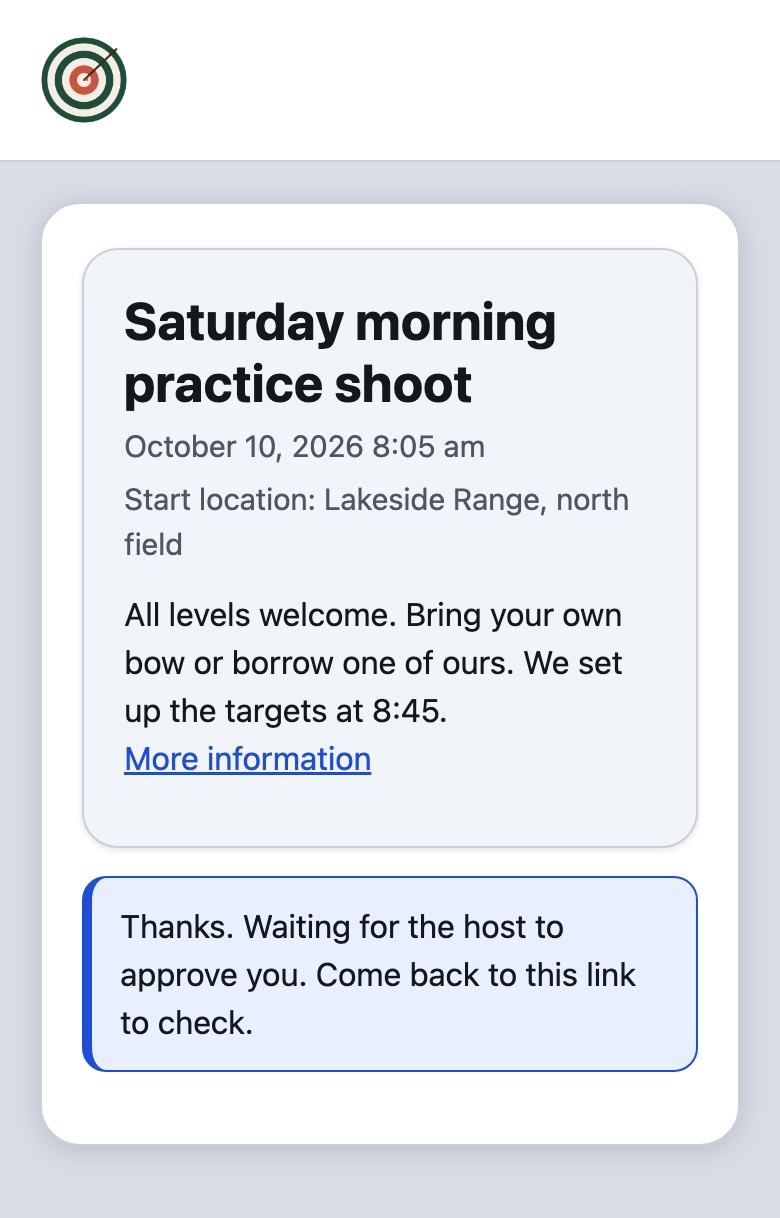
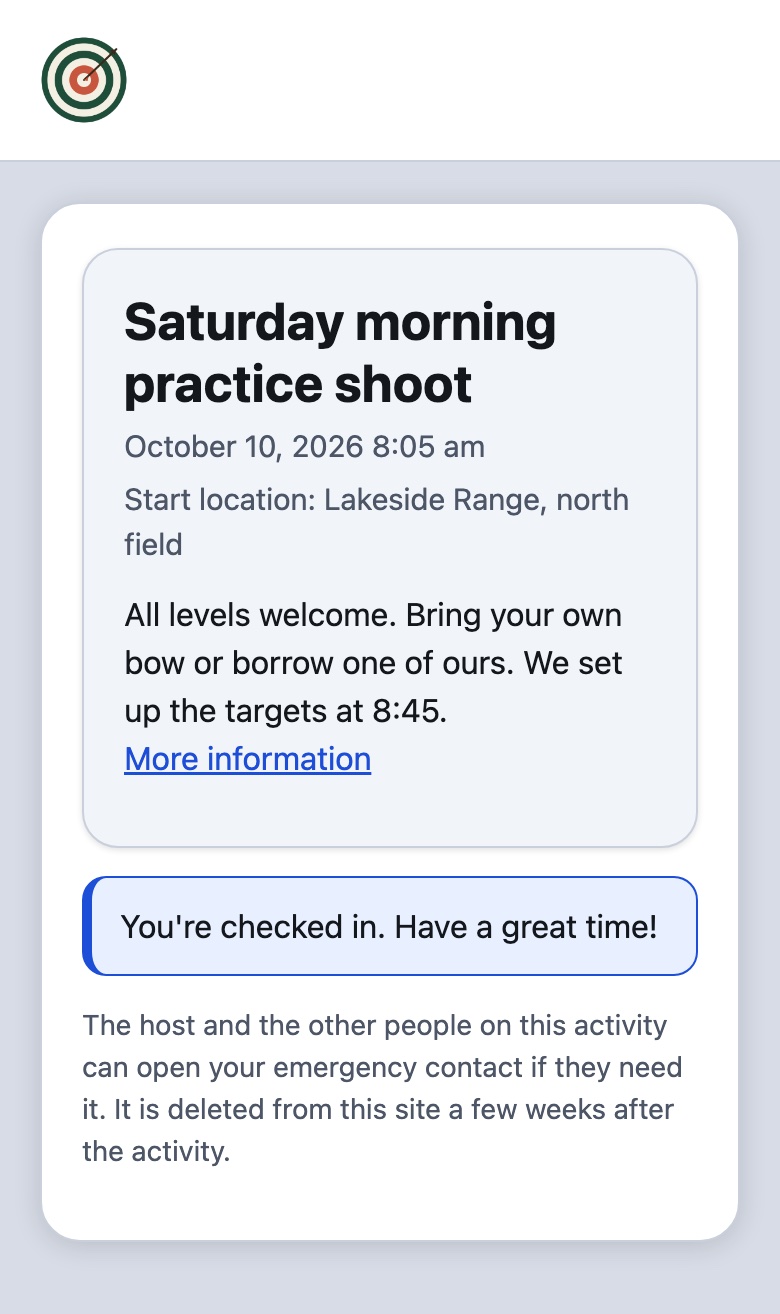
An approved guest never sees the list or anyone’s contact. They show in the members’ list marked (guest), and their emergency contact can be opened and logged like anyone else’s.
What is kept, and for how long
- The guest’s phone and emergency contact are deleted 30 days after the activity.
- The guest’s name, the waiver text they agreed to and the date are kept for 18 months, so you can show what they agreed to. Then they are deleted too.
Choose who can lead, and what is kept Pro and Pro+
Everything here is on Club Members → Settings → Club Activities, the screen you used in Give members a digital card.
Who can start an activity
Choose Any active member (the default) or Only members marked as activity leaders. With leaders only, members who are not leaders do not see the Start an activity button, but they can still join, see the list and use emergency information like anyone else. A leader whose flag is removed keeps control of the activities they already started.
You mark leaders in any of three ways:
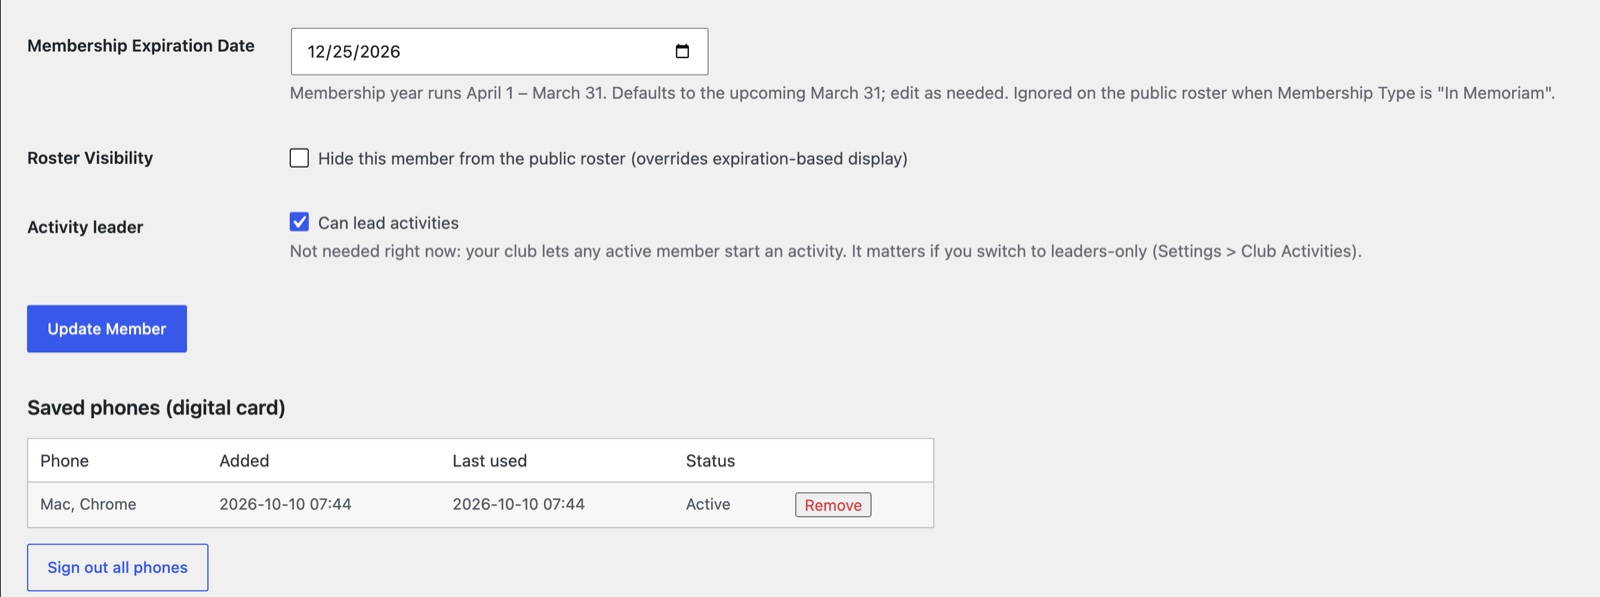
- Tick Can lead activities on a member’s record.
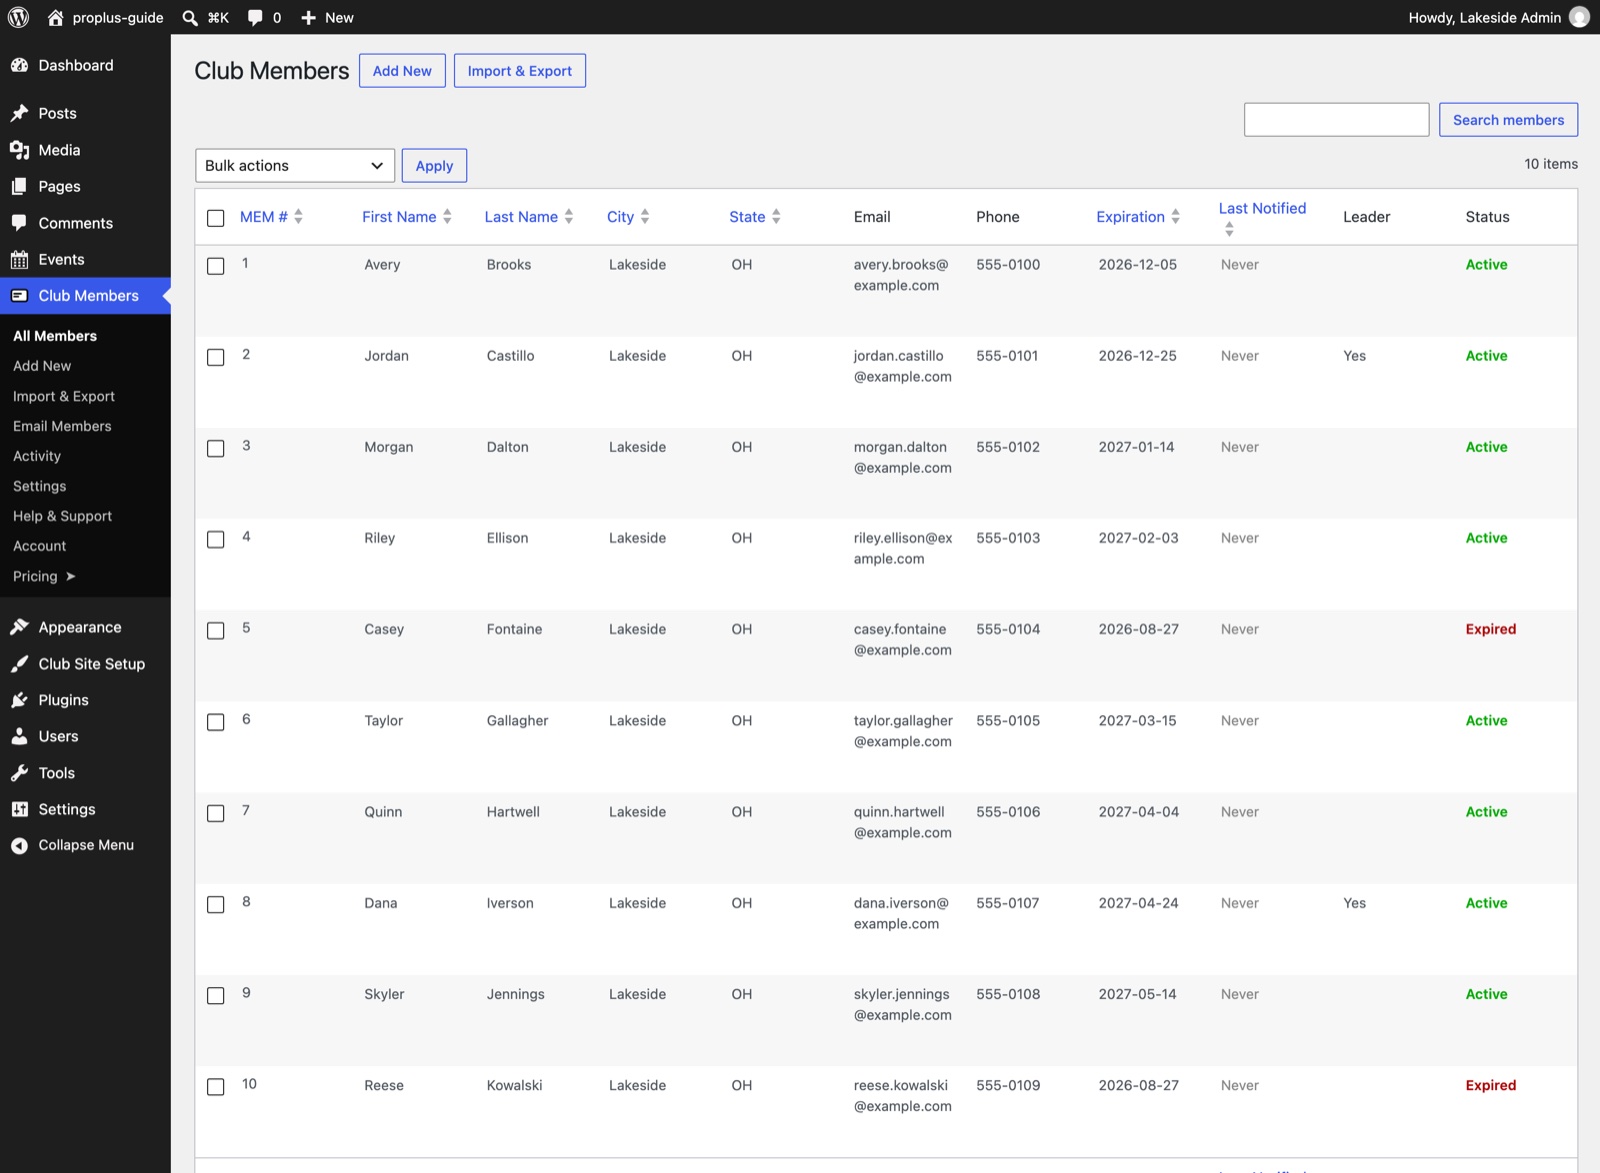
- In the All Members list, tick several members and choose Make activity leaders from the bulk actions. A Leader column shows who is marked.
- Add a Can Lead Activities column (1 or 0) to a CSV import. The export includes it too.
The other settings
- Page layout. The card and activity pages open as a clean, phone-friendly screen with no site header, hero image or footer, and follow the phone’s light or dark setting. Untick the box to show them inside your theme instead.
- Guests. Switch guests off for the whole club, and set the two retention periods from Guests and the waiver.
Your records
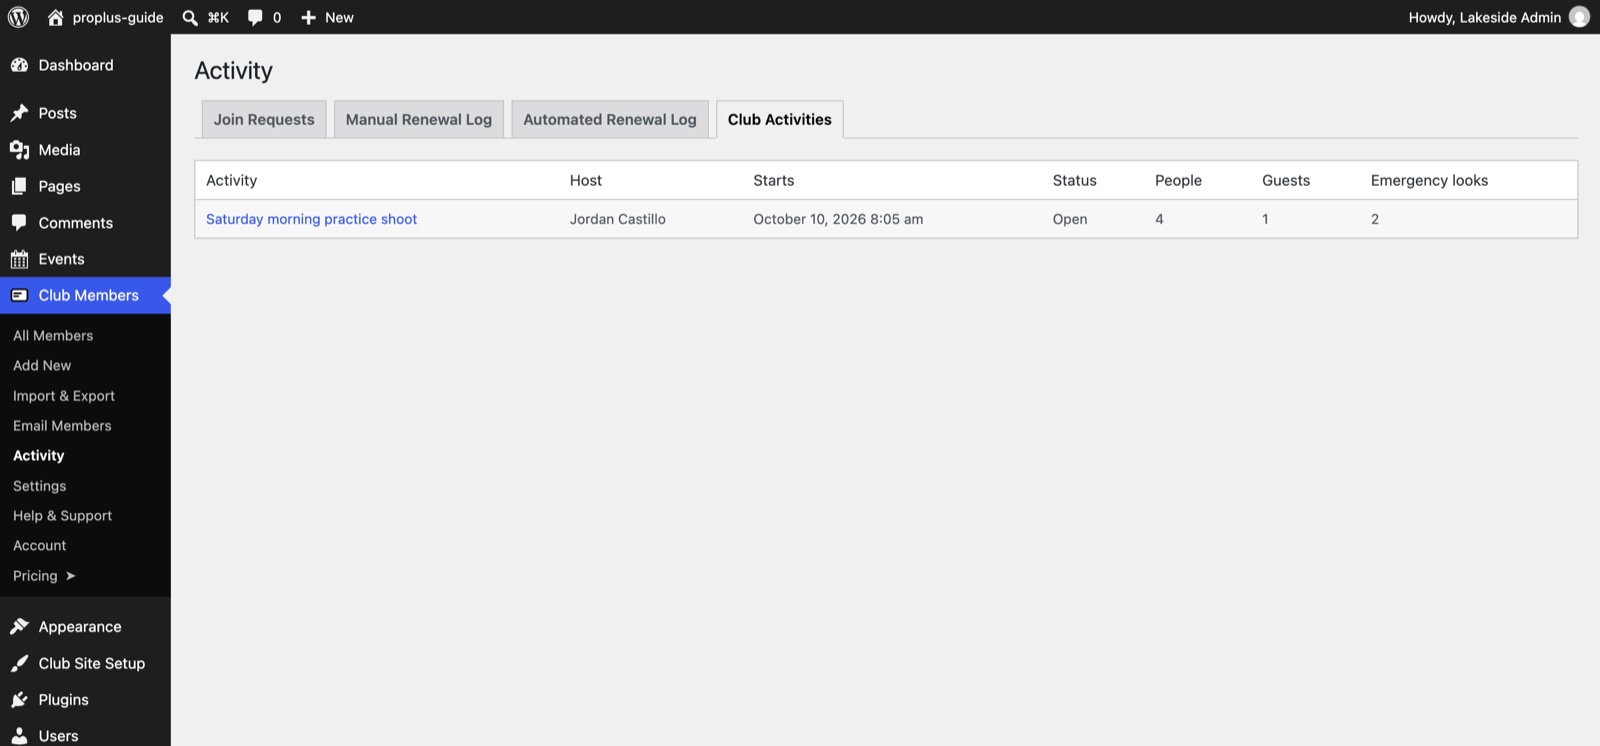
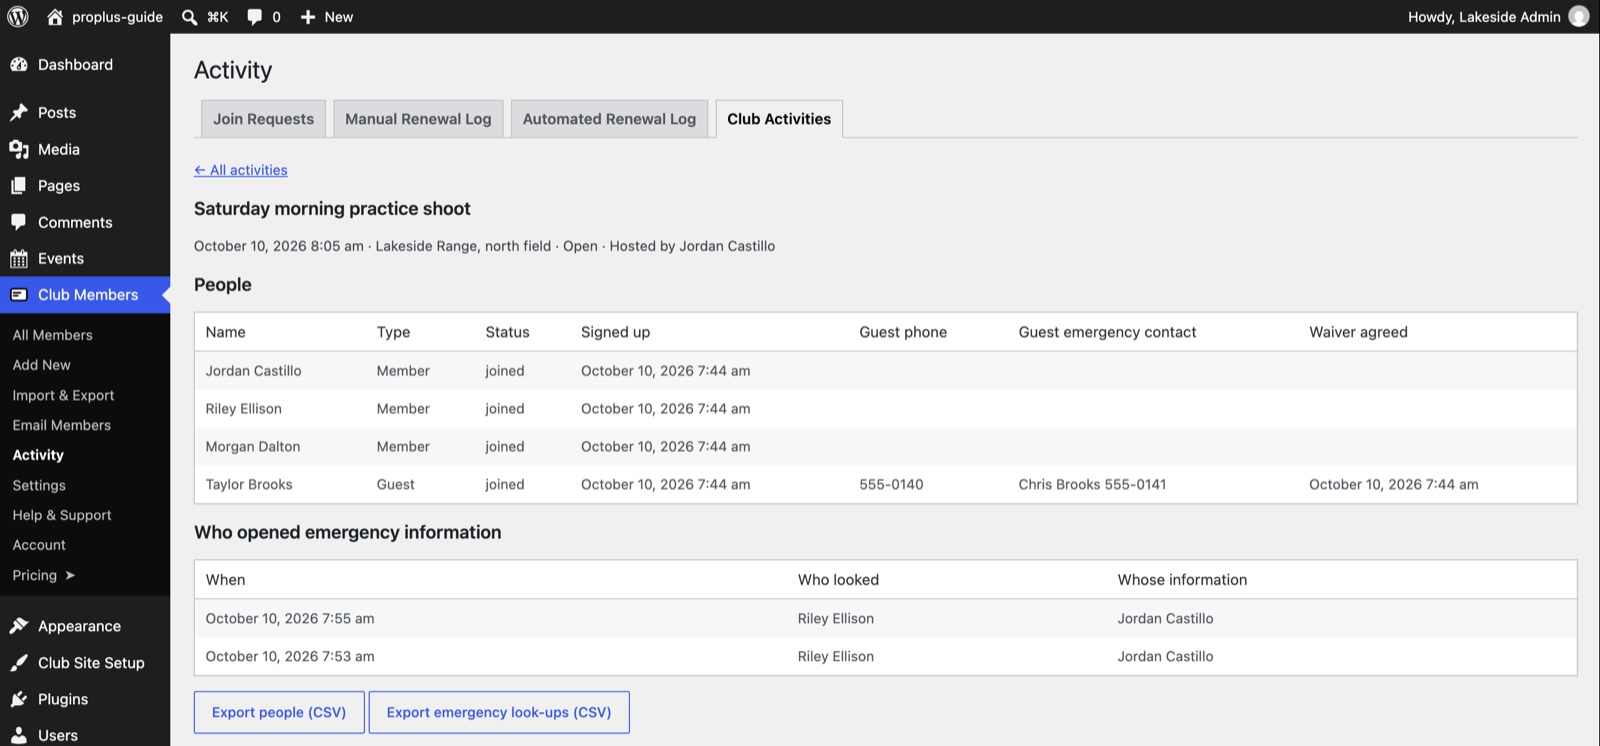
On Club Members → Activity, the Club Activities tab lists every activity with its host, start, status, number of people and emergency look-ups. Click one to see everyone on it, each guest’s waiver agreement, and the full look-up log. Two buttons export the people and the look-ups as CSV files.
Go live checklist
Work down this list before you tell your members about the site.
- Test join done. You completed a test join with Stripe and/or PayPal, received the welcome email, and saw the new member in All Members.
- Test renewal done. You renewed that test member from the Renew page.
- Card and activity tested. You opened your My card page on your phone and saved the card to the home screen. You started a test activity, joined it as a second member, opened someone’s emergency information, and checked that the host banner and email arrived. Then you ended the activity.
- Menu checked. My card and Activity are in your menu, next to your other pages.
- Waiver reviewed. The text in Signup Details is yours, and reviewed by someone qualified.
- Roster privacy. Only the columns you intend are public in Roster Display.
- Live keys added. In PayPal Credentials add the Live Client ID and Live Secret and set PayPal Mode to Live. In Stripe add the live secret key (
sk_live_) and live webhook secret, and set Stripe Mode to Live. Save. - One small real payment. Join as yourself with a real card or PayPal. Check the money arrives in your account and the member appears. Then refund yourself from your PayPal or Stripe dashboard.
- Test members removed. Delete your test members in All Members so your real list is clean.
- Site basics. Under Settings → General in WordPress, set your site title and timezone. Check the site on your phone.
Running the club day to day
Here is what each item in your Club Members menu is for.
All Members and Add New
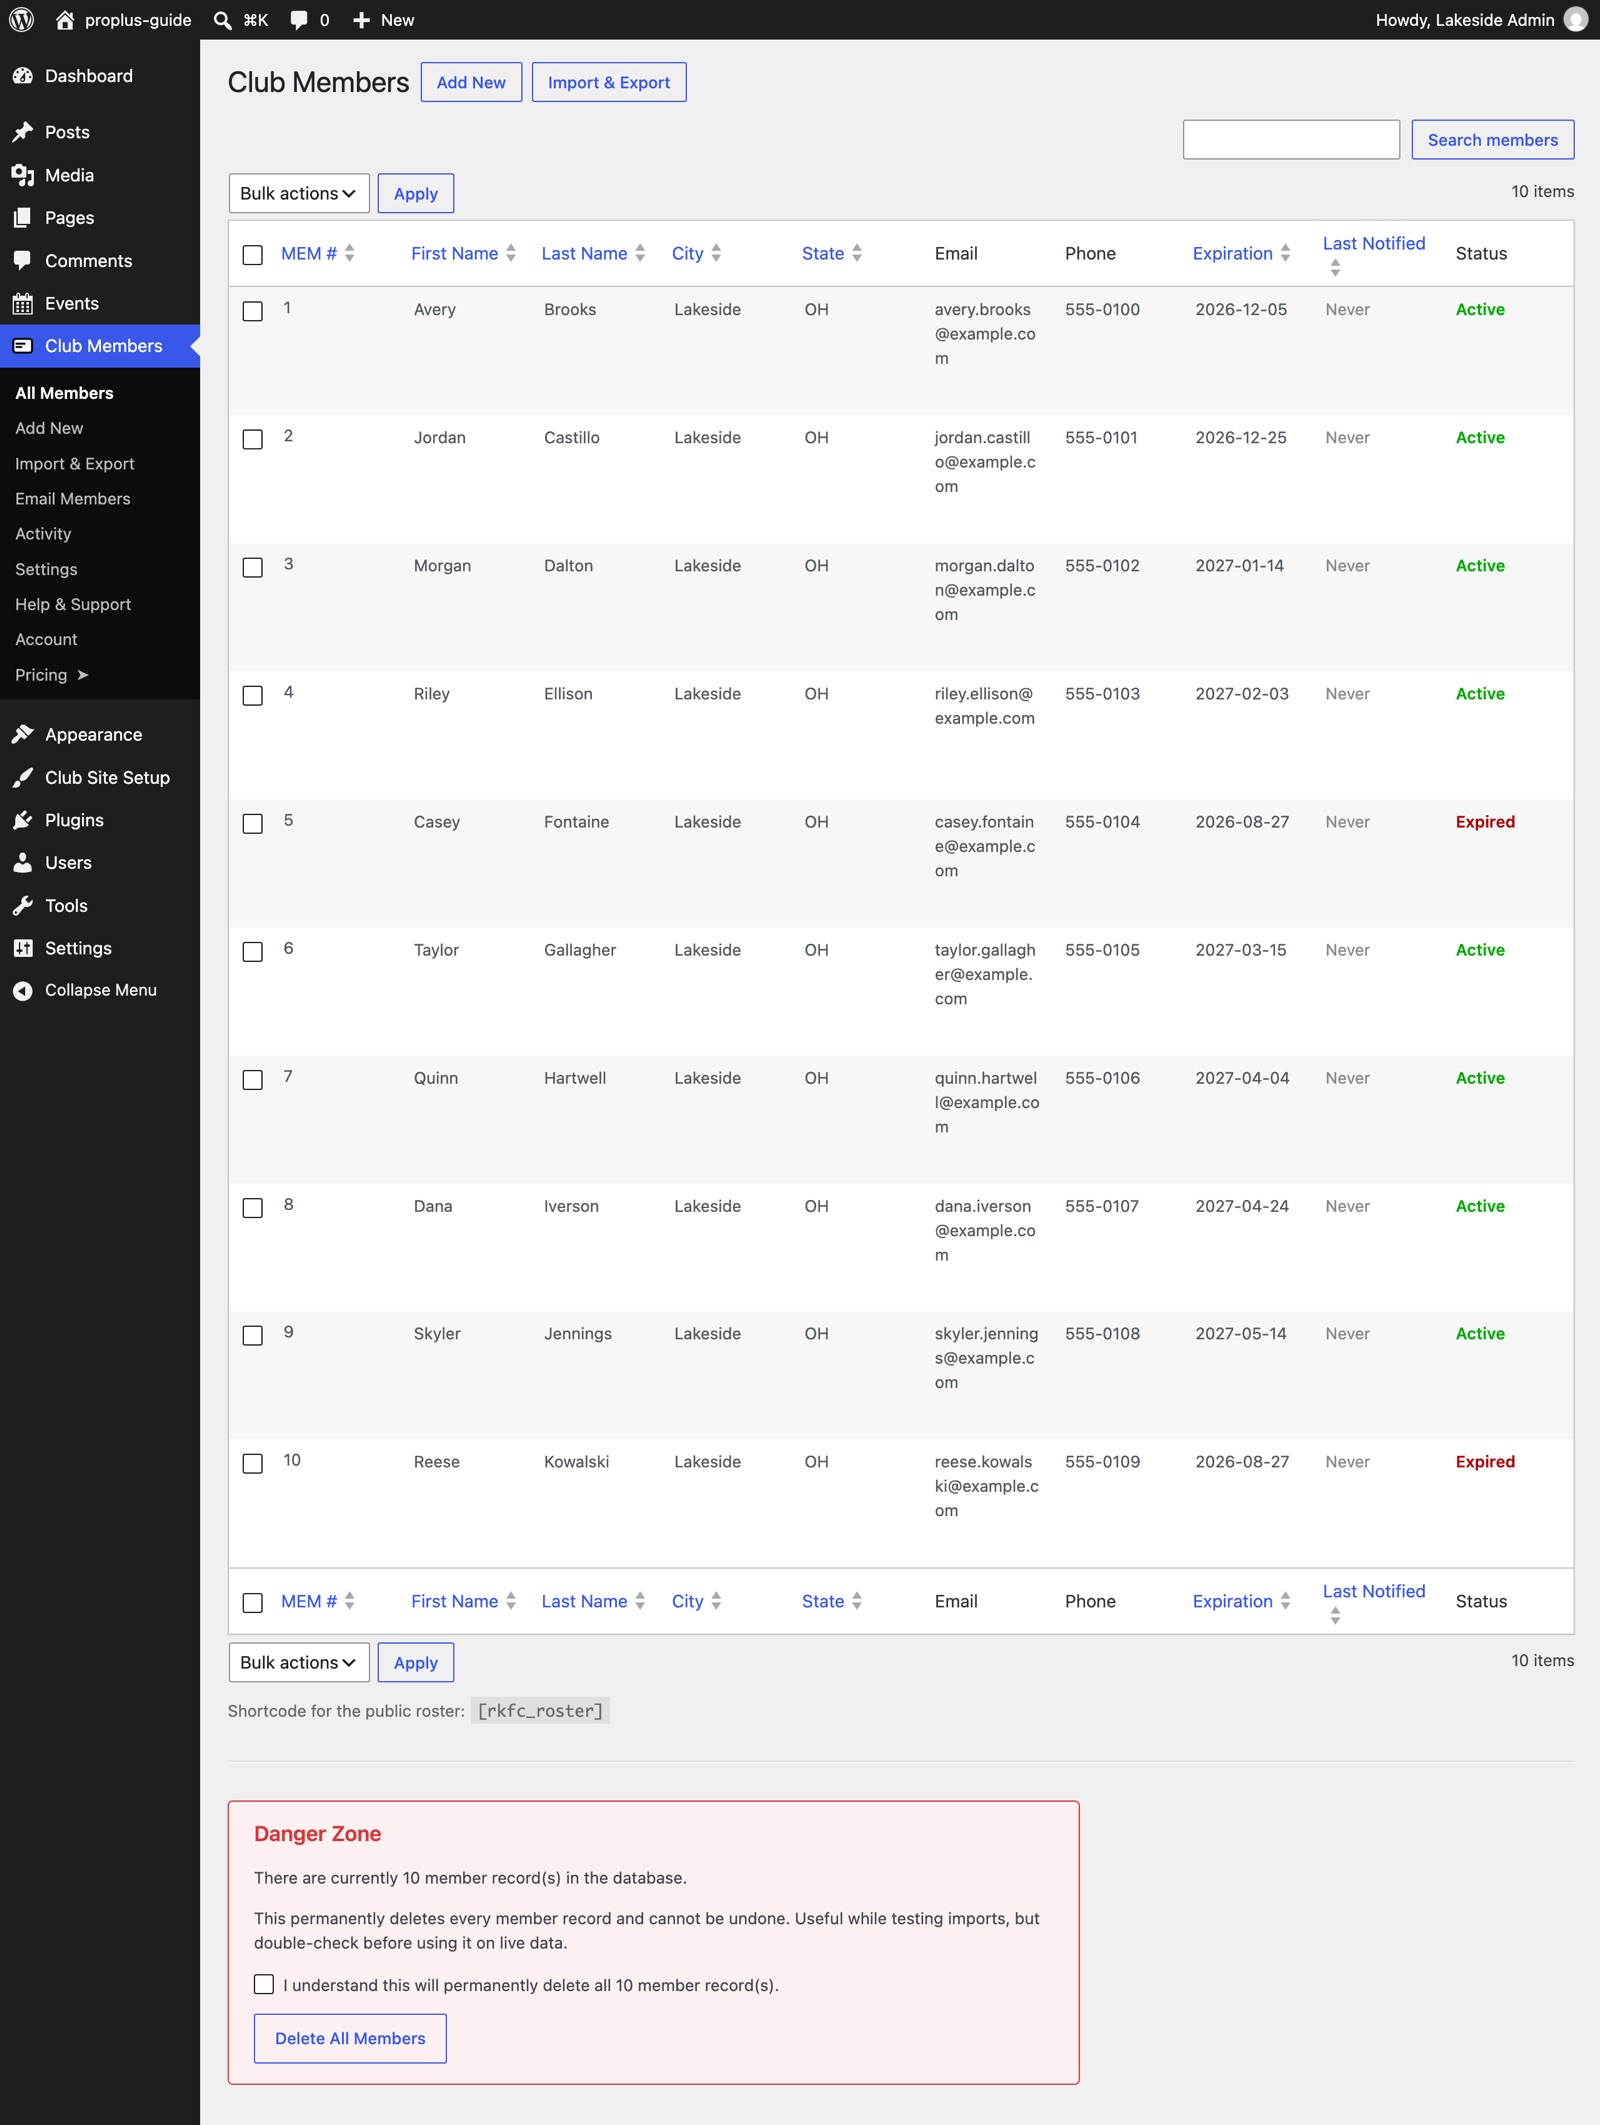
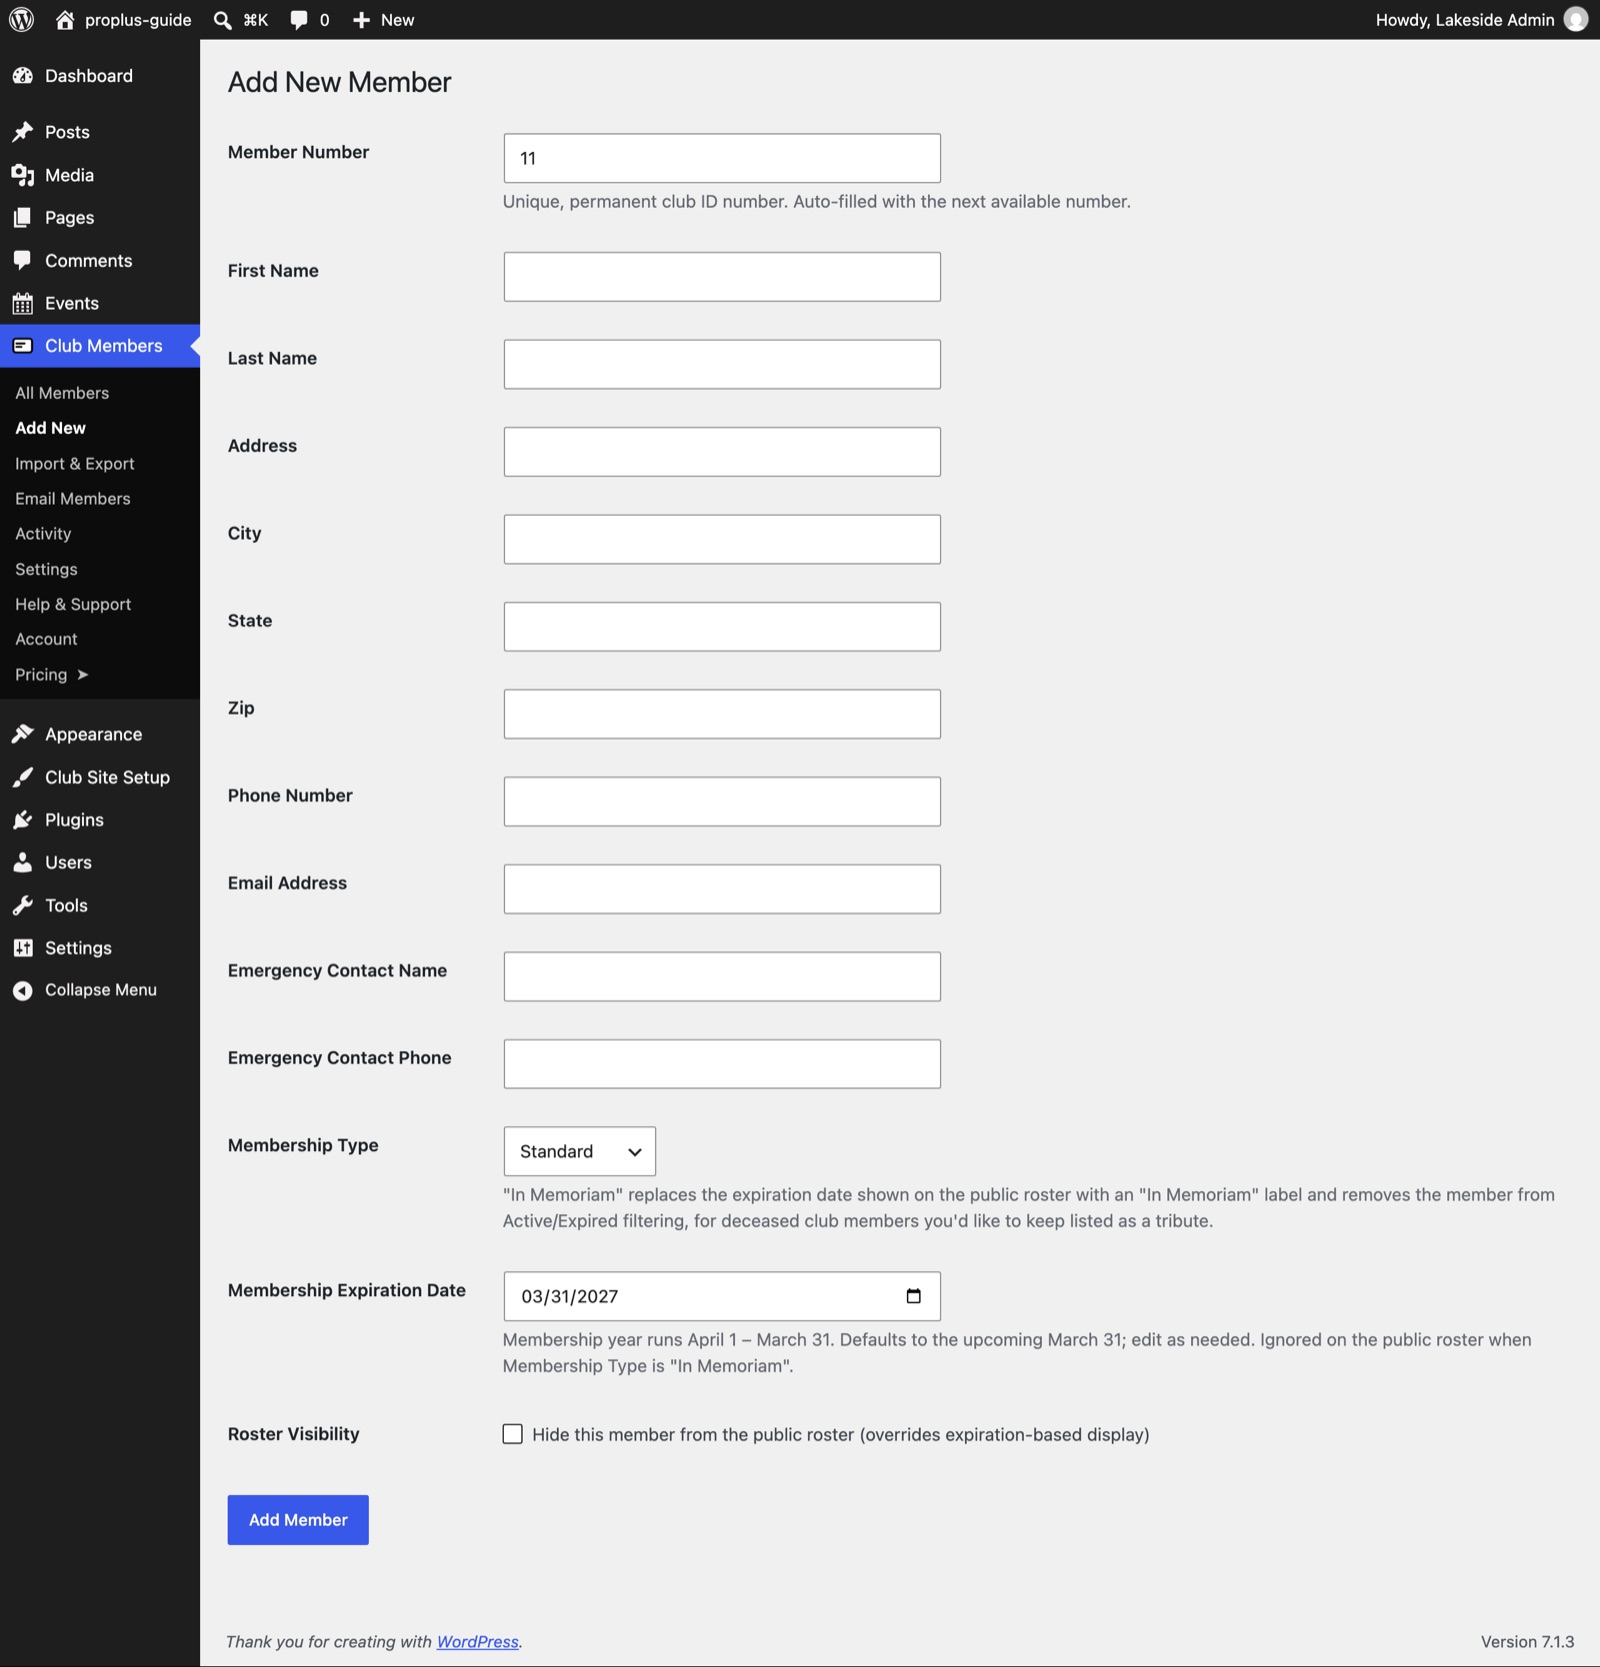
Your master list. Search, sort and filter it, and click a name to edit. Use Add New to enter a member by hand, for example someone who paid cash at a meeting.
Import & Export
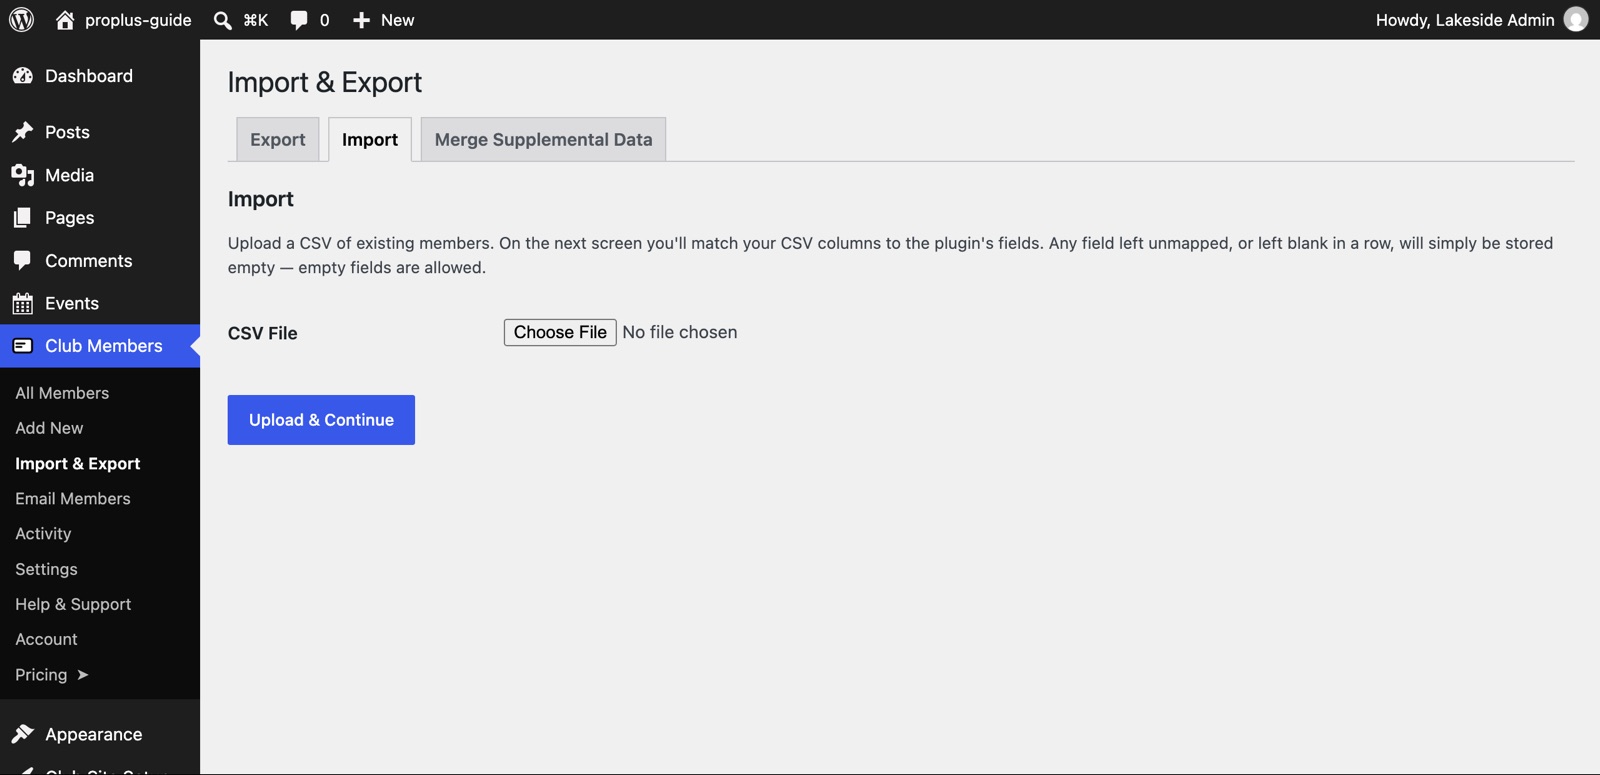
Moving from a spreadsheet? Import your list from a CSV file, and export it any time for backups or the treasurer. PRO and PRO+ add exports, the choice of updating existing members on import, and a tool to merge in extra data.
Email Members
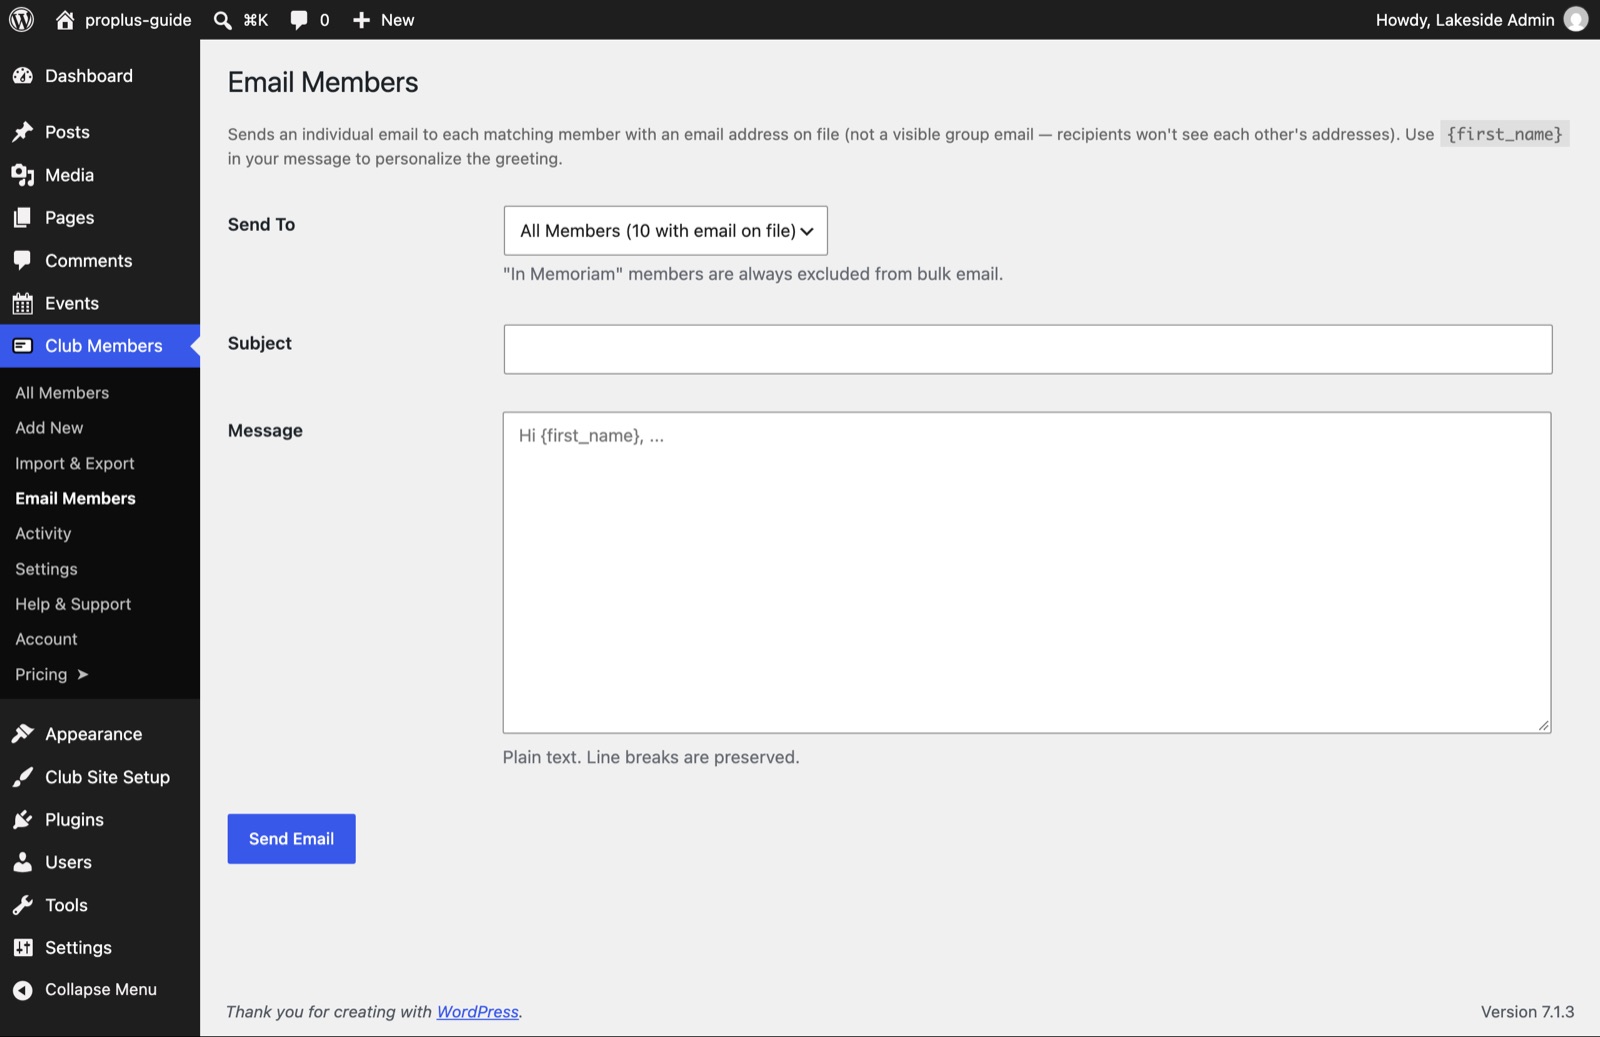
Send a message to all members, only active members, or only expired members, without leaving your site. Each person gets their own individual email, so members never see each other’s addresses.
Activity
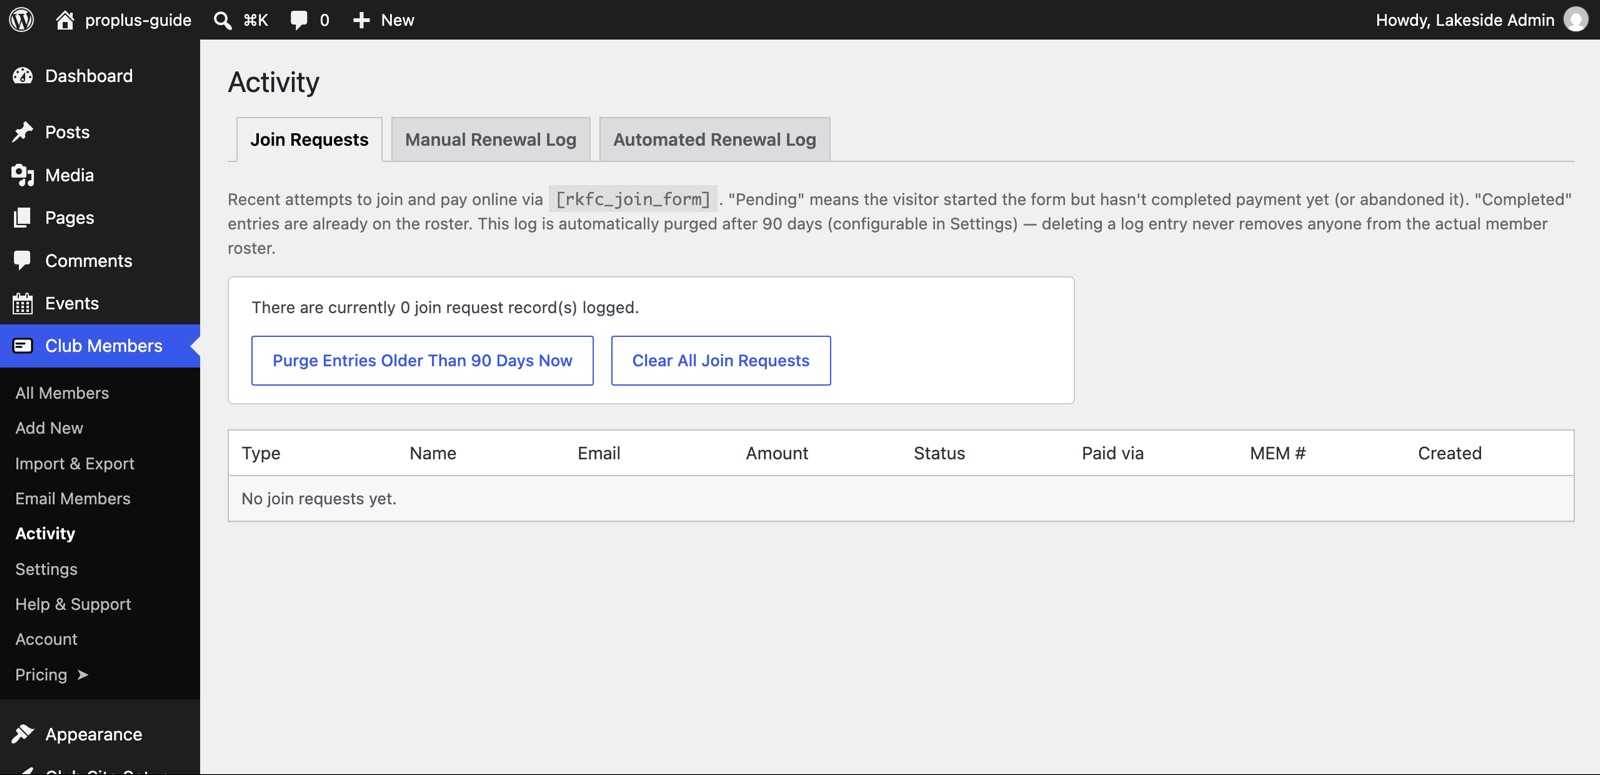
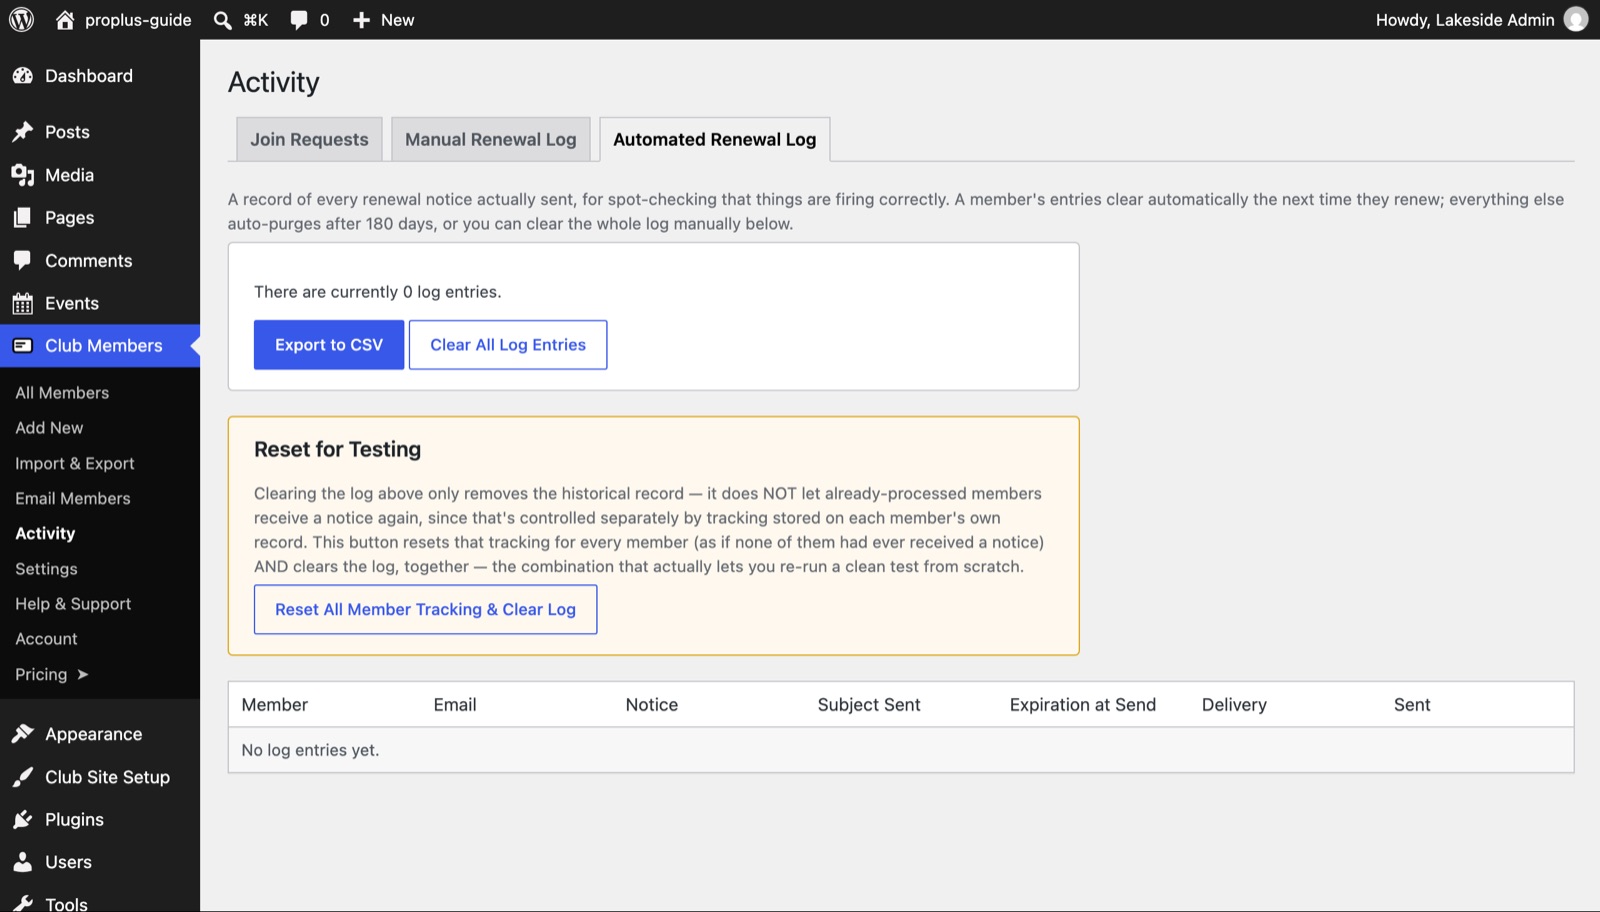
The record of what the system has done, in four tabs: Join Requests (every online join attempt and its payment status), Club Activities (every activity, who joined and who looked at emergency information; see Choose who can lead), Manual Renewal Log (renewal notices you sent from the member list) and Automated Renewal Log (reminders sent automatically). When something does not look right, look here first.
The record of what the system has done, in two tabs: Join Requests (every online join attempt and its payment status) and Manual Renewal Log (renewal notices you sent from the member list). Use Join Requests first when something goes wrong with a payment.
Settings, Help & Support, Account
Settings is everything you set up in Set up your club and Turn on online payments. Help & Support lists every shortcode and setting in plain English and has a Contact Support button. Account shows your plan and license.
A yearly rhythm that works
- A month or two before the year ends: turn on Automated Renewals so members get friendly reminders.
- A month or two before the year ends: use the Send Renewal Notice button beside members in the list, so members get a friendly reminder with the link to renew.
- Year end: check All Members for anyone expired, and filter the roster as you prefer.
- Any time: add events as they are planned. Visitors always see the upcoming ones.
- After each meeting or newsletter: add the PDF under Documents → Add New, with its date.
You’re done
You now have a club website with online joining, payments, a member roster, an events calendar and a document library.
You now have online joining and renewals, payments and one place to manage your members.
If you get stuck on any step, use Club Members → Help & Support → Contact Support and tell us which step you were on.
Prefer to have it done for you? PRO and PRO+ customers can add our done-for-you installation and setup for a one-time $75.
Want more? PRO adds digital membership cards, club activities with emergency contacts, email, automated renewal reminders and exports. See what PRO adds.